1. Introduction
This manual provides essential information for the installation and maintenance of the Generic Car Brake Caliper Repair Kit. This kit is designed to replace worn or damaged guide sleeves and associated components within your vehicle's brake caliper system, ensuring proper function and safety. It is a guide sleeve kit for brake calipers, typically black in color, and is installed within the brake system.
2. Compatibility
This brake caliper repair kit is compatible with various vehicle models. Please verify the Original Equipment (OE) part numbers on your existing components against the numbers listed below to ensure proper fitment before purchase and installation. The primary OE numbers for this kit are 41120-01A27, 41120-01A25, and 00000A00718.
Applicable Models include:
- For CITROËN DS3 1.4 VTi 98 (2009.11-2015.07)
- For FIAT STILO Multi Wagon (192_) 1.8 16V (2003.01-2008.08)
- For FORD TRANSIT Box (FA_ _) 2.2 TDCi (2007.10-2014.08)
- For PEUGEOT 206 SW (2E/K) 1.4 (2002.07-2007.02)
- For SKODA SUPERB II Estate (3T5) 2.0 TDI 16V 4x4 (2010.11-2015.05)
- For VAUXHALL MOVANO Mk I (A) Van (X70) 1.9 DTI (FD) (2001.10-2010.05)
- For VW CRAFTER 30-35 Bus (2E_) 2.0 TDI (2011.10-2016.12)
- For VW SCIROCCO (137, 138) 2.0 TDI (2013.01-2017.11)
Important: Always cross-reference the manufacturer's part number (OE number) found on your original part or in your vehicle's service manual to ensure compatibility.
3. Package Contents (Setup)
The Generic Car Brake Caliper Repair Kit typically includes the following components:
- Guide pins (2x)
- Rubber boots/sleeves (2x)
- Caliper bolts (2x)
- Small rubber bushing (1x)
- Lubricant packet (1x)

Image 3.1: Overview of the brake caliper repair kit components, including guide pins, rubber boots, bolts, a small bushing, and lubricant.

Image 3.2: Close-up view of the two rubber boots and one small rubber bushing included in the kit, designed to protect the guide pins.

Image 3.3: Detailed view of the two metallic guide pins, which allow the brake caliper to slide smoothly.

Image 3.4: Close-up of the two caliper mounting bolts, featuring thread locker pre-applied for secure fastening.
4. Installation Instructions (Operating)
Professional installation is highly recommended for this brake caliper repair kit. Improper installation can compromise vehicle safety and brake performance. The following steps are general guidelines; always refer to your vehicle's specific service manual for detailed procedures.
- Preparation: Ensure the vehicle is safely lifted and supported. Remove the wheel and gain access to the brake caliper.
- Caliper Removal: Carefully remove the brake caliper from its mounting bracket. This typically involves removing the caliper bolts.
- Inspect Components: Examine the existing guide pins, rubber boots, and mounting points for wear, corrosion, or damage.
- Remove Old Components: Extract the old guide pins and rubber boots from the caliper bracket. Clean the guide pin bores thoroughly.
- Install New Components:
- Apply a thin layer of the provided lubricant to the new guide pins.
- Insert the new rubber boots into the caliper bracket.
- Slide the lubricated guide pins into the new rubber boots and into the caliper bracket bores. Ensure they move freely.
- If applicable, install the small rubber bushing into its designated position.
- Reassemble Caliper: Reattach the brake caliper to its mounting bracket using the new caliper bolts. Torque the bolts to the manufacturer's specifications.
- Final Checks: Verify that all components are securely fastened and that the brake caliper slides freely. Pump the brake pedal several times to restore pressure before driving.
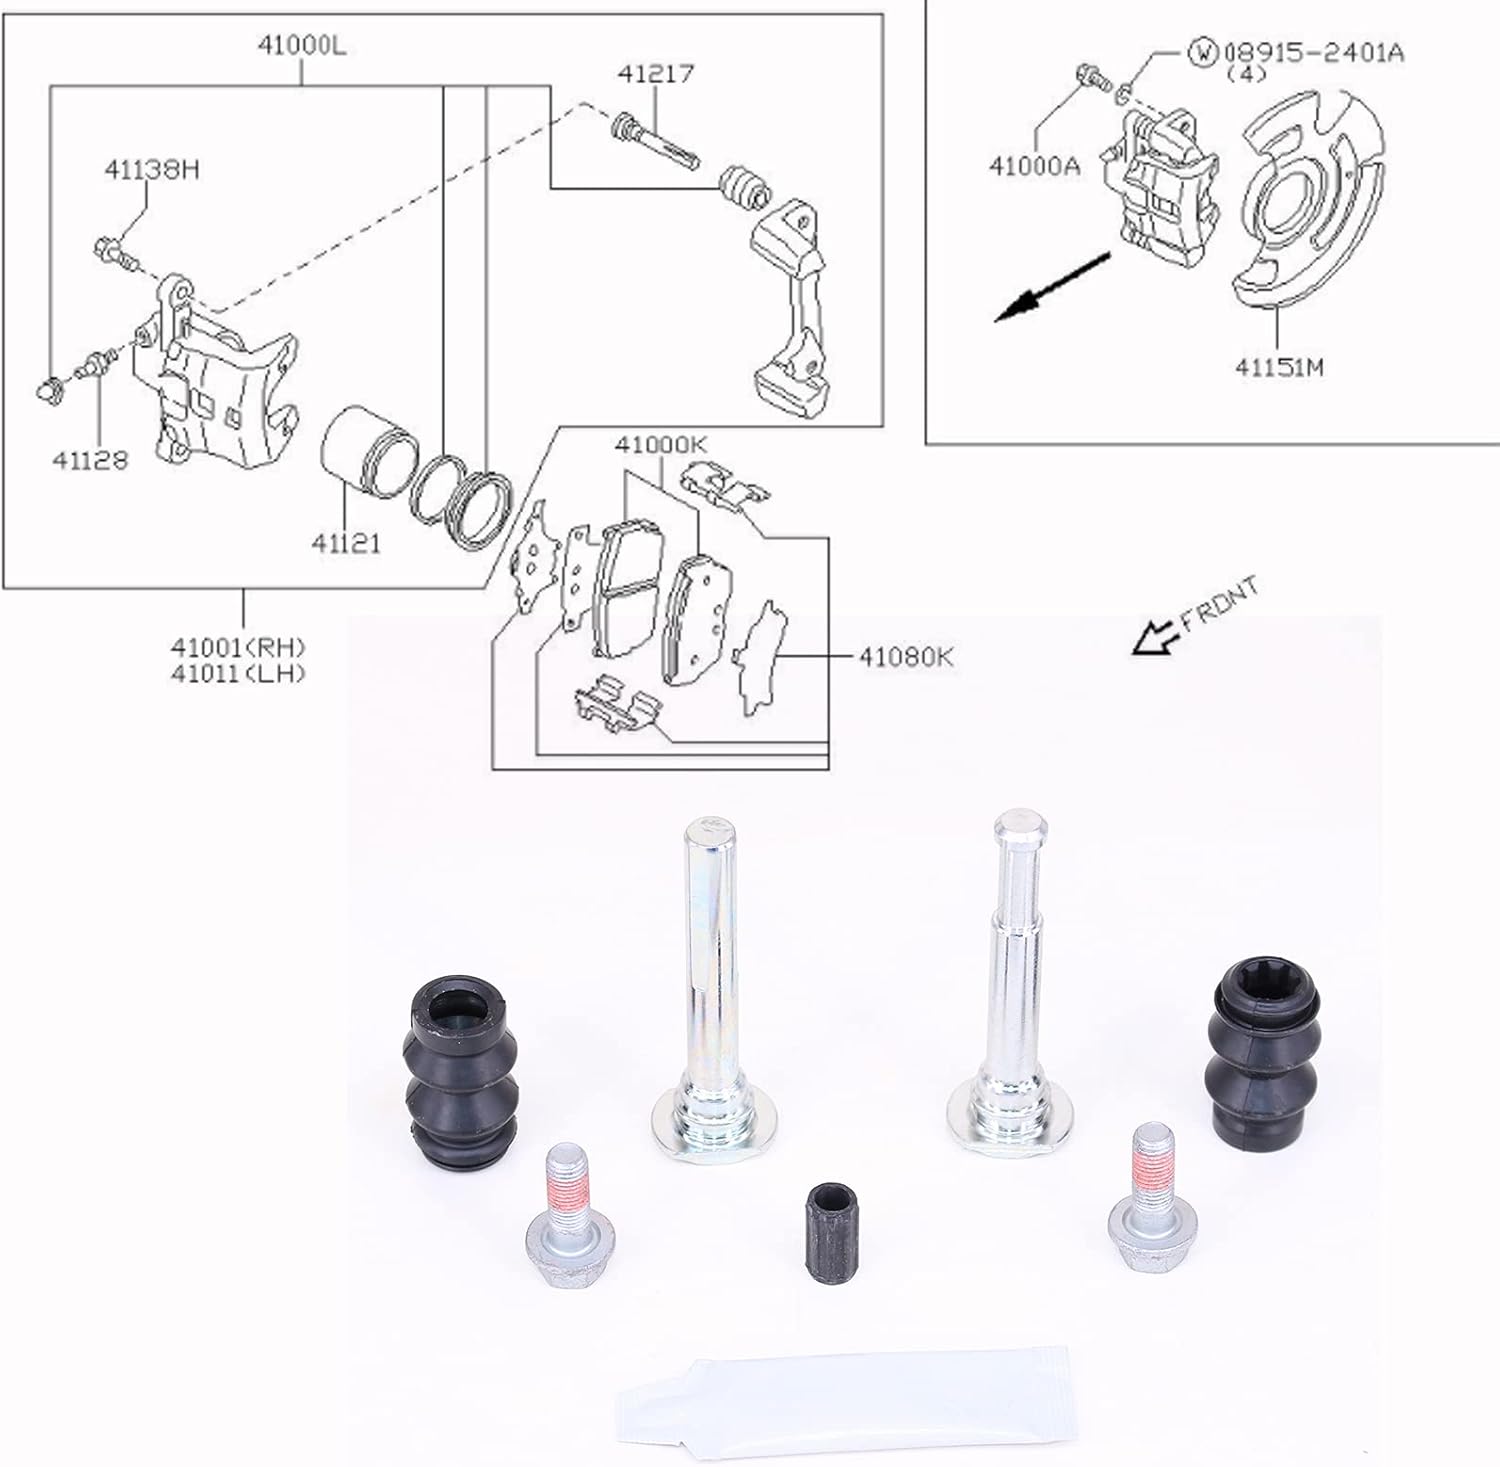
Image 4.1: An exploded diagram illustrating the various components of a brake caliper assembly, including the caliper body, pads, and mounting bracket, providing context for the repair kit's parts.
5. Maintenance
Regular inspection of your vehicle's brake system is crucial for safety and longevity. While this kit provides new components, ongoing maintenance helps prevent future issues:
- Periodic Inspection: During tire rotations or other service, visually inspect the brake calipers, guide pins, and rubber boots for signs of wear, tears, or corrosion.
- Lubrication: Ensure guide pins remain properly lubricated to allow smooth caliper movement. Re-lubricate with appropriate brake grease if necessary.
- Cleanliness: Keep the brake area free from excessive dirt and debris, which can accelerate wear on components.
6. Troubleshooting
If you experience issues after installing the brake caliper repair kit, consider the following:
- Uneven Brake Pad Wear: This could indicate that the caliper guide pins are not sliding freely. Re-check lubrication and ensure no debris is obstructing movement.
- Brake Noise (Squealing/Grinding): While not directly related to guide pins, ensure brake pads are correctly seated and that all anti-rattle clips are in place.
- Soft Brake Pedal: This is typically a sign of air in the brake lines. Ensure proper bleeding of the brake system after any brake component replacement.
- Difficulty Installing: Double-check that the OE part numbers match your vehicle's requirements.
If problems persist, consult a qualified automotive technician.
7. Specifications
| Product Name | Guide sleeve kit, brake caliper |
| Brand | Generic |
| Color | Black |
| Fitting Position | Brake System |
| Primary OE Part Numbers | 41120-01A27, 41120-01A25, 00000A00718 |
| Additional Compatible OE Numbers | 41120-01A26, 41120-01A28, 55830-70B00, 7251-91210, 55830-70B01, 55140-60B30, 55100-60820, 00000-A00718 |
| Package Dimensions | Approximately 4 x 2 x 2 inches |
| Assembly Required | No (refers to the kit itself, not the installation into the vehicle) |
8. Warranty & Support
This product comes with a 1-year warranty from the date of purchase. If you encounter any questions or issues after receiving your product, please do not hesitate to contact the seller directly for assistance.
For technical support or warranty claims, please refer to your purchase documentation for seller contact information.


