
1. Introduction
Thank you for choosing the conecto Digital Timer. This device is designed to automate the switching of electrical appliances, offering convenience and energy savings for both indoor and outdoor applications. It features 10 programmable ON/OFF settings, a 1.5-inch LCD display, and a backup battery to retain settings during power outages. Please read this manual carefully before use to ensure proper operation and safety.
2. Important Safety Information
- Compatibility Warning: This timer is equipped with a Type F (Schuko) 2-pin plug. Ensure compatibility with your local electrical outlets. It may not be compatible with standard French outlets that require a grounding pin.
- Do not immerse the timer in water or expose it to extreme temperatures.
- Ensure the total load of connected appliances does not exceed 3600 Watts (16A).
- The device has an IP44 rating, making it suitable for outdoor use, but it should be protected from direct heavy rain or prolonged submersion.
- Keep out of reach of children. This device includes child safety features.
- Do not attempt to open or repair the device yourself. Refer all servicing to qualified personnel.
3. Package Contents
Please check the package for the following items:
- 1 x conecto Digital Timer (Model SA-CC50203-V2)
- 1 x Instruction Manual (German and English)
4. Product Overview
Familiarize yourself with the components of your digital timer:

Image 4.1: Front view of the conecto Digital Timer with the protective cover open, revealing the Type F socket and the control panel with LCD display and buttons.
- LCD Display: Shows current time, day, program status, and settings.
- Protective Cover: Transparent cover for the display and buttons, and a hinged cover for the socket, providing IP44 protection.
- Socket (Type F): For connecting your appliance.
- Plug (Type F): For connecting the timer to a wall outlet.
- Control Buttons:
- MASTER CLEAR: Resets all settings.
- WEEK: Sets the day of the week.
- HOUR: Sets the hour.
- MINUTE: Sets the minute.
- RST/RCL: Resets or recalls program settings.
- CLOCK: Enters clock setting mode or exits program setting mode.
- TIMER: Enters program setting mode.
- ON/AUTO/OFF: Selects operating mode (Always ON, Automatic, Always OFF).
- RANDOM: Activates/deactivates random function.
5. Setup
5.1 Initial Setup and Charging
- Plug the timer into a standard wall outlet for at least 30 minutes to charge the internal backup battery. This battery retains your settings during power outages.
- After charging, press the MASTER CLEAR button with a pointed object (e.g., a pen tip) to reset all settings and clear any residual charge. The display will show '0:00'.
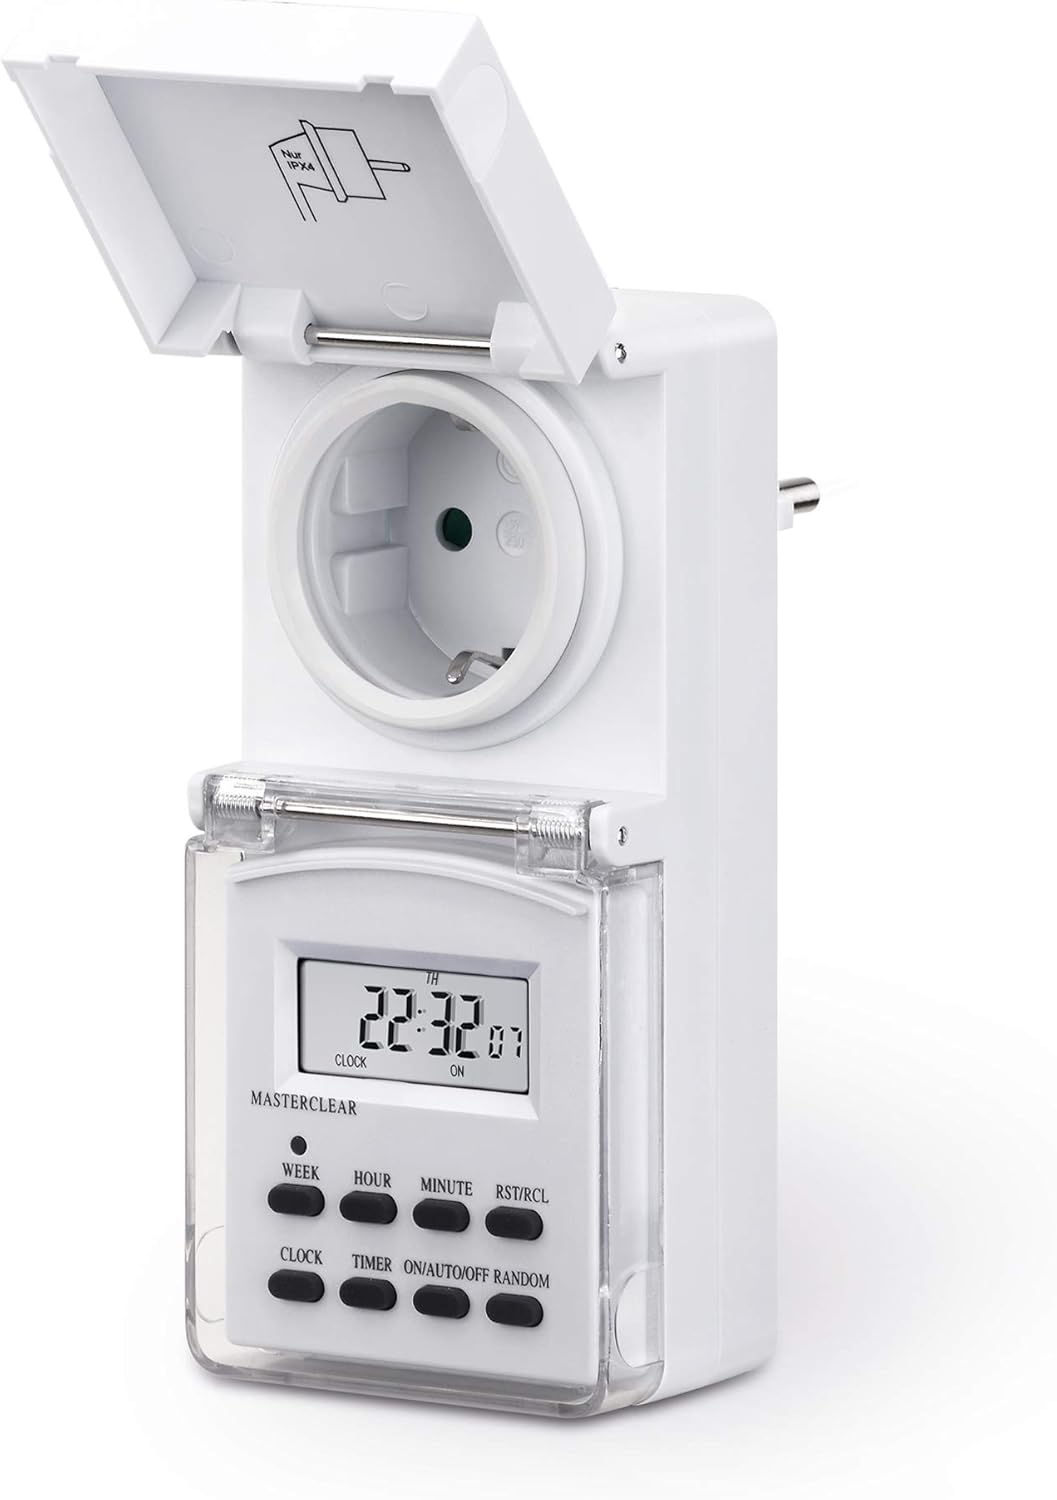
Image 5.1: The conecto Digital Timer plugged into a wall outlet, ready for initial setup and charging.
5.2 Setting the Current Time and Day
- Press the CLOCK button. The display will show the current time.
- While holding the CLOCK button, press the WEEK button repeatedly to set the current day of the week (MO, TU, WE, TH, FR, SA, SU).
- While holding the CLOCK button, press the HOUR button repeatedly to set the current hour (12/24-hour format can be toggled by pressing HOUR while CLOCK is held).
- While holding the CLOCK button, press the MINUTE button repeatedly to set the current minute.
- Release the CLOCK button. The time and day are now set.
- To switch between 12-hour and 24-hour format, press the CLOCK and HOUR buttons simultaneously.
- To activate/deactivate Daylight Saving Time (DST), press the CLOCK and ON/AUTO/OFF buttons simultaneously. An 'S' will appear/disappear on the display.
6. Operating Instructions
6.1 Programming ON/OFF Times
The timer allows for up to 10 ON/OFF programs. Each program consists of an ON time and an OFF time.
- Press the TIMER button once. The display will show '1 ON'. This is the first ON program.
- Press WEEK to select the desired day(s) for this program. You can choose from 16 different day combinations (e.g., Mon-Fri, Sat-Sun, Mon-Sun, individual days).
- Press HOUR to set the desired hour for the ON time.
- Press MINUTE to set the desired minute for the ON time.
- Press the TIMER button again. The display will show '1 OFF'. This is the first OFF program.
- Repeat steps 2-4 to set the day(s), hour, and minute for the OFF time of the first program.
- Continue pressing TIMER to cycle through programs 2 ON, 2 OFF, ..., up to 10 ON, 10 OFF, setting each as needed.
- After setting all desired programs, press the CLOCK button to exit program mode and return to the current time display.
6.2 Manual Override (ON/AUTO/OFF)
Press the ON/AUTO/OFF button repeatedly to cycle through the operating modes:
- ON: The connected appliance will remain continuously ON, ignoring all programs.
- AUTO: The connected appliance will operate according to the programmed ON/OFF times.
- OFF: The connected appliance will remain continuously OFF, ignoring all programs.
For programmed operation, ensure the timer is set to AUTO mode.
6.3 Random Function
The random function is useful for security purposes, making it appear as if someone is home. When activated, the timer will randomly turn ON and OFF the connected appliance within a specific time window (e.g., 6 PM to 6 AM).
- Ensure the timer is in AUTO mode.
- Press the RANDOM button. 'R' will appear on the display, indicating the random function is active.
- To deactivate, press the RANDOM button again. 'R' will disappear.
7. Maintenance
- Clean the timer with a soft, dry cloth. Do not use abrasive cleaners or solvents.
- Ensure the protective covers for the display and socket are closed when not actively programming or connecting/disconnecting appliances, especially in outdoor environments, to maintain the IP44 rating.
- If the timer is not used for an extended period, plug it into an outlet for a few hours every few months to keep the internal battery charged.
8. Troubleshooting
| Problem | Possible Cause | Solution |
|---|---|---|
| Display is blank or shows garbled characters. | Low internal battery or system error. | Plug the timer into an outlet for at least 30 minutes to charge. Press MASTER CLEAR to reset. |
| Appliance does not turn ON/OFF at programmed times. | Timer is not in AUTO mode. Incorrect program settings. | Ensure the timer is set to AUTO mode using the ON/AUTO/OFF button. Review and correct your program settings. |
| Random function is not working. | Random function not activated or timer not in AUTO mode. | Press the RANDOM button to activate (check for 'R' on display). Ensure the timer is in AUTO mode. |
| Timer is not compatible with my wall outlet. | Incorrect plug type for your region (Type F). | This timer uses a Type F (Schuko) plug. Ensure your outlets are compatible. Do not force the plug into an incompatible socket. |
9. Specifications
- Model Number: SA-CC50203-V2
- Brand: conecto
- Dimensions (L x W x H): 14 x 6.5 x 8.7 cm (5.5 x 2.5 x 3.4 inches)
- Weight: 240 grams (0.53 lbs)
- Material: Acrylonitrile Butadiene Styrene (ABS)
- Color: White
- Display Size: 1.5 inches LCD
- Number of Programs: 10 ON/OFF programs
- Max Load: 3600 Watts / 16 Amps
- Protection Rating: IP44 (Splash-proof, suitable for outdoor use)
- Features: Backup battery, Child safety, Random function, 12/24-hour mode, Daylight Saving Time (DST) adjustment.

Image 9.1: Side view of the conecto Digital Timer, highlighting the Type F plug for connection to a wall outlet.
10. Warranty Information
Specific warranty details are not provided in the product information. Please refer to your purchase documentation or contact the retailer for warranty terms and conditions.
11. Customer Support
For technical assistance or inquiries, please contact conecto customer support through their official website or the retailer where the product was purchased. Please have your model number (SA-CC50203-V2) ready when contacting support.