1. Product Overview
This manual provides instructions for the installation, operation, and maintenance of the LMLZNP Canbus Error Free LED Interior Light Kit. This kit is designed to upgrade the interior lighting of specific Peugeot models, offering enhanced brightness and energy efficiency.

Image 1.1: The LMLZNP LED interior light kit components and an example of a vehicle interior illuminated by these lights. The image displays various types of LED bulbs included in the kit, alongside a modern car interior with bright white LED lighting in the dome and footwell areas.
2. Compatibility and Kit Contents
This LED interior light kit is compatible with the following Peugeot models and includes the specified bulbs for each:
2.1. For Peugeot 407 SW (2004-2010) - 10 Pieces
- Front/Rear Dome Light: 3 pieces
- Front/Rear Map Light: 2 pieces
- Glove Box Light: 1 piece
- Footwell Light: 2 pieces
- Trunk Light: 1 piece
- Spare Light: 1 piece
2.2. For Peugeot 307 CC Cabriolet (2003-2009) - 10 Pieces
- Front Dome/Map Light: 3 pieces
- Rear Dome Light: 1 piece
- Glove Box Light: 1 piece
- Trunk Light: 1 piece
- License Plate Light: 2 pieces
- Spare Light: 2 pieces

Image 2.1: A Peugeot 407 SW, illustrating one of the compatible vehicle models for this LED interior lighting kit. The image highlights the vehicle type for which the kit is designed.
3. Safety Information
- Always turn off the vehicle's power to the relevant circuit before attempting any electrical installation or bulb replacement. This prevents electrical shock and damage to the vehicle's electrical system.
- Handle LED bulbs by their base to avoid touching the LED chips directly, which can transfer oils and reduce lifespan.
- Ensure the correct bulb type and size are used for each specific light location as outlined in the kit contents.
- If a bulb does not light up after installation, ensure the power is off, then remove the bulb and flip it 180 degrees to reverse its polarity. Reinsert and test.
- Do not force bulbs into sockets. If a bulb does not fit, verify it is the correct type for that location.
4. Installation Guide
The LMLZNP LED interior light kit is designed for plug-and-play installation. Follow these general steps for replacing your vehicle's interior bulbs.
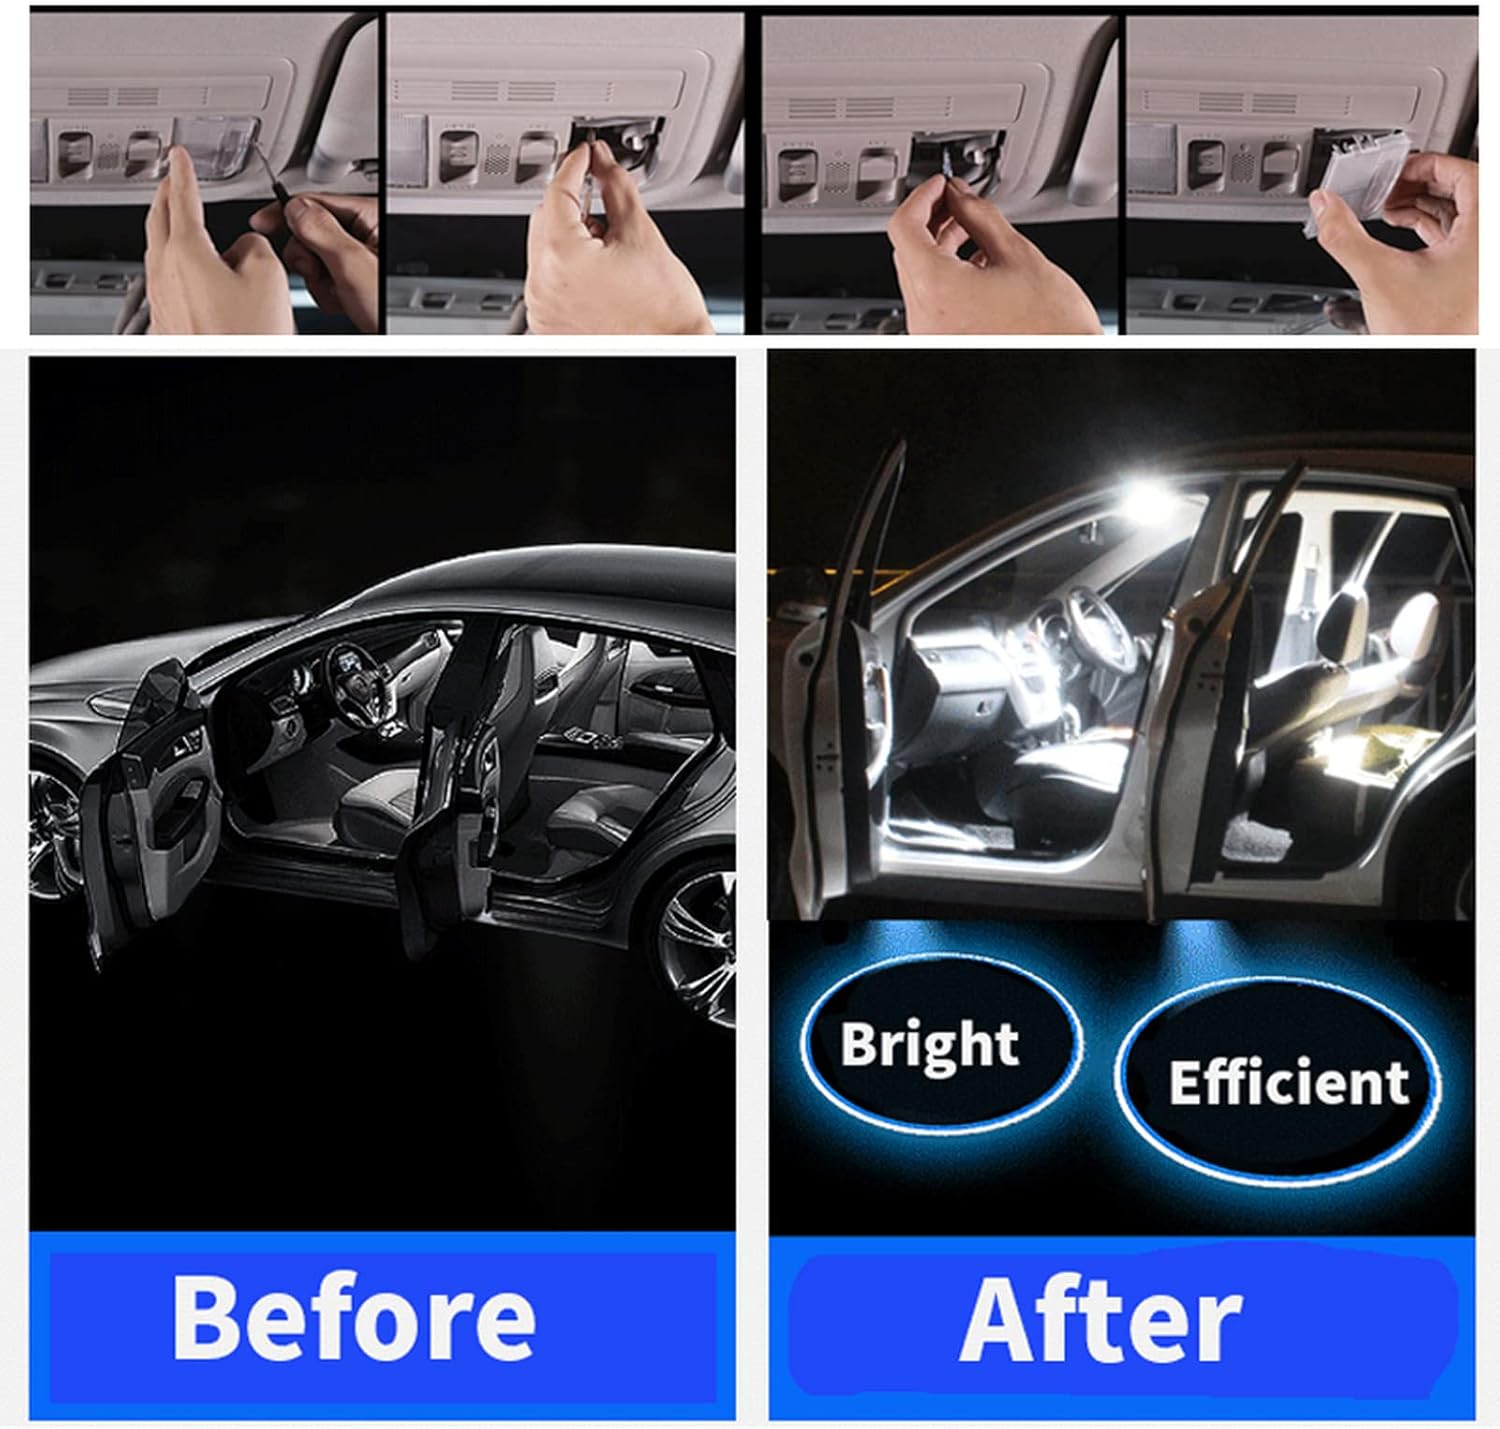
Image 4.1: A visual guide demonstrating the process of removing an existing light cover, extracting the old bulb, inserting the new LED bulb, and replacing the cover. The lower part of the image shows a 'Before' and 'After' comparison of a car interior, illustrating the significant increase in brightness and efficiency provided by the LED lights.
4.1. General Installation Steps
- Prepare the Vehicle: Ensure the vehicle's ignition is off and the relevant interior light circuit is de-energized. This may involve removing the key from the ignition or disconnecting the battery for safety.
- Locate the Light Fixture: Identify the specific interior light fixture you wish to upgrade (e.g., dome light, map light, glove box light).
- Remove the Cover: Carefully pry off the plastic cover of the light fixture. Use a plastic trim removal tool to avoid scratching the interior surfaces.
- Remove the Old Bulb: Gently pull out the existing incandescent bulb from its socket. Be aware that old bulbs may be hot if recently used.
- Insert the New LED Bulb: Take one of the LMLZNP LED bulbs from the kit, matching it to the type and size of the bulb you just removed. Insert the LED bulb firmly into the socket.
- Test the Light: Briefly restore power to the circuit (e.g., turn on the interior light switch or open a door) to check if the new LED bulb illuminates.
- Address Non-Illumination: If the LED bulb does not light up, turn off the power again, remove the LED bulb, flip it 180 degrees, and reinsert it. LED bulbs are polarity sensitive. Test again.
- Replace the Cover: Once the LED bulb is confirmed to be working, carefully snap the light fixture cover back into place.
- Repeat for All Lights: Follow these steps for all other interior lights you wish to upgrade.
4.2. Specific Light Locations (Examples)
Refer to your vehicle's owner's manual for precise locations and removal procedures for specific light fixtures.

Image 4.2: Example of illuminated vanity mirror and dome lights in a Peugeot 407 SW interior.

Image 4.3: Example of an illuminated dome light in a Peugeot 307 CC interior.
5. Operating Instructions
Once installed, the LMLZNP LED interior lights operate in the same manner as your vehicle's original interior lighting system. They will activate and deactivate based on door openings, ignition status, and manual switch operations, as dictated by your Peugeot's electrical system.
- Automatic Activation: Lights will turn on when doors are opened or the ignition is turned off, and fade out according to your vehicle's factory settings.
- Manual Control: Use the existing switches on your dome lights, map lights, or other fixtures to manually turn the lights on or off.

Image 5.1: Various sections of a car interior, including door panels, footwell, and rear seating area, illuminated by the LED lights, demonstrating their operational brightness.
6. Maintenance
The LMLZNP LED interior lights are designed for long-term, maintenance-free operation. With an estimated lifespan of up to 50,000 hours, regular replacement is not required.
- Cleaning: If necessary, gently wipe the LED bulbs or light covers with a soft, dry, lint-free cloth. Avoid using abrasive cleaners or solvents.
- Inspection: Periodically check the light fixtures for any loose connections or damage.
7. Troubleshooting
| Problem | Possible Cause | Solution |
|---|---|---|
| LED bulb does not light up | Incorrect polarity | Turn off power, remove bulb, flip 180 degrees, reinsert. |
| LED bulb flickers | Loose connection or incompatible circuit | Ensure bulb is seated firmly. Verify vehicle compatibility. |
| Some lights work, others do not | Individual bulb issue or specific circuit problem | Check polarity and connection for non-working bulbs. Consult a professional if circuit issues are suspected. |
| Error message on dashboard | Rarely, a vehicle's CANBUS system may detect a low power draw. | This kit is designed to be Canbus error-free. If an error occurs, ensure all bulbs are correctly installed. If the issue persists, consult a professional. |
8. Product Specifications
| Feature | Specification |
|---|---|
| Brand | LMLZNP |
| Light Source Type | LED |
| Operating Voltage | 12V DC |
| Light Color | White |
| Auto Part Position | Inside |
| Operating Life | Up to 50,000 Hours |
| Special Features | Canbus Error Free, Constant Temperature Intelligent Heat Dissipation, Stable Capacitance |
9. Warranty and Support
For information regarding warranty coverage or technical support, please refer to the seller's policies on the platform where the product was purchased. Keep your purchase receipt as proof of purchase.