1. Introduction
The AODELAN WTR-2 is a versatile intervalometer and timer remote control designed for select Nikon cameras. It allows photographers to trigger the camera shutter remotely, set precise time-lapse sequences, perform long exposures, and utilize exposure bracketing for High Dynamic Range (HDR) photography. This manual provides detailed instructions for its setup, operation, and advanced features.
2. Package Contents
Please verify that all items are present in your package:
- WTR-2 Transmitter
- WTR-2 Receiver
- Camera Connection Cable(s) (specific to your camera model)
- User Manual (this document)
3. Product Overview

Image Description: This image displays the AODELAN WTR-2 transmitter and receiver units, along with the various cables used for connecting to a camera. The transmitter features an LCD screen and control buttons for setting various parameters, while the receiver is a compact unit that attaches to the camera's hot shoe or strap.
3.1 Transmitter Layout
- LCD Display: Shows current settings and timer status.
- Shutter Release Button: Two-stage button for autofocus and shutter release.
- Mode Button: Cycles through different shooting modes (e.g., single shot, continuous, timer).
- SET Button: Confirms selections.
- Directional Buttons (Up/Down/Left/Right): Navigate menus and adjust values.
- ON/OFF Button: Powers the transmitter on or off.
3.2 Receiver Layout
- Power Button: Powers the receiver on or off.
- Status Indicator LED: Shows connection and operation status.
- Camera Connection Port: Connects to the camera via the provided cable.
4. Setup
4.1 Battery Installation
The WTR-2 transmitter and receiver each require 2 AAA batteries (not included). To install:
- Open the battery compartment cover on the back of both the transmitter and receiver.
- Insert 2 AAA batteries into each unit, ensuring correct polarity (+/-).
- Close the battery compartment covers securely.
4.2 Connecting to Your Camera
The WTR-2 supports both wired and wireless connections.
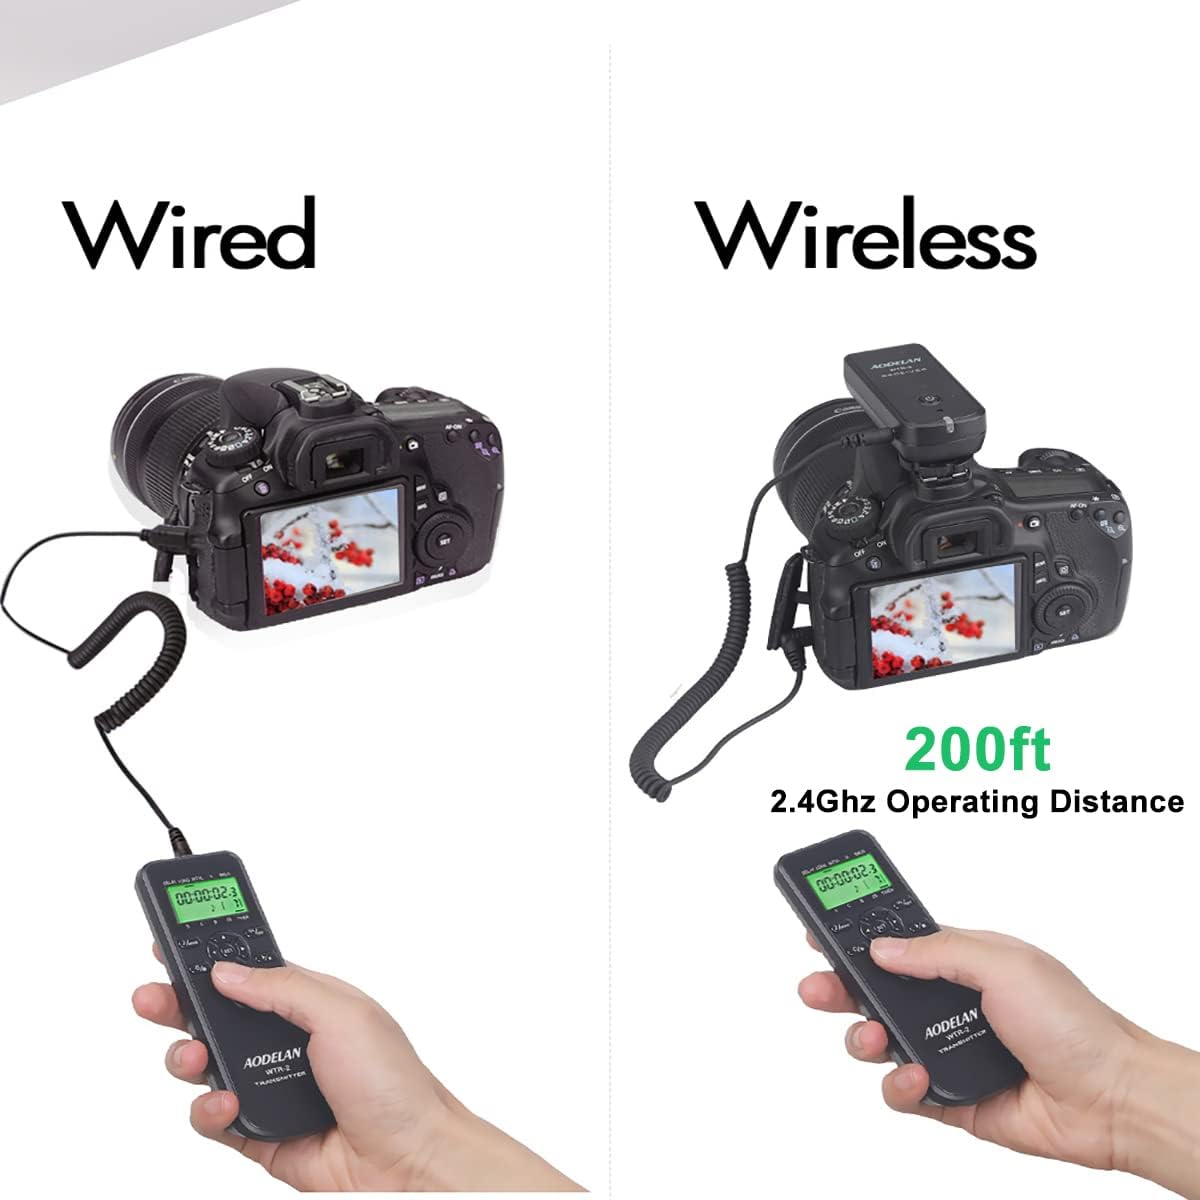
Image Description: This image illustrates the two modes of operation: wired, where the transmitter is directly connected to the camera, and wireless, showing the transmitter and receiver communicating over 2.4GHz up to 200ft. The wired setup shows the remote connected to the camera's remote port, while the wireless setup shows the receiver mounted on the camera's hot shoe and connected via a short cable.
4.2.1 Wired Connection
For wired operation, the transmitter connects directly to your camera.
- Ensure both the transmitter and camera are powered off.
- Connect one end of the appropriate camera connection cable to the transmitter's output port.
- Connect the other end of the cable to your camera's remote control terminal.
- Power on the transmitter and your camera.
4.2.2 Wireless Connection
For wireless operation, the receiver acts as an intermediary between the transmitter and the camera.
- Ensure both the transmitter, receiver, and camera are powered off.
- Attach the WTR-2 receiver to your camera's hot shoe or a suitable mounting point.
- Connect one end of the appropriate camera connection cable to the receiver's output port.
- Connect the other end of the cable to your camera's remote control terminal.
- Power on the receiver, then the transmitter, and finally your camera.
- The transmitter and receiver should automatically pair. If not, refer to the troubleshooting section for pairing instructions. The wireless operating distance is approximately 200 feet (60 meters) using 2.4GHz frequency.
5. Basic Operation
5.1 Power On/Off
- Transmitter: Press and hold the ON/OFF button for a few seconds.
- Receiver: Press and hold the power button on the side for a few seconds.
5.2 Shutter Release Modes
The WTR-2 offers various shutter release options:
- Single Shot: Press the shutter release button halfway to focus, then fully to take a single photo.
- Continuous Shooting: Press and hold the shutter release button fully to take multiple photos as long as the button is held.
- Bulb Mode: For exposures longer than 30 seconds, set your camera to Bulb mode. Press the shutter release button fully to open the shutter, press again to close it. The WTR-2's timer functions can also control Bulb exposures.
6. Advanced Functions

Image Description: This image depicts a photographer using the remote in a scenic outdoor setting, emphasizing its capabilities for wireless control, time-lapse, bulb photography, continuous shooting, and exposure bracketing (HDR).
6.1 Timer Settings
The WTR-2 transmitter features an LCD display for setting precise timer functions. Use the MODE button to cycle through settings and the directional buttons to adjust values.

Image Description: This diagram visually explains the parameters for time-lapse photography: Delay, Exposure Time, Interval, and Number of Shots (N). It also shows the LCD display with corresponding settings for hours, minutes, seconds, and 0.1-0.9 second increments.
- DELAY: Sets the delay time before the first shot is taken. (0.1s - 99h 59m 59.9s)
- LONG (Exposure Time): Sets the exposure duration for each shot. This is particularly useful for Bulb exposures. (0.1s - 99h 59m 59.9s)
- INTVL (Interval): Sets the time between each shot in a sequence. (1s - 99h 59m 59.9s)
- N (Number of Shots): Sets the total number of photos to be taken. Can be set from 1 to 199, or unlimited [--].
6.2 Time-Lapse Photography
Time-lapse photography captures a series of images over an extended period, which are then played back as a video to show change or movement that is usually too slow to perceive. The WTR-2 allows precise control over this process.

Image Description: This image illustrates the application of time-lapse photography to document processes like construction, showcasing how the remote can capture the passage of time by compiling a sequence of images into a video.
To set up a time-lapse sequence:
- Set your camera to Manual (M) or Aperture Priority (A) mode.
- On the WTR-2 transmitter, use the MODE button to navigate to the timer settings.
- Adjust DELAY, LONG (exposure time), INTVL (interval between shots), and N (number of shots) according to your desired sequence.
- Press the shutter release button fully to start the time-lapse sequence. The display will show the progress.
6.3 Bulb Photography
Bulb photography allows for exposures longer than the camera's standard maximum shutter speed (typically 30 seconds). This is ideal for capturing light trails, star trails, or faint celestial objects.

Image Description: This image showcases the results of bulb photography, such as car light trails on a winding road, star trails over a rock formation, and detailed night cityscapes, emphasizing the remote's role in capturing sharp long exposures.
To use Bulb mode with the WTR-2:
- Set your camera to Bulb mode.
- On the WTR-2 transmitter, set the LONG (exposure time) parameter to your desired duration.
- Press the shutter release button fully to begin the exposure. The shutter will remain open for the set LONG duration.
6.4 Exposure Bracketing (BKLN/HDR)
The BKLN (Bracketing) function is designed for shooting low-light multiple exposure HDR (High Dynamic Range) photos. It automatically takes a series of photos at different exposure levels.

Image Description: This image details the BKLN function, which allows for long exposure bracketing to create HDR photos. It shows an example of a house photographed with normal, underexposed, and overexposed settings, and the resulting HDR image, demonstrating how the remote captures multiple exposures for later merging.
When the BKLN function is activated:
- The exposure time of the first photo is determined by the time set in the LONG parameter.
- Subsequent exposure times will be twice that of the previous one, creating a bracketed sequence.
- The number of shots in the bracketed sequence can be set from 1 to 7 in the N parameter.

Image Description: This image further illustrates the BKLN function for creating HDR photos in low-light conditions, using a snowy house scene to show the effect of combining multiple exposures (underexposed, normal, overexposed) to capture detail in both highlights and shadows.
7. Anti-Shake Functionality
Using a remote shutter release like the WTR-2 is crucial for preventing camera shake, especially during long exposures or when using telephoto lenses. Any physical contact with the camera during exposure can introduce blur.

Image Description: This image demonstrates the benefit of using a remote shutter release to prevent camera shake. It shows a side-by-side comparison: one image is blurry due to camera movement, while the other, taken with a remote, is sharp and clear, highlighting the importance of remote triggering for picture sharpness.
By releasing the shutter remotely, you eliminate direct contact with the camera, ensuring maximum sharpness for your photographs.
8. Troubleshooting
- Remote not triggering camera:
- Ensure batteries are correctly installed and charged in both transmitter and receiver.
- Verify the connection cable is securely attached to both the receiver/transmitter and the camera's remote port.
- Check camera settings to ensure it's configured to accept remote triggers (refer to your camera's manual).
- For wireless mode, ensure both units are powered on and within range.
- LCD display is blank or dim:
- Replace batteries in the transmitter.
- Wireless connection issues:
- Ensure no strong interference sources (e.g., Wi-Fi routers, other 2.4GHz devices) are nearby.
- Try re-pairing the transmitter and receiver (specific pairing instructions may be in a separate quick start guide, or try powering both off and on again).
9. Specifications

Image Description: This image provides a detailed table of specifications for the remote, covering delay time, exposure, interval, number of shots, batteries, weight, dimensions, cable length, and transmission distance. It also shows the remote components and packaging.
| Parameter | Value |
|---|---|
| Delay Time | 0.1S - 99 Hour 59 Min 59.9S (accurate to 0.1S) |
| Exposure Time (LONG) | 0.1S - 99 Hour 59 Min 59.9S (accurate to 0.1S) |
| Interval Time (INTVL) | 1S - 99 Hour 59 Min 59.9S (accurate to 1S) |
| Number of Shots (N) | 1-199 photos programmable or unlimited [--] |
| Batteries | 2*AAA batteries (for Transmitter), 2*AAA batteries (for Receiver) - Not included |
| Weight | Transmitter 56.5g; Receiver 37.5g |
| Dimensions | Transmitter L130.4mm x W46.2mm x H22mm; Receiver L85mm x W37.4mm x H30.9mm |
| Cable Length | Not stretched 19.5 inches (50cm); stretched to approximately max 59 inches (150cm) |
| Transmission Distance | 2.4GHz 200ft+ (open space) |
10. Warranty and Support
For warranty information and technical support, please refer to the product packaging or contact AODELAN customer service directly. Keep your purchase receipt as proof of purchase.