1. Introduction
The XEAST XE-27 is a professional handheld thermal imager designed for accurate temperature measurement and analysis across various applications. This device combines infrared thermal imaging with a visible light camera and LED illumination, providing comprehensive diagnostic capabilities. It is ideal for detecting hot and cold spots, identifying energy inefficiencies, and troubleshooting electrical, mechanical, and building systems.
This manual provides essential information for the safe and effective operation, maintenance, and troubleshooting of your XE-27 thermal imager. Please read it thoroughly before using the device.

Figure 1.1: XEAST XE-27 Thermal Imager with included accessories (USB cable, 8GB U disk, card reader, screwdriver, carrying case).
2. Safety Information
Always observe the following safety precautions to prevent injury and damage to the device:
- Do not point the thermal imager directly at the sun or other strong energy sources. This can damage the infrared detector.
- Do not use the device in explosive atmospheres or near flammable gases.
- Keep the device dry. Do not expose it to rain or moisture.
- Use only the specified battery type (4 x 1.5V AA lithium batteries). Ensure correct polarity when inserting batteries.
- Do not attempt to disassemble or modify the device. Refer all servicing to qualified personnel.
- Clean the lens and screen with a soft, lint-free cloth. Do not use abrasive cleaners or solvents.
- Store the device within the specified temperature and humidity ranges.
3. Product Overview
The XEAST XE-27 features a robust design with intuitive controls. Familiarize yourself with the components and their functions:

Figure 3.1: Key components and controls of the XE-27 Thermal Imager.
3.1 Components and Controls
- Temp & Humidity Sensor: Located at the top, measures ambient temperature and humidity.
- TFT High Definition Color Screen: 2.4-inch display for thermal and visual images, and menu navigation.
- SD Card/USB Interface: Slot for the 8GB TF Micro SD card and USB port for data transfer.
- Power Key/Return Key: Powers the device on/off and acts as a return button in menus.
- Up Button: Navigates up in menus or adjusts settings.
- Down Button: Navigates down in menus or adjusts settings.
- Menu Key/Confirmation Key (MODE): Accesses the main menu and confirms selections.
- Infrared Imaging Lens: Captures thermal radiation.
- Visible Light Camera: Captures visual images for image blending.
- LED Lighting: Provides illumination for visual inspection in dark areas.
- Image Capture Key: Trigger button to capture and save thermal images.
- Installation Nuts for Battery Cover and Tripod: Located at the bottom for battery access and tripod mounting.
4. Setup
4.1 Battery Installation
The XE-27 requires four 1.5V AA lithium batteries (not included). To install:
- Locate the battery compartment at the bottom of the handle.
- Use a screwdriver (provided) to open the battery cover.
- Insert four AA batteries, ensuring correct polarity as indicated inside the compartment.
- Replace the battery cover and secure it with the screw.
4.2 SD Card Insertion
An 8GB TF Micro SD card is provided for image storage. Insert it into the SD card slot located near the USB interface before first use.
4.3 Powering On/Off
Press and hold the Power Key (labeled with a power symbol) for approximately 2 seconds to turn the device on. The screen will display the boot-up sequence. To power off, press and hold the Power Key again until the device shuts down.
5. Operating Instructions
5.1 Basic Operation
Once powered on, the device will display the live thermal image. The screen shows real-time temperature readings, including maximum, minimum, and center spot temperatures. Ambient temperature, humidity, dew point, and wet bulb temperature are also displayed.
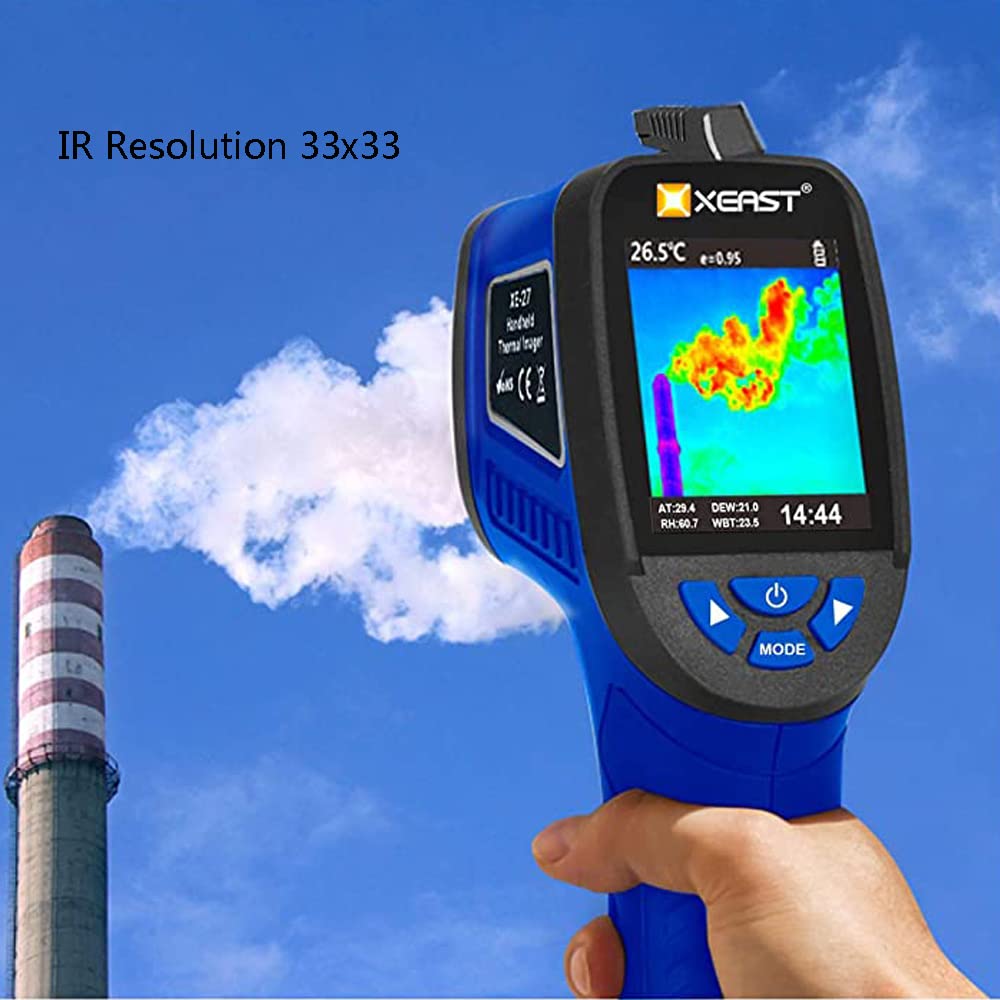
Figure 5.0: Live thermal image display with temperature data and IR resolution indication.
5.2 Capturing Images
To capture a thermal image, aim the device at the target and press the Image Capture Key (trigger button). The image will be saved to the inserted SD card in BMP format.

Figure 5.1: Using the XE-27 to inspect industrial equipment.
5.3 Menu Navigation and Settings
Press the MODE button to access the main menu. Use the Up and Down buttons to navigate through menu options. Press MODE again to select an option or confirm a setting. Use the Power Key to return to the previous screen or exit the menu.
5.3.1 Color Palettes
The XE-27 offers five color palettes to visualize temperature differences. These palettes enhance the visibility of hot and cold spots based on your application needs.

Figure 5.2: Available color palettes for thermal imaging visualization.
- Iron Red: Good for general thermal contrast.
- Ocean Blue: Provides a different visual representation, often used for subtle temperature changes.
- Rainbow: Offers a wide spectrum of colors for detailed temperature gradients.
- Ink Color: A more subdued palette, useful for specific industrial applications.
- Black and White: Simple grayscale representation, highlighting extreme temperatures.
Select the desired palette from the menu to change the display mode.
5.3.2 Emissivity Adjustment
Emissivity (ε) is a measure of an object's ability to emit infrared energy. Different materials have different emissivities. For accurate temperature readings, adjust the emissivity setting in the menu (range 0.10 to 1.0) to match the material being measured. Consult an emissivity table for common materials.
5.3.3 Image Blending and Visual Alignment
The XE-27 can blend thermal and visual images. This feature helps in identifying the exact location of thermal anomalies. Adjust the blending percentage (e.g., 25% step length) or switch between full infrared and full visual views as needed.
5.4 Data Transfer
Images saved on the SD card can be transferred to a computer:
- Connect the XE-27 to your PC using the provided mini USB cable.
- The device's SD card will appear as a removable disk (U disk) on your computer.
- You can then access and copy the BMP image files directly from the SD card.

Figure 5.3: Connecting the XE-27 to a PC for data transfer.
6. Maintenance
6.1 Cleaning
- Device Body: Wipe the exterior of the device with a soft, damp cloth. Do not use harsh chemicals or abrasive cleaners.
- Lens and Screen: Gently clean the infrared lens and display screen with a clean, lint-free microfiber cloth. If necessary, use a small amount of lens cleaning solution designed for optics. Avoid touching the lens directly with fingers.
6.2 Storage
When not in use, store the XE-27 in its carrying case in a cool, dry place, away from direct sunlight and extreme temperatures. Remove batteries if the device will not be used for an extended period to prevent leakage.
7. Troubleshooting
If you encounter issues with your XE-27 thermal imager, refer to the following table for common problems and solutions:
| Problem | Possible Cause | Solution |
|---|---|---|
| Device does not power on. | Low or dead batteries; incorrect battery installation. | Replace batteries with new 1.5V AA lithium batteries. Ensure correct polarity. |
| Image is blurry or unclear. | Dirty lens; object too close/far (fixed focus). | Clean the infrared lens. Ensure target is within optimal focus distance (0.5m). |
| Temperature readings are inaccurate. | Incorrect emissivity setting; reflective surfaces. | Adjust emissivity to match the target material. Be aware of highly reflective surfaces. |
| Cannot save images. | SD card not inserted; SD card full or corrupted. | Insert the 8GB TF Micro SD card. Check if the card is full and delete unnecessary files, or format the card (this will erase all data). |
| Device freezes or becomes unresponsive. | Temporary software glitch. | Press and hold the Power Key to force a shutdown, then restart the device. |
If the problem persists after attempting these solutions, please contact XEAST customer support.
8. Specifications
The following table lists the technical specifications of the XEAST XE-27 Thermal Imager:
| Parameter | Value |
|---|---|
| Model | XE-27 |
| Material | Plastic |
| Infrared Resolution | 33 x 33 pixels (1089 IR pixels) |
| Dimensions | 260 x 200 x 112 mm |
| Weight | 0.35 kg |
| Temperature Range | -20 ℃ ~ 380 ℃ (-4 ℉ ~ 716 ℉) |
| Accuracy | ± 2 ℃ or ± 2 % of reading |
| Display | 2.4" TFT 320 x 240 pixels color LCD |
| Visible Camera | 300,000 pixels |
| Field of View (FOV) | 33° x 33° |
| Best Focus Distance | 0.5 m |
| Thermal Sensitivity | 0.15 ℃ |
| Emissivity | 0.10 ~ 1.0 adjustable |
| Wavelength Range | 8-14 um |
| Ambient Temperature | -20 ℃ ~ 70 ℃ (± 1.0 ℃) |
| Ambient Humidity | 0-100 % RH (30-10 % RH; ± 3 % RH) |
| Dew Point Temperature | -30 ℃ ~ 100 ℃ (± 1.0 ℃) (at 25 ℃, 40-80 % RH) |
| Wet Bulb Temperature | -30 ℃ ~ 100 ℃ (± 1.0 ℃) (at 25 ℃, 40-80 % RH) |
| Color Palettes | Iron Red, Rainbow, Gray (White Hot), Ocean Blue, Ink Color, Black and White |
| Image Capture Frequency | 9 Hz |
| Focus Mode | Fixed |
| Image Storage | 8GB SD card (TF Micro) |
| File Format | BMP |
| Power Type | 4 x 1.5V AA lithium batteries (not included) and USB |
| Battery Life | 6 hours |
| Operating Conditions | -5 ℃ to 40 ℃; 10 % RH to 80 % RH |
| Storage Conditions | -20 ℃ to 50 ℃; 10 % RH to 80 % RH |
9. Warranty and Support
Information regarding the specific warranty period and terms for the XEAST XE-27 Thermal Imager was not provided in the product data. For warranty claims, technical support, or service inquiries, please contact your point of purchase or refer to the official XEAST website for customer service contact details.
Please retain your purchase receipt as proof of purchase for any warranty-related issues.