1. Introduction
This manual provides detailed instructions for the setup, operation, and maintenance of your eoqo 32GB Analog Telephone Voice Recorder. Please read this manual carefully before using the device to ensure proper functionality and to maximize its lifespan. This recorder is designed for use with analog telephone landline systems.
2. Product Overview
2.1 Key Features
- High-Quality Audio Recording: Records telephone conversations with clear sound.
- RJ11 Connectivity: Connects easily to RJ11 telephone ports; auto-detects line in/out.
- 32GB Internal Memory: Stores up to 200 hours of recordings at 192kbps.
- Stable Operation: Features an embedded Linux system and high-speed MCU for consistent performance.
- Plug-and-Play Setup: Simple connection with a telephone cable and 5V USB power adapter for automatic recording.
- Compact Design: Small, discreet black box design.
- Cycle Recording: Supports continuous recording by overwriting the oldest files when memory is full.
- Automatic File Naming: Files are named by date and time for easy organization.
- Analog System Compatible: Designed for use with analog telephone landline systems only.
2.2 What's in the Box
- 1 x eoqo 32GB Analog Telephone Voice Recorder

Image 1: The eoqo 32GB Analog Telephone Voice Recorder.

Image 2: Close-up of the eoqo recorder, emphasizing its durable metal casing.

Image 3: Diagram showing the dimensions and ports (Line In/Out, USB, LED Indicator) of the eoqo Analog Telephone Recorder.
3. Setup Instructions
The eoqo Analog Telephone Voice Recorder is designed for simple plug-and-play operation. Follow these steps to connect your device:
- Connect to Telephone Line: Use the provided telephone cable to connect your telephone's RJ11 port to one of the recorder's RJ11 ports (labeled LINE1 or LINE2). The recorder automatically detects the line direction.
- Connect to Modem/Router (if applicable): If your telephone line passes through a modem or router, connect the other RJ11 port of the recorder to the appropriate telephone line output on your modem or router.
- Power On: Connect the 5V USB adapter (not included) to the recorder's USB port and plug it into a power source. The recorder will power on and be ready to record.
3.1 Connection Diagrams
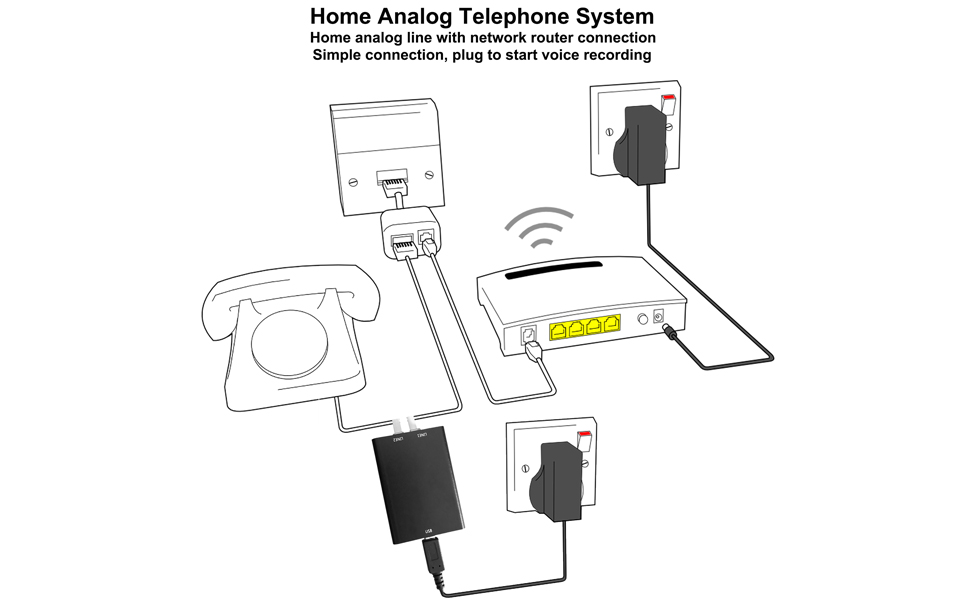
Image 4: Connection diagram for the eoqo recorder in a home analog telephone system with a network router.

Image 5: Detailed view of connecting the eoqo recorder to a telephone line, showing the phone base and the recorder.
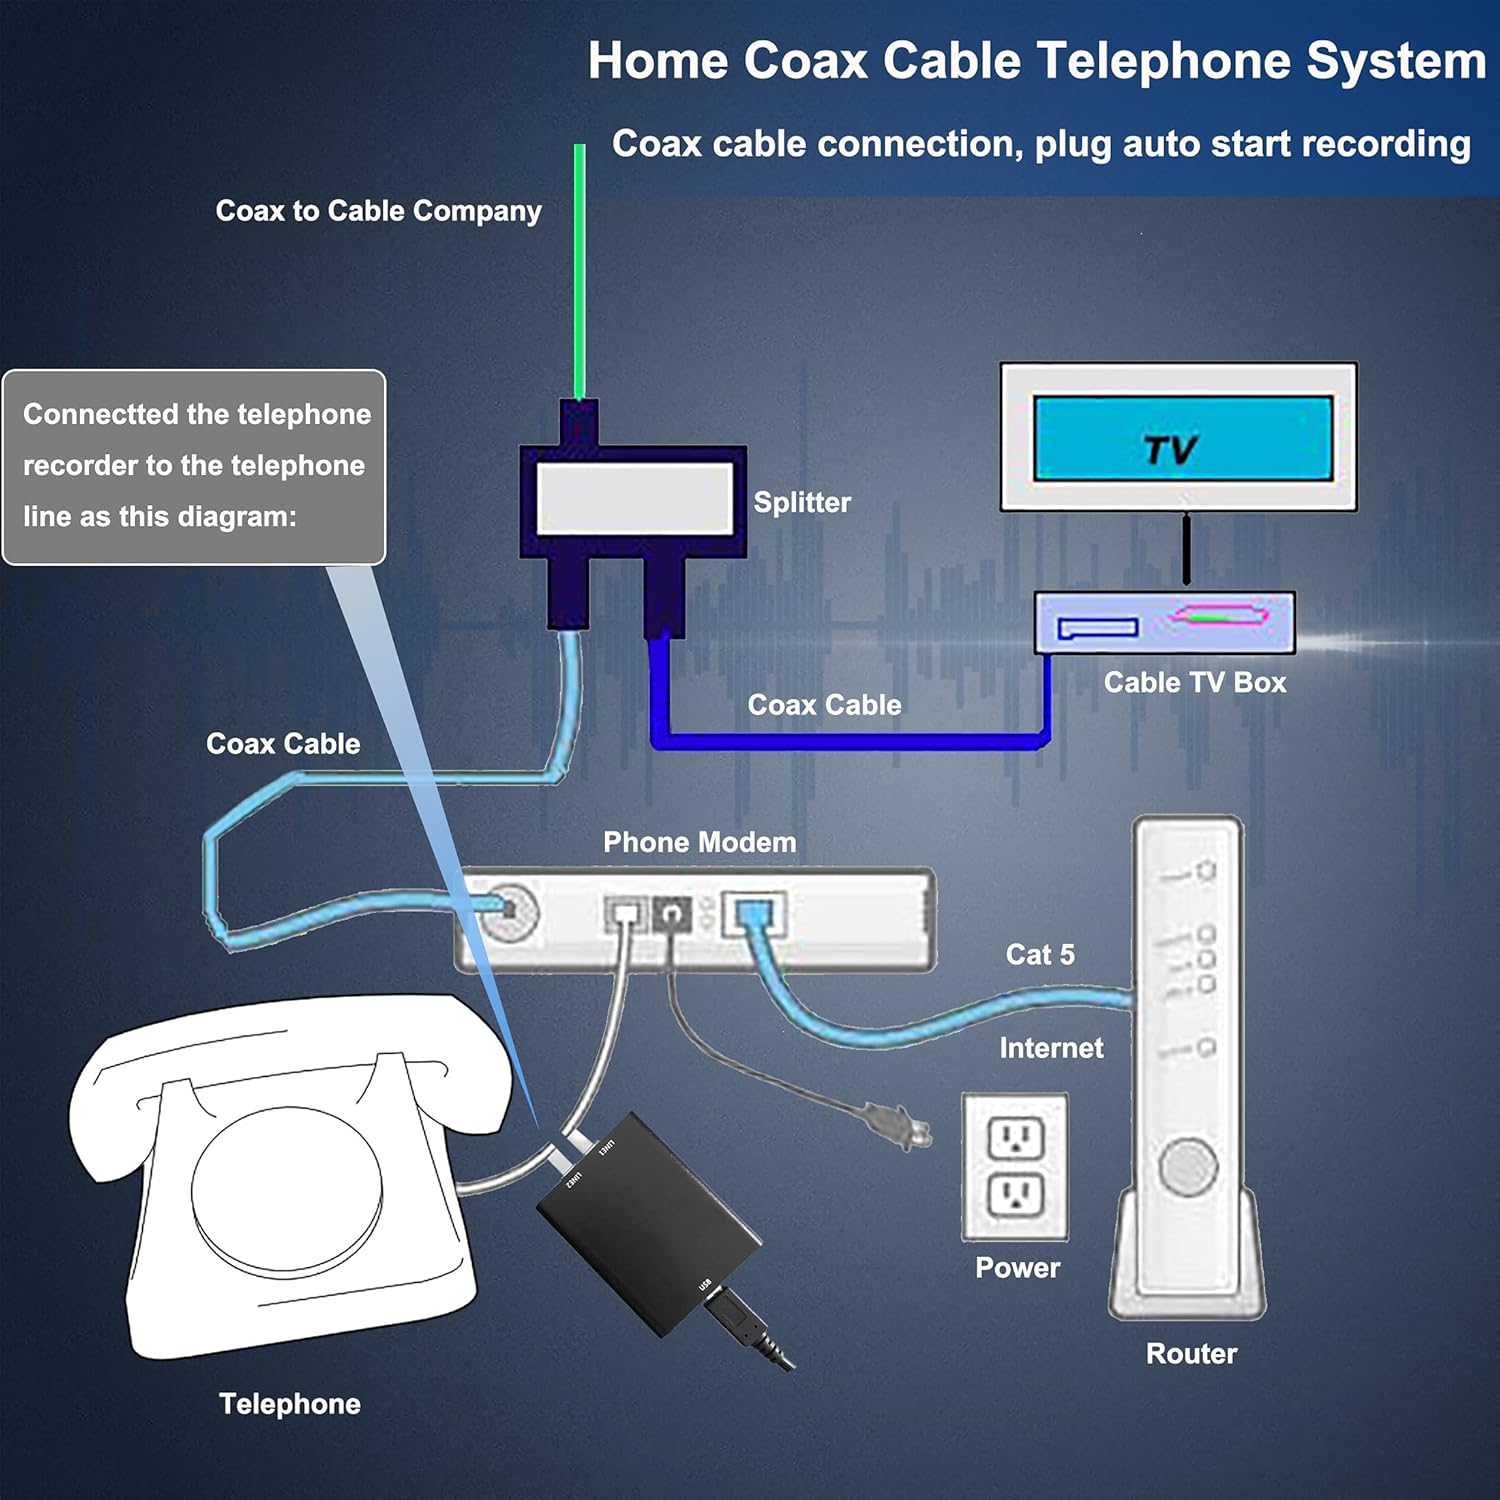
Image 6: Connection diagram for the eoqo recorder in a home coax cable telephone system.

Image 7: Connection diagram for the eoqo recorder in a small office telephone system.
4. Operating Instructions
The eoqo recorder operates automatically once properly connected and powered.
- Automatic Recording: The device will automatically begin recording when a call is made or received on the connected analog telephone line. Recording stops when the call ends (handset is hung up).
- Cycle Recording: The recorder features a cycle recording function. When the 32GB memory is full, the newest recordings will automatically overwrite the oldest recordings. This ensures continuous operation without manual intervention to clear space.

Image 8: Illustration of automatic recording in home and office settings.
5. File Management
Recorded files are stored on the internal 32GB memory and can be accessed by connecting the recorder to a computer.
- Connecting to a Computer: Use a Micro USB cable (not included) to connect the recorder to your computer. The recorder will appear as a removable storage device.
- Automatic File Naming: All recorded files are automatically named with the date and time of the recording (e.g., YYYYMMDD_HHMMSS.WAV). This allows for easy organization and retrieval.
- Supported Formats: The recorder supports WAV audio format. Files can be played back on any standard media player.

Image 9: Connecting the recorder to a laptop for file management.
6. Specifications
| Feature | Specification |
|---|---|
| Product Dimensions | 1.77 x 0.91 x 2.09 inches |
| Item Weight | 4.2 ounces |
| Memory Storage Capacity | 32 GB |
| Digital Recording Time | Approximately 200 hours |
| Battery Life | 150 Hours (internal, for time/date stamp) |
| Hardware Interface | USB |
| Microphone Form Factor | Built-In |
| Format | WAV |
| Compatible Devices | Analog Telephone System, Laptop, Personal Computer |
7. Troubleshooting
If you encounter issues with your eoqo recorder, please refer to the following common solutions:
- Device Not Recording:
- Ensure the recorder is properly connected to the telephone line and a 5V USB power source.
- Check if the LED indicator is active, indicating power.
- Verify that the telephone line itself is active and functioning correctly.
- Poor Sound Quality / Buzzing Noise:
- Ensure all cable connections are secure and free from damage.
- Try using a different telephone cable to rule out cable issues.
- Ensure the recorder is not placed too close to other electronic devices that might cause interference.
- Confirm that your telephone system is analog. This recorder is not compatible with digital or VoIP systems.
- Cannot Access Files on Computer:
- Ensure the recorder is connected to your computer using a functional Micro USB data cable.
- Try a different USB port on your computer.
- Restart your computer and reconnect the device.
- Memory Full / Old Recordings Not Overwriting:
- The cycle recording feature should manage memory automatically. If you suspect an issue, connect to a computer and manually delete some older files to free up space.
8. Maintenance
To ensure the longevity and optimal performance of your eoqo recorder, follow these maintenance guidelines:
- Cleaning: Use a soft, dry cloth to clean the exterior of the device. Do not use liquid cleaners or abrasive materials.
- Storage: Store the recorder in a cool, dry place away from direct sunlight and extreme temperatures.
- Handling: Avoid dropping the device or subjecting it to strong impacts.
9. Warranty and Support
For warranty information or technical support, please refer to the documentation provided at the time of purchase or contact eoqo customer service through the retailer where the product was acquired.