Introduction
This manual provides detailed instructions for the assembly, operation, maintenance, and troubleshooting of your ADVANCE OUTDOOR 12x20 ft Heavy Duty Carport Canopy. Please read this manual thoroughly before assembly and retain it for future reference. Proper assembly and care will ensure the longevity and safe use of your carport.
Safety Information
Always prioritize safety during assembly and use. Failure to follow these guidelines may result in injury or damage to the product.
- Always follow the included instructions for assembly and disassembly.
- Secure the carport to a stable foundation using the provided ropes, sandbags, pegs, and auger anchors to prevent it from moving or collapsing in windy conditions.
- Be cautious of pinch points and sharp edges during setup and takedown. Wearing the provided gloves is recommended.
- Do not use the carport in severe weather conditions, including heavy winds, snow accumulation, or extreme storms. Disassemble or reinforce as necessary.
- Ensure the assembly area is clear of obstructions and overhead power lines.
Package Contents
Verify that all components are present before beginning assembly. The entire carport is delivered in two packages, and arrival times may vary.

Image: Diagram illustrating the package contents and key specifications of the carport.
- 1 x Steel Frame (various poles and connectors)
- 1 x 180g PE Canopy Cover
- 16 x Height Adjustable Poles
- 8 x Reinforced Triangular Poles
- 4 x Sandbags
- 8 x Windproof Ropes
- 16 x Ground Pegs
- 8 x Spiral Pegs
- 2 Pairs of Gloves
- 1 x Instruction Manual
Setup Instructions
Assembly of this carport is designed to be straightforward and tool-free. It is recommended that two or more adults participate in the assembly process.
Preparation:
- Unpack all components and lay them out in an organized manner. Refer to the package contents list to ensure all parts are present.
- Identify all poles, connectors, and the canopy cover. The frame consists of 1.5-inch diameter galvanized steel poles and 1.65-inch diameter connectors.
- Choose a level and clear area for assembly.
Frame Assembly:
- Begin by connecting the horizontal and vertical poles to form the base frame. The tool-free design utilizes spring buttons for secure connections.
- Assemble the roof structure, incorporating the reinforced triangular poles for added stability.
- Attach the height-adjustable poles to the main frame. This model offers 4 adjustable side heights (6.5ft, 7.0ft, 7.5ft, 8.0ft) and corresponding peak heights (9.5ft, 10.0ft, 10.5ft, 11.0ft). Adjust to your desired height before proceeding.

Image: Visual representation of the carport's four adjustable height settings.

Image: Diagram highlighting the reinforced triangular poles and the included securing accessories like pegs, ropes, and weight bags.
Canopy Cover Installation:
- Carefully drape the 180g polyethylene canopy cover over the assembled frame. Ensure it is centered and evenly distributed.
- Secure the canopy cover to the frame using the provided elastic bungees or ties. Ensure the cover is taut to prevent water pooling.
Securing the Carport:
- Fill the sandbags with sand and attach them to the base of the legs for additional stability.
- Use the ground pegs and spiral pegs to anchor the carport legs and guy ropes firmly into the ground.
- Attach the windproof ropes to the designated points on the frame and secure them to the ground using pegs or other suitable anchor points.

Image: The fully assembled ADVANCE OUTDOOR carport canopy, showcasing its structure and securing elements.
Operating Instructions
Your ADVANCE OUTDOOR carport is designed for versatile use and protection.
Adjustable Height:
The carport features 4 adjustable height settings, allowing you to customize the side height from 6.5ft to 8.0ft, and the peak height from 9.5ft to 11.0ft. This flexibility accommodates various items such as cars, trucks, boats, or provides ample space for events.
Weather Protection:
The heat-sealed, triple-layer 180g polyethylene fabric canopy is designed to be Anti-UV, waterproof, and tear-proof. It provides protection against sun, wind, rain, dust, hail, and snow, safeguarding your stored items or event space from the elements.

Image: Visual representation of the canopy's multi-layer construction and its protective qualities against various weather conditions.
Multipurpose Use:
This carport is suitable for a variety of applications:
- Vehicle Shelter: Protect cars, trucks, boats, ATVs, or motorcycles from weather.
- Storage: Ideal for storing lawn and garden equipment, tools, or other outdoor items.
- Event Tent: Can be used for parties, fairs, weddings, or other outdoor gatherings.
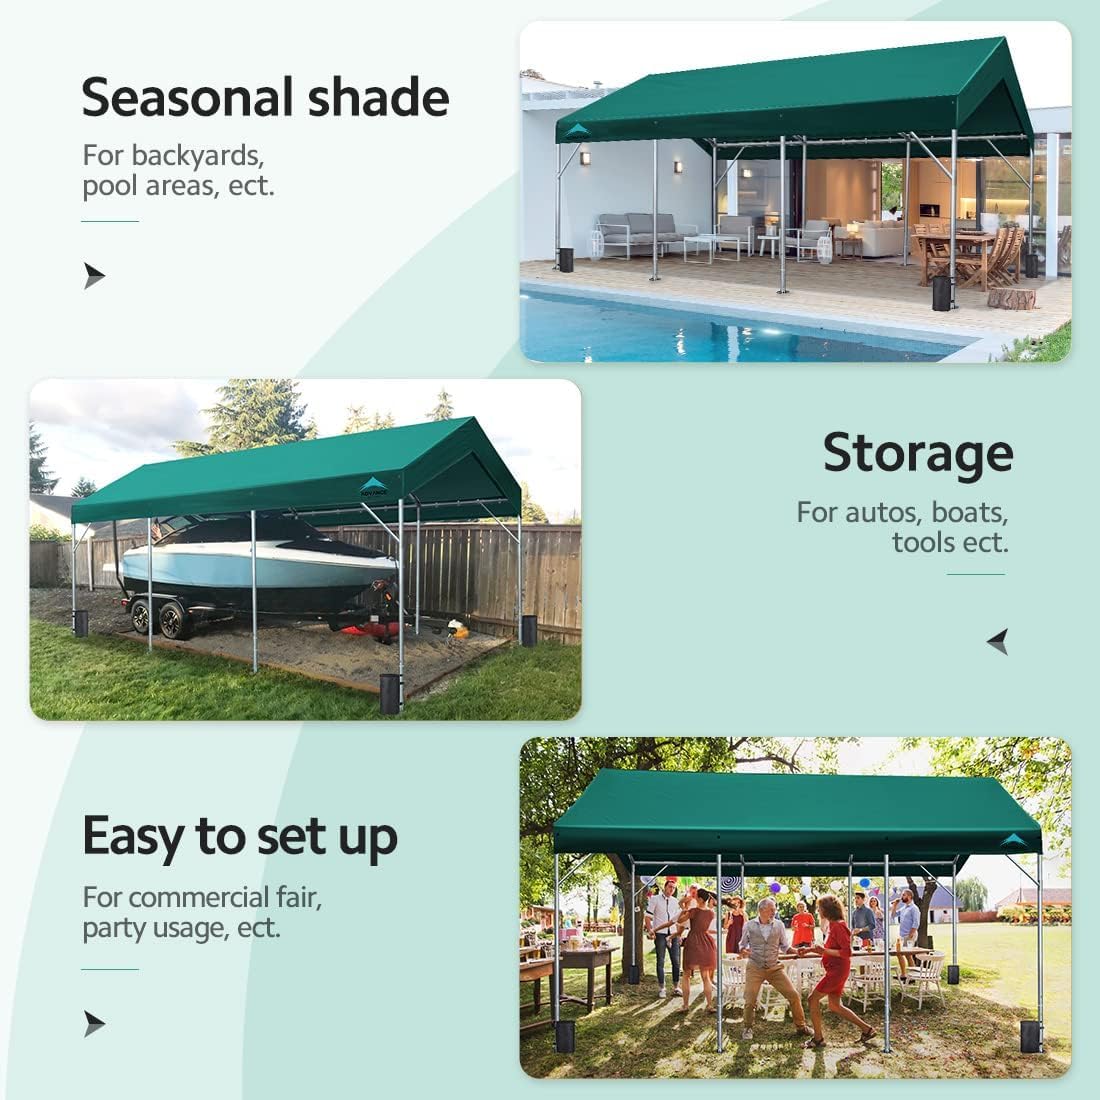
Image: Examples of the carport's versatile uses, including shading a patio, covering a boat, and hosting an outdoor event.
Maintenance
Regular maintenance will extend the life of your carport.
- Frame Inspection: Periodically check all frame connections to ensure they are secure. Tighten any loose connections. Inspect poles for any signs of damage or rust.
- Canopy Cleaning: Clean the canopy cover regularly with mild soap and water. Avoid harsh chemicals or abrasive brushes that could damage the fabric. Ensure the cover is dry before long-term storage to prevent mildew.
- Anchoring System: Regularly inspect the ropes, sandbags, pegs, and auger anchors for wear or loosening. Re-secure or replace as needed, especially after strong winds or heavy rain.
- Snow Removal: In areas with snow, regularly remove snow accumulation from the canopy to prevent structural collapse due to excessive weight.
- Seasonal Storage: If disassembling for seasonal storage, clean all components, ensure they are dry, and store them in a cool, dry place away from direct sunlight.
Troubleshooting
Here are solutions to common issues you might encounter:
- Carport Instability: If the carport feels unstable, ensure all frame connections are fully engaged and secure. Verify that all ground pegs, spiral pegs, sandbags, and windproof ropes are properly installed and taut. Consider additional anchoring in very windy conditions.
- Water Pooling on Canopy: Ensure the canopy cover is stretched tightly and evenly over the frame. Adjust the height if necessary to create sufficient slope for water runoff. Check for any sagging areas and re-tension the cover.
- Difficulty Assembling Poles: Ensure you are matching the correct poles and connectors as per the instructions. Apply gentle pressure to engage the spring buttons. Wearing gloves can improve grip.
- Tears or Damage to Canopy: Small tears can often be repaired with a suitable canopy repair kit. For significant damage, consider replacing the canopy cover.
Specifications
| Brand | ADVANCE OUTDOOR |
| Model Number | 018G |
| Style | No Sidewall-12x20 |
| Color | Green |
| Product Dimensions (L x W x H) | 240"L x 144"W x 132"H (20 ft L x 12 ft W x 11 ft H max) |
| Item Weight | 137.3 Pounds |
| Frame Material | Alloy Steel, Metal (Galvanized Steel) |
| Canopy Cover Material | 180g Polyethylene Fabric |
| Water Resistance Level | Waterproof |
| UV Protection | Yes |
| Adjustable Peak Height | 9.5 ft, 10.0 ft, 10.5 ft, 11.0 ft |
| Adjustable Sidewall Height | 6.5 ft, 7.0 ft, 7.5 ft, 8.0 ft |
| Number of Legs | 8 |
| Assembly Required | Yes |
Warranty and Support
ADVANCE OUTDOOR stands behind the quality of its products.
- Poles and Canopy Covers: A one-year warranty is provided for these components.
- Other Accessories: A lifetime warranty is provided for connectors, foot pads, pegs, anchors, and elastic bungees.
For warranty claims, replacement parts, or any product support inquiries, please contact ADVANCE OUTDOOR customer service through the retailer where the product was purchased or visit the official ADVANCE OUTDOOR website for contact information.


