1. Introduction
The MAD OWL Mini DMX Controller M-54W is a compact and portable 54-channel DMX controller designed for managing stage and DJ lighting fixtures. Featuring both wired DMX output and 2.4GHz wireless capabilities, this controller offers flexibility and ease of use for various lighting setups. It supports programming and scene memory functions, making it suitable for both simple and complex lighting sequences.
2. Safety Information
- Read all instructions before operating the device.
- Keep the device away from water, moisture, and extreme temperatures.
- Do not attempt to open or modify the device. Refer all servicing to qualified personnel.
- Use only the specified power supply (USB 5V or 9-12V DC) to prevent damage.
- Ensure proper ventilation around the controller during operation.
3. Package Contents
Please check the package for the following items:
- MAD OWL Mini DMX Controller M-54W
- USB Power Cable
- Power Adapter (may vary by region)
- Wireless Antenna
4. Product Overview
The Mini DMX Controller M-54W features a compact design with intuitive controls for managing DMX-compatible lighting fixtures.
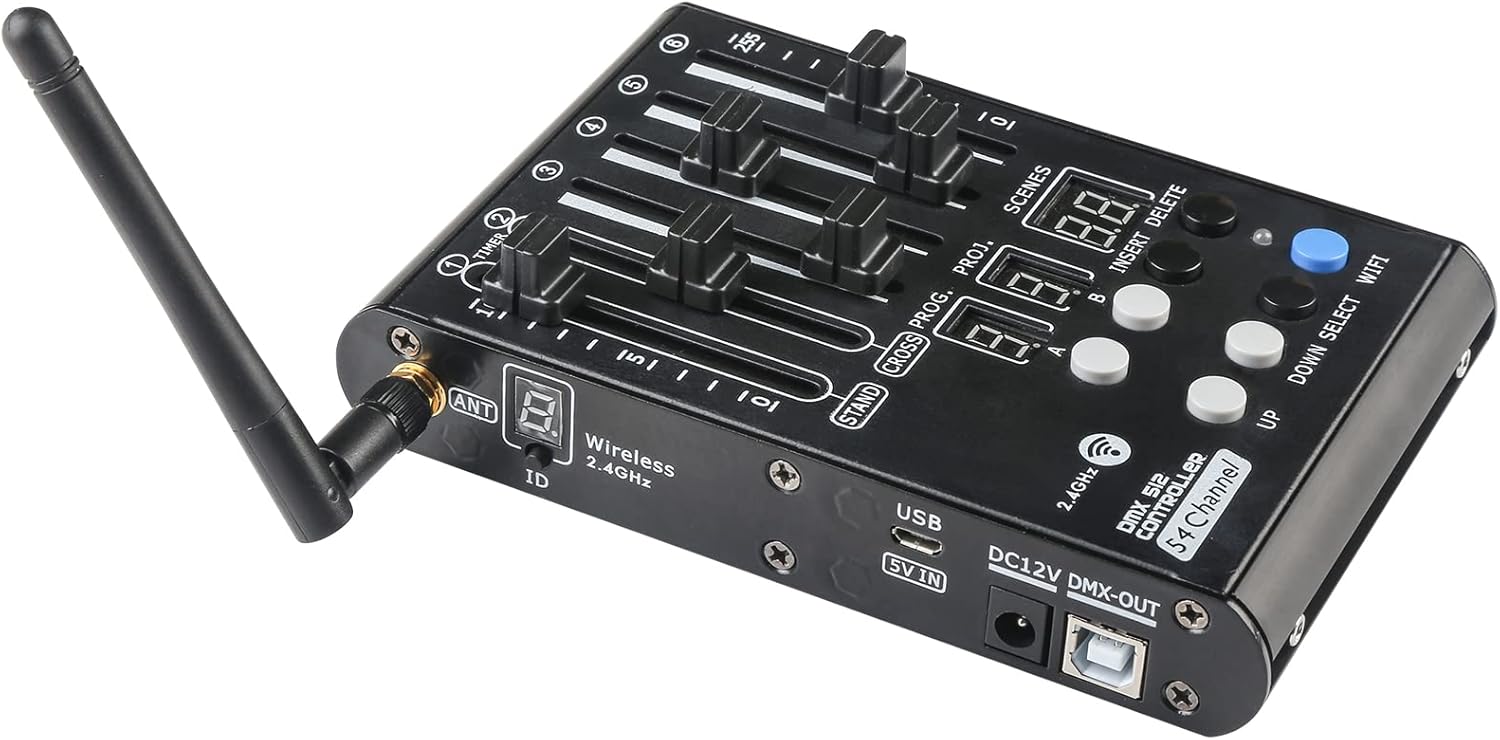
Figure 4.1: Top-down angled view of the MAD OWL Mini DMX Controller M-54W, highlighting the six faders, program/scene displays, and control buttons.
Controls and Ports:
- 6 Faders (Putters): Control individual DMX channels or parameters.
- Program/Scene Displays: Digital displays for program and scene numbers.
- Control Buttons: For selecting programs, scenes, and other functions (e.g., UP, DOWN, SELECT, WIFI, INSERT, DELETE).
- Wireless Antenna Port: For connecting the 2.4GHz wireless antenna.
- USB 5V IN Port: For power input via USB.
- DC 12V DMX-OUT Port: For power input via DC adapter and DMX output.
- USB DMX-OUT Port: Standard 3-pin DMX output for connecting to lighting equipment.

Figure 4.2: Side view of the controller, illustrating the USB 5V IN, DC 12V DMX-OUT, and USB DMX-OUT ports, along with the wireless antenna connection.
5. Setup
5.1 Powering the Controller
The Mini DMX Controller can be powered in two ways:
- USB 5V: Connect the provided USB cable to the USB 5V IN port on the controller and to a standard USB power source (e.g., a power bank, computer USB port, or USB wall adapter).
- DC 9-12V: Connect a compatible 9-12V DC power adapter to the DC 12V DMX-OUT port.

Figure 5.1: The controller can be powered using a power bank via the USB 5V input when an external power supply is not available.
5.2 Connecting to Lighting Equipment
The controller features a standard 3-pin DMX output for connecting to DMX-compatible lighting fixtures.
- Ensure all lighting fixtures are powered off before connecting.
- Connect one end of a 3-pin DMX cable to the USB DMX-OUT port on the controller.
- Connect the other end of the DMX cable to the DMX IN port of your first lighting fixture.
- For multiple fixtures, daisy-chain them by connecting the DMX OUT of the first fixture to the DMX IN of the next, and so on.
- Set the DMX address for each lighting fixture according to its manual and your desired control scheme.

Figure 5.2: The controller is compatible with a wide range of 3-pin DMX lighting equipment, including PAR lights, moving heads, and LED bars.
5.3 Wireless Connection (Optional)
The controller supports 2.4GHz wireless DMX communication. To use this feature:
- Attach the wireless antenna to the ANT port on the controller.
- Ensure your DMX lighting fixtures are equipped with compatible 2.4GHz wireless DMX receivers.
- Follow the instructions for your wireless DMX receivers to pair them with the controller. The controller's wireless ID is displayed on its screen.
6. Operating Instructions
The Mini DMX Controller M-54W offers simple operation with 6 faders, 9 programs, and the ability to save 50 scenes per program. It supports both manual control and programmed sequences.
6.1 Manual Control
To control DMX channels manually:
- Power on the controller and connected lighting fixtures.
- Ensure the controller is in 'STAND' mode (indicated on the display).
- Adjust the 6 faders to control the corresponding DMX channels or parameters of your lights. Each fader typically controls a range of 0-255 values.
6.2 Programming Scenes and Programs
The controller allows you to create and save custom lighting scenes and organize them into programs.
- Creating a Scene: Adjust the faders to achieve your desired lighting state. Press the 'INSERT' button to save this state as a scene. The display will show the scene number.
- Saving to a Program: The controller has 9 programs. Select a program using the 'PROG' button and 'UP'/'DOWN' buttons. Once a program is selected, you can save up to 50 scenes within it.
- Recalling Scenes/Programs: Use the 'SCENES' or 'PROG' buttons along with 'UP'/'DOWN' to navigate and recall saved scenes or programs.
- Deleting Scenes: Select the scene you wish to delete and press the 'DELETE' button.
Refer to the specific DMX channel assignments of your lighting fixtures to effectively program scenes.
7. Maintenance
7.1 Cleaning
To maintain the appearance and functionality of your controller:
- Always disconnect power before cleaning.
- Use a soft, dry cloth to wipe the exterior surfaces.
- Do not use abrasive cleaners, solvents, or harsh chemicals, as these can damage the finish and internal components.
7.2 Storage
When not in use, store the controller in a cool, dry place, away from direct sunlight and excessive dust. It is recommended to store it in its original packaging or a protective case to prevent damage.
8. Troubleshooting
| Problem | Possible Cause | Solution |
|---|---|---|
| Controller does not power on. | No power supply or faulty connection. | Check USB cable and power adapter connections. Ensure power source is active. Try a different USB port or power adapter. |
| Lights are not responding to the controller. | Incorrect DMX connections, wrong DMX addresses, or wireless signal issues. | Verify DMX cable connections. Ensure DMX addresses on fixtures match controller settings. If using wireless, check antenna connection and pairing with receivers. |
| Faders or buttons are unresponsive. | Dust or debris, or internal malfunction. | Gently clean around faders and buttons. If problem persists, contact support. |
| Programs or scenes are not saving. | Incorrect programming procedure. | Review Section 6.2 on programming. Ensure 'INSERT' button is pressed correctly to save scenes. |
9. Specifications

Figure 9.1: Physical dimensions and weight of the MAD OWL Mini DMX Controller M-54W.
- Model: M-54W
- Channels: 54 Channel
- Control Type: DMX512
- Wireless Frequency: 2.4GHz
- Power Supply: USB 5V or DC 9-12V
- Material: Aluminum
- Dimensions: 150mm x 98mm x 25mm (5.9"W x 3.9"D x 1"H)
- Item Weight: 420g (1.1 Pounds)
- Features: 6 Faders, 9 Programs, 50 Scenes per Program, Power off memory, Scene programming and recall.
- Output Connection: Standard 3-pin DMX, USB DMX-OUT
10. Warranty Information
This MAD OWL Mini DMX Controller M-54W comes with a standard manufacturer's warranty. Please retain your proof of purchase for any warranty claims. The warranty typically covers defects in materials and workmanship under normal use. It does not cover damage caused by misuse, accidents, unauthorized modifications, or improper installation.
For specific warranty terms and conditions, please refer to the documentation provided with your purchase or contact MAD OWL customer support.
11. Support
If you encounter any issues or have questions regarding the MAD OWL Mini DMX Controller M-54W that are not covered in this manual, please contact our customer support team for assistance.
- Online Support: Visit the MAD OWL store page on Amazon or the official MAD OWL website for FAQs and contact options.
- Email Support: Refer to your product packaging or purchase invoice for direct email contact information.
When contacting support, please have your product model (M-54W) and purchase details ready to help us assist you more efficiently.