1. Introduction
This manual provides essential information for the safe and efficient operation of your KENWOOD Digital Twin Air Fryer HFP70.000BK. Please read all instructions carefully before first use and retain this manual for future reference. This appliance is designed for domestic use only.
2. Important Safeguards
- Always ensure the appliance is placed on a stable, heat-resistant surface, away from walls and other appliances to allow adequate air circulation.
- Do not immerse the main unit, cord, or plug in water or any other liquid.
- Supervise children closely when the appliance is in use. This appliance is not intended for use by persons with reduced physical, sensory, or mental capabilities unless supervised.
- Unplug the appliance from the outlet when not in use and before cleaning. Allow it to cool completely before handling or cleaning parts.
- Do not operate any appliance with a damaged cord or plug, or after the appliance malfunctions or has been damaged in any manner. Contact customer support for assistance.
- Do not use accessories or attachments not recommended by the manufacturer, as this may cause injuries or damage.
- Exercise extreme caution when moving an appliance containing hot oil or other hot liquids.
- Do not block any ventilation openings.
- The outer surfaces of the appliance may become hot during use. Use oven mitts when handling hot components.
3. Product Components
Familiarize yourself with the main parts of your Kenwood Digital Twin Air Fryer:
- Main Unit with Digital Control Panel
- Left Cooking Basket (4L capacity)
- Right Cooking Basket (4L capacity)
- Removable Crisper Plates (2 units)

Figure 3.1: Front view of the Kenwood Digital Twin Air Fryer HFP70.000BK, highlighting the digital control panel and two distinct cooking baskets.

Figure 3.2: Detailed view of the digital control panel, showing temperature and time adjustments, and various cooking function icons.

Figure 3.3: The air fryer with both cooking baskets and their respective crisper plates removed, illustrating the internal structure.
4. Setup and First Use
4.1 Unpacking
- Remove all packaging materials, stickers, and labels from the appliance.
- Check that all components are present and undamaged.
4.2 Cleaning Before First Use
- Wash the cooking baskets and crisper plates in hot, soapy water. Rinse thoroughly and dry completely.
- Wipe the interior and exterior of the main unit with a damp cloth. Do not use abrasive cleaners.
4.3 Placement
- Place the air fryer on a stable, level, and heat-resistant surface.
- Ensure there is at least 10 cm (4 inches) of clear space around the back and sides of the appliance for proper ventilation.
- Plug the power cord into a grounded electrical outlet.
5. Operating Instructions
5.1 Powering On/Off
Press the power button (⏻) on the control panel to turn the appliance on or off.

Figure 5.1: A user interacting with the control panel, pressing the power button to initiate operation.
5.2 Basic Cooking Steps
- Place the crisper plates into the cooking baskets.
- Add your ingredients to the baskets. Do not overfill. For best results, a small amount of oil can be added to some foods.

Figure 5.2: Illustrates adding a minimal amount of oil to food in a basket, a common practice for enhanced crispiness.
- Insert the baskets firmly into the main unit.
- Press the power button.
- Select the desired cooking function (e.g., Fry, Roast, Bake) or manually set the temperature and time for each basket using the 'L' (Left) and 'R' (Right) controls.
- Press the Start/Pause button to begin cooking.
- During cooking, you may receive a 'SHAKE' reminder. Pull out the basket, shake the contents, and reinsert to continue.
- Once cooking is complete, the appliance will beep. Carefully remove the baskets and transfer food to a serving dish.
5.3 DualZone Technology
The DualZone technology allows you to cook two different foods simultaneously with independent temperature and time settings for each basket.

Figure 5.3: The air fryer demonstrating its dual-zone capability, cooking French fries and chicken nuggets concurrently.
5.3.1 Sync Finish Function
This feature allows two different foods, set with different cooking times, to finish cooking at the same moment. Set the cooking parameters for both baskets, then press the 'SYNC FINISH' button. The appliance will automatically adjust the start time for the basket with the shorter cooking duration.
5.3.2 Dual Cook Function
Use this function to apply the same cooking settings (temperature and time) to both baskets with a single command. Set the desired parameters for one basket, then press 'DUAL COOK' to mirror these settings to the other basket.
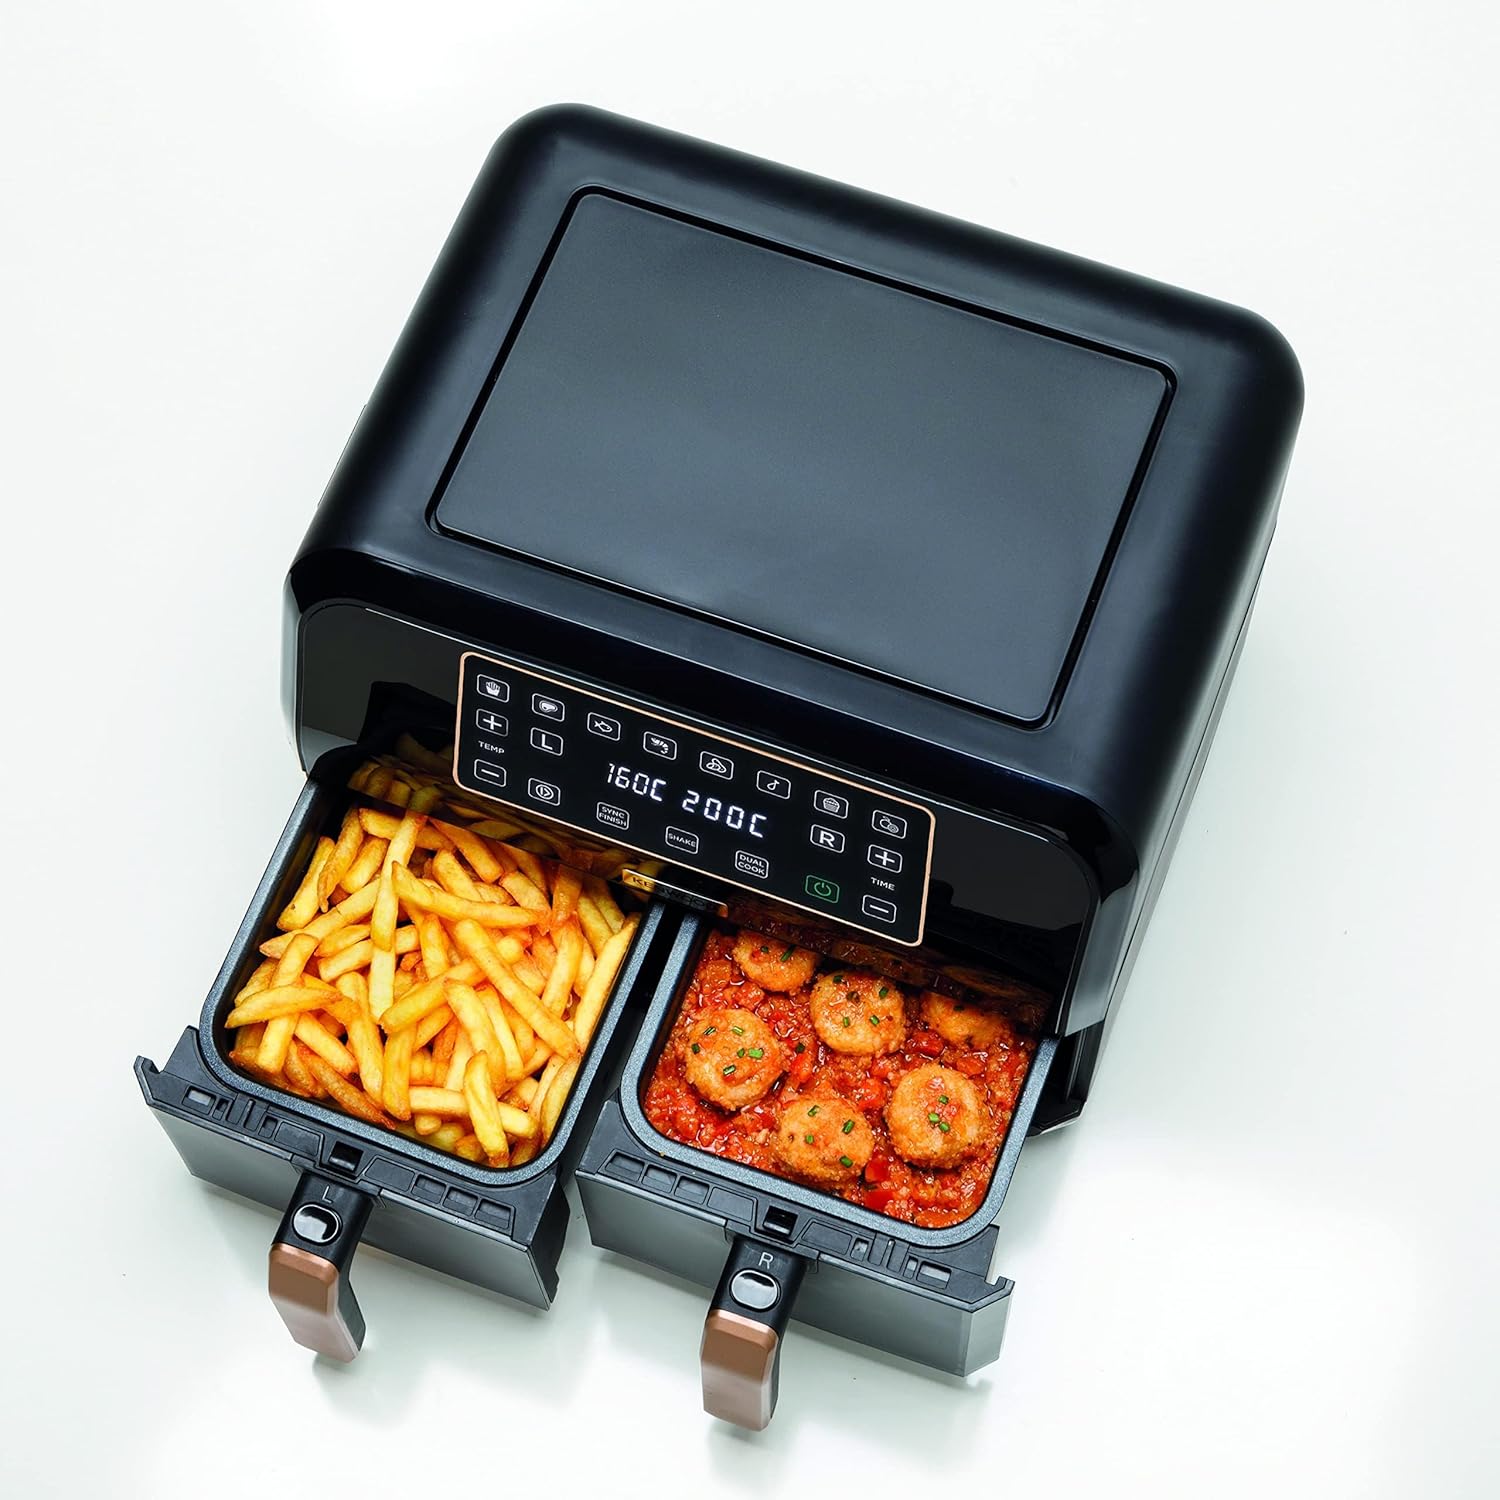
Figure 5.4: An example of dual cooking, with different food items in each basket, ready for simultaneous preparation.

Figure 5.5: Another illustration of the dual cooking capability, featuring French fries and meatballs, demonstrating versatility.
5.4 Max Crisp Function
This function is designed to achieve maximum crispiness for foods like frozen fries or chicken wings. It typically uses a higher temperature for a shorter duration to ensure a crispy exterior.
5.5 Dehydrate Function
The dehydrate function allows you to dry fruits, vegetables, or make jerky. It operates at a lower temperature for an extended period, up to 24 hours, to slowly remove moisture from food.
6. Cleaning and Maintenance
Regular cleaning ensures optimal performance and extends the lifespan of your air fryer.
6.1 Cleaning Steps
- Always unplug the air fryer and allow it to cool completely before cleaning.
- Remove the cooking baskets and crisper plates. These parts are generally dishwasher safe or can be washed by hand with warm, soapy water and a non-abrasive sponge.
- Wipe the exterior of the appliance with a damp cloth. Do not use harsh chemicals or abrasive materials.
- Clean the interior of the air fryer with a damp cloth and mild detergent if necessary. Ensure no water enters the electrical components.
- Ensure all parts are thoroughly dry before reassembling and storing the appliance.

Figure 6.1: Both cooking baskets extended, illustrating ease of access for cleaning or food removal.
6.2 Storage
Store the air fryer in a cool, dry place, ensuring the power cord is neatly wrapped and secured.
7. Troubleshooting
If you encounter issues with your air fryer, refer to the following common problems and solutions:
- Appliance does not turn on: Check if the power cord is securely plugged into a working outlet. Ensure the baskets are fully inserted.
- Food is not cooked evenly: Ensure baskets are not overloaded. Shake or flip food halfway through cooking. Adjust temperature or cooking time.
- White smoke comes from the appliance: This is usually caused by grease residue from previous use. Clean the baskets and crisper plates thoroughly. If it persists, unplug and contact support.
- Air fryer emits a burning smell: This can be due to food particles stuck in the heating element. Unplug, allow to cool, and clean the interior.
- Food is not crispy: Ensure food is not overcrowded. Add a small amount of oil to certain foods. Increase cooking time or temperature slightly.
For issues not covered here, please contact Kenwood customer support.
8. Technical Specifications
| Brand | Kenwood |
| Model Number | HFP70.000BK |
| Color | Black/Gold |
| Product Dimensions | 44 x 41.5 x 36.5 cm |
| Capacity | 2 x 4 Liters (Total 8 Liters) |
| Power / Wattage | 1700 watts |
| Voltage | 240 Volts |
| Material | Aluminum |
| Auto Shutoff | Yes |
| Special Features | Dual Zone Features |
| Item Weight | 6 Kilograms |
9. Warranty and Customer Support
Your KENWOOD Digital Twin Air Fryer HFP70.000BK comes with a manufacturer's warranty. Please refer to the warranty card included with your purchase for specific terms and conditions, including coverage duration and service procedures.
For technical assistance, spare parts, or warranty claims, please contact Kenwood customer support through their official website or the contact information provided in your product packaging.
10. Official Product Videos
No official product videos from the seller were available for embedding in this manual.