Machine Heracleum II Pendant Light
Classic Heracleum II Pendant Light User Manual
Model: Heracleum II Pendant Light | Brand: Machine
1. Introduction
Thank you for purchasing the Machine Classic Heracleum II Pendant Light. This manual provides essential information for the safe installation, operation, and maintenance of your new lighting fixture. Please read this manual thoroughly before installation and keep it for future reference.
This elegant pendant light features a unique tree leaf design with integrated LED lights, offering low power consumption and a long lifespan. It provides a bright, uniform, non-glare illumination, creating a cozy atmosphere. Its stylish design makes it suitable for various indoor spaces including living rooms, dining rooms, bedrooms, kitchens, and offices.
2. Important Safety Information
WARNING: Risk of Electric Shock. Disconnect power at the fuse box or circuit breaker before installation or servicing.
- Always turn off the main power supply before installing, cleaning, or performing any maintenance on the fixture.
- Installation must be performed by a qualified electrician in accordance with all local electrical codes.
- Do not connect this fixture to an ungrounded electrical system.
- Do not attempt to modify the fixture. Any modifications may void the warranty and create a safety hazard.
- Handle the fixture with care. Avoid dropping or subjecting it to strong impacts.
- Ensure all connections are secure and properly insulated.
- This product is designed for indoor use only. Do not expose to moisture or extreme temperatures.
3. Package Contents
Please check that all parts are included and undamaged before beginning installation. If any parts are missing or damaged, do not proceed with installation and contact customer support.
- Heracleum II Pendant Light Fixture (1 unit)
- Mounting Hardware Kit (screws, anchors, wire connectors)
- Installation Manual (this document)
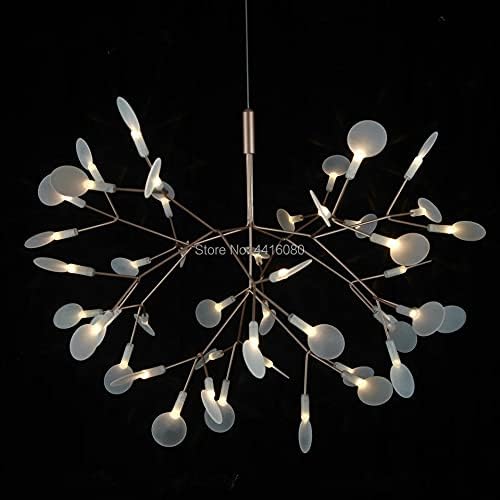
Figure 3.1: Main view of the Heracleum II Pendant Light, showcasing its intricate branch-like structure and numerous LED light sources.
4. Installation Instructions
Follow these steps carefully to install your pendant light. Professional installation is recommended.
- Prepare for Installation:
- Turn off power at the circuit breaker or fuse box to the outlet box where the fixture will be installed.
- Ensure the power is off by testing the circuit with a voltage tester.
- Unpack the fixture and its components carefully.
- Attach Mounting Bracket:
- Secure the mounting bracket (included in hardware kit) to the ceiling outlet box using the provided screws. Ensure it is firmly attached.
- Adjust Hanging Length (if applicable):
- If your model allows, adjust the length of the suspension cable to your desired height. Secure the cable firmly.

Figure 4.1: View of the pendant light from a slightly lower angle, highlighting the individual light elements and their arrangement.
- Make Electrical Connections:
- Connect the fixture's wires to the corresponding wires from the outlet box using the wire connectors:
- Connect the black (Live) wire from the fixture to the black (Live) wire from the outlet box.
- Connect the white (Neutral) wire from the fixture to the white (Neutral) wire from the outlet box.
- Connect the green or bare copper (Ground) wire from the fixture to the green or bare copper (Ground) wire from the outlet box.
- Ensure all connections are tight and secure.
- Mount the Fixture:
- Carefully tuck all wires into the outlet box.
- Align the fixture canopy with the mounting bracket and secure it with the provided screws.
- Restore Power:
- Once the fixture is securely mounted, restore power at the circuit breaker or fuse box.
- Test the light to ensure it functions correctly.
5. Operating Instructions
The Classic Heracleum II Pendant Light is designed for simple operation.
- Power On/Off: Control the light using a standard wall switch connected to the fixture's circuit.
- Light Source: This fixture uses integrated LED lights. There are no bulbs to replace.
- Control Method: The primary control method is via a touch-sensitive switch, if available on your specific model, or through the wall switch.

Figure 5.1: The Heracleum II Pendant Light illuminating a modern living room, demonstrating its aesthetic appeal when in use.
6. Maintenance
Regular cleaning and proper care will help maintain the appearance and performance of your pendant light.
- Cleaning:
- Always turn off the power to the fixture before cleaning.
- Use a soft, dry, or slightly damp cloth to wipe down the fixture.
- Do not use abrasive cleaners, solvents, or polishes as they may damage the finish.
- Avoid spraying cleaners directly onto the fixture.
- LED Longevity: The integrated LEDs are designed for long life and do not require replacement under normal use.
- Inspection: Periodically inspect the fixture for any loose connections or signs of damage. If any issues are found, consult a qualified electrician.
7. Troubleshooting
If you encounter issues with your pendant light, refer to the following common problems and solutions:
| Problem | Possible Cause | Solution |
|---|---|---|
| Light does not turn on. | No power supply. Loose wire connection. Faulty wall switch. | Check circuit breaker/fuse. Ensure all wire connections are secure (power off first). Test or replace wall switch. |
| Light flickers. | Loose wire connection. Incompatible dimmer switch (if applicable). | Check and secure all wire connections (power off first). Ensure dimmer switch is compatible with LED lighting. |
| Light is dim. | Incorrect voltage. Dust accumulation. | Verify correct voltage supply. Clean the fixture gently. |
If the problem persists after trying these solutions, please contact customer support.
8. Product Specifications
| Feature | Detail |
|---|---|
| Brand | Machine |
| Model | Heracleum II Pendant Light |
| Style | Classic |
| Light Fixture Form | Pendant |
| Color | Gold, White (Cold White light color) |
| Shade Material | Aluminum |
| Light Source Type | LED |
| Number of Light Sources | 45 |
| Power Source | Corded Electric |
| Control Method | Touch |
| Indoor/Outdoor Usage | Indoor |
| Assembly Required | No |
| Item Weight | 0.035 ounces (approx. 1 gram) |

Figure 8.1: A detailed view of the pendant light against a dark background, emphasizing the metallic structure and the glow of the LED elements.
9. Warranty and Customer Support
For warranty information or technical support, please contact the retailer or manufacturer directly. Keep your purchase receipt as proof of purchase.
We are committed to providing good quality services. If you have any needs or questions, please do not hesitate to consult us. We will do our best to meet your requirements.
no relevant documents
Ask a question about this manual
Ask about setup, troubleshooting, compatibility, parts, safety, or missing instructions. Manuals+ will review the question and use this page’s manual context to help answer it.