1. Introduction
This manual provides detailed instructions for the safe and effective operation of your Andoer 4K 48MP 60FPS WiFi Camcorder. Please read this manual thoroughly before using the device and retain it for future reference. This camcorder is designed for high-quality video recording and photography, featuring 4K Ultra HD resolution, 48-megapixel photos, a 3-inch IPS touchscreen, and infrared night vision capabilities. It is equipped with WiFi connectivity for easy file transfer and remote control, and comes with essential accessories such as an external microphone and a wide-angle macro lens.

Image 1.1: Andoer 4K Camcorder with included accessories.
2. Package Contents
Verify that all items listed below are included in your package. If any items are missing or damaged, please contact your retailer.

Image 2.1: All components included in the package.
- Camcorder
- Microphone
- Windshield for microphone
- 3.5mm TRS to TRS Audio Cable
- USB Cable
- Handgrip
- Camera Lens (Wide-angle macro lens)
- Lens Adapter Ring
- 2 x Lithium-polymer Batteries (2000mAh)
- Remote Control
- Camcorder Storage Bag
- Lens Storage Bag
- Camcorder User Manual
- Microphone User Manual
3. Product Overview
Familiarize yourself with the various parts and controls of your camcorder.
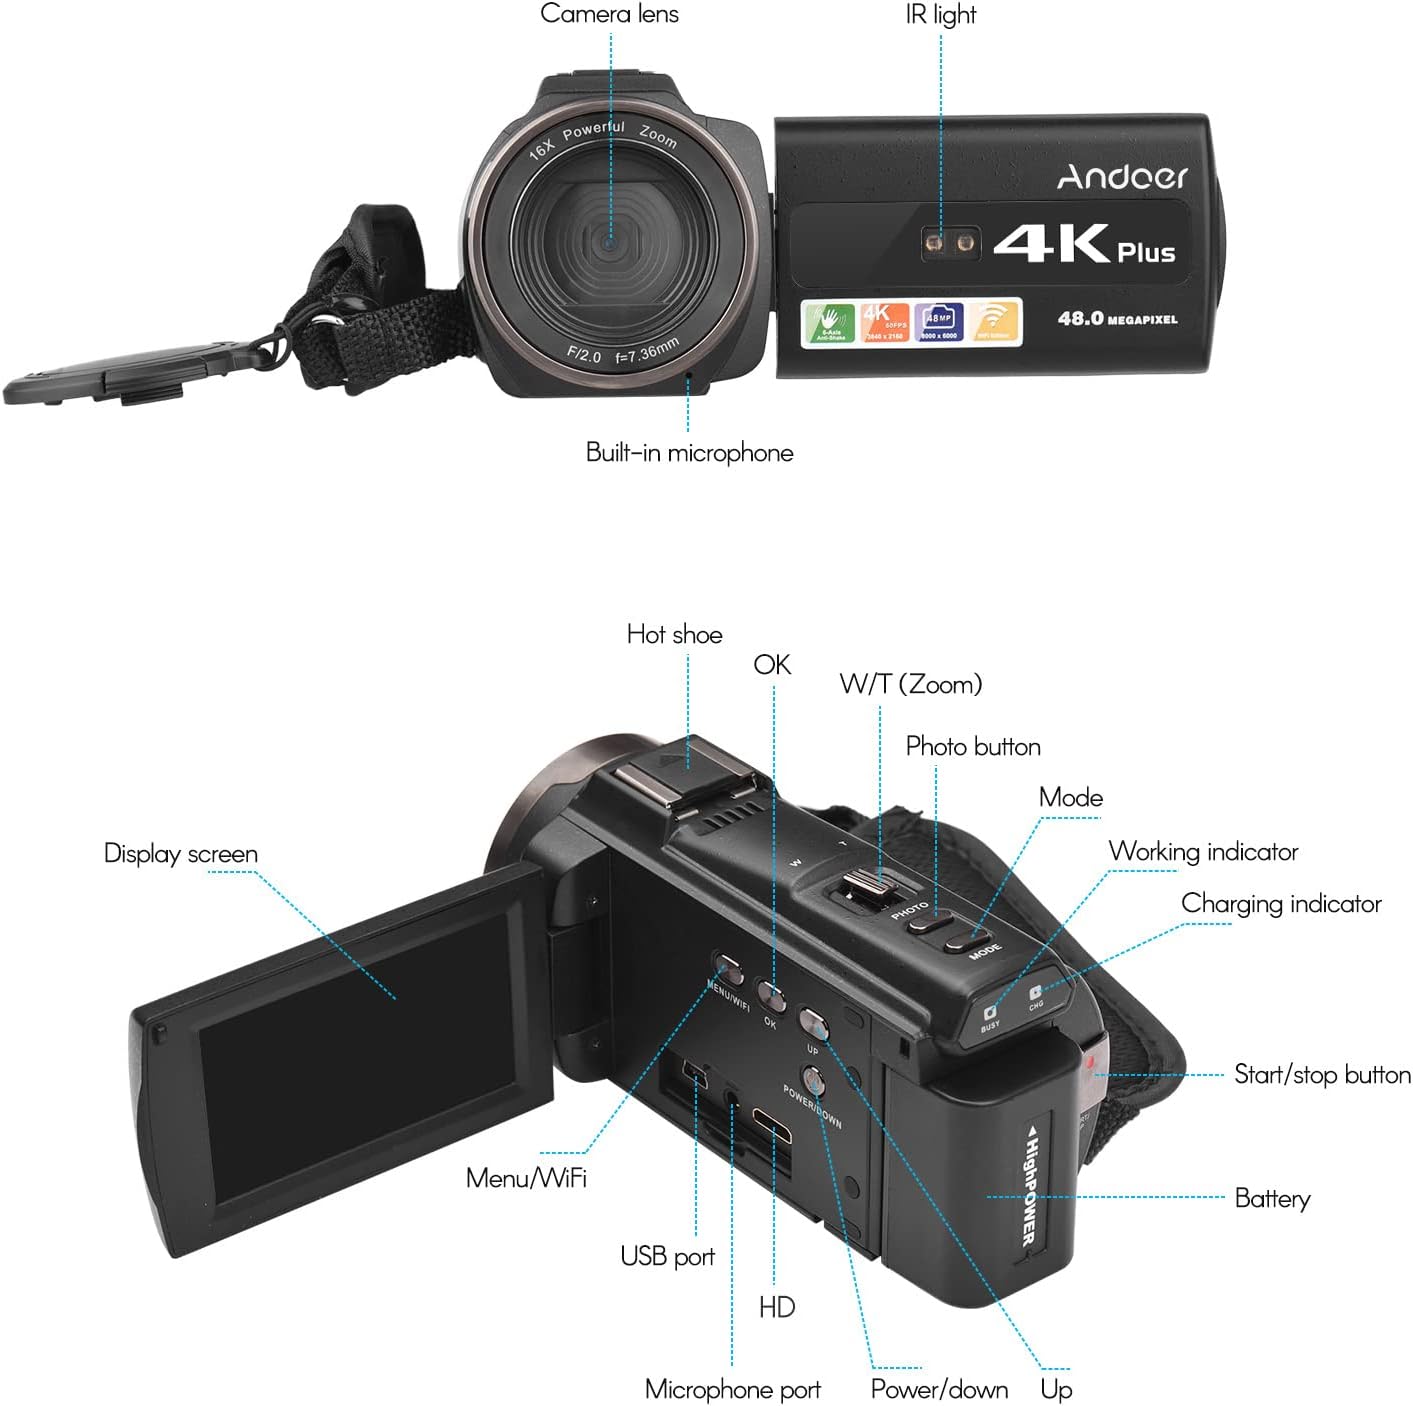
Image 3.1: Front and Rear View of the Camcorder with labeled components.
Key Components:
- Camera Lens: Main optical component for capturing images and videos.
- IR Light: Emits infrared light for night vision recording.
- Built-in Microphone: Captures audio. An external microphone can be connected for enhanced sound quality.
- Hot Shoe: Mount for external accessories like the included microphone or an LED video light.
- Display Screen (3" IPS Touch Screen): For viewing live footage, playback, and navigating menus.
- Control Buttons: Including Power, Mode, Photo, Zoom (W/T), OK, Menu/WiFi, Up/Down.
- Ports: USB, HD (HDMI), Microphone port.
- Battery Compartment: Houses the rechargeable battery.
4. Setup
4.1 Charging the Battery
Before first use, fully charge the included lithium-polymer batteries. Insert one battery into the camcorder's battery compartment. Connect the camcorder to a power source using the provided USB cable. The charging indicator will illuminate during charging and turn off when fully charged. A full charge typically takes several hours.

Image 4.1: Battery installation and charging indication.
4.2 Inserting a Memory Card
The camcorder supports TF (MicroSD) cards up to 128GB. Ensure the card is formatted before first use in the camcorder's settings. Insert the memory card into the designated slot until it clicks into place.
- Use a Class 10 or higher speed rating for optimal performance, especially for 4K video recording.
- The camcorder supports V60 video speed class.
4.3 Attaching the External Microphone
For improved audio quality, attach the external stereo microphone to the hot shoe mount on top of the camcorder. Connect the microphone's 3.5mm audio cable to the microphone input port on the camcorder.
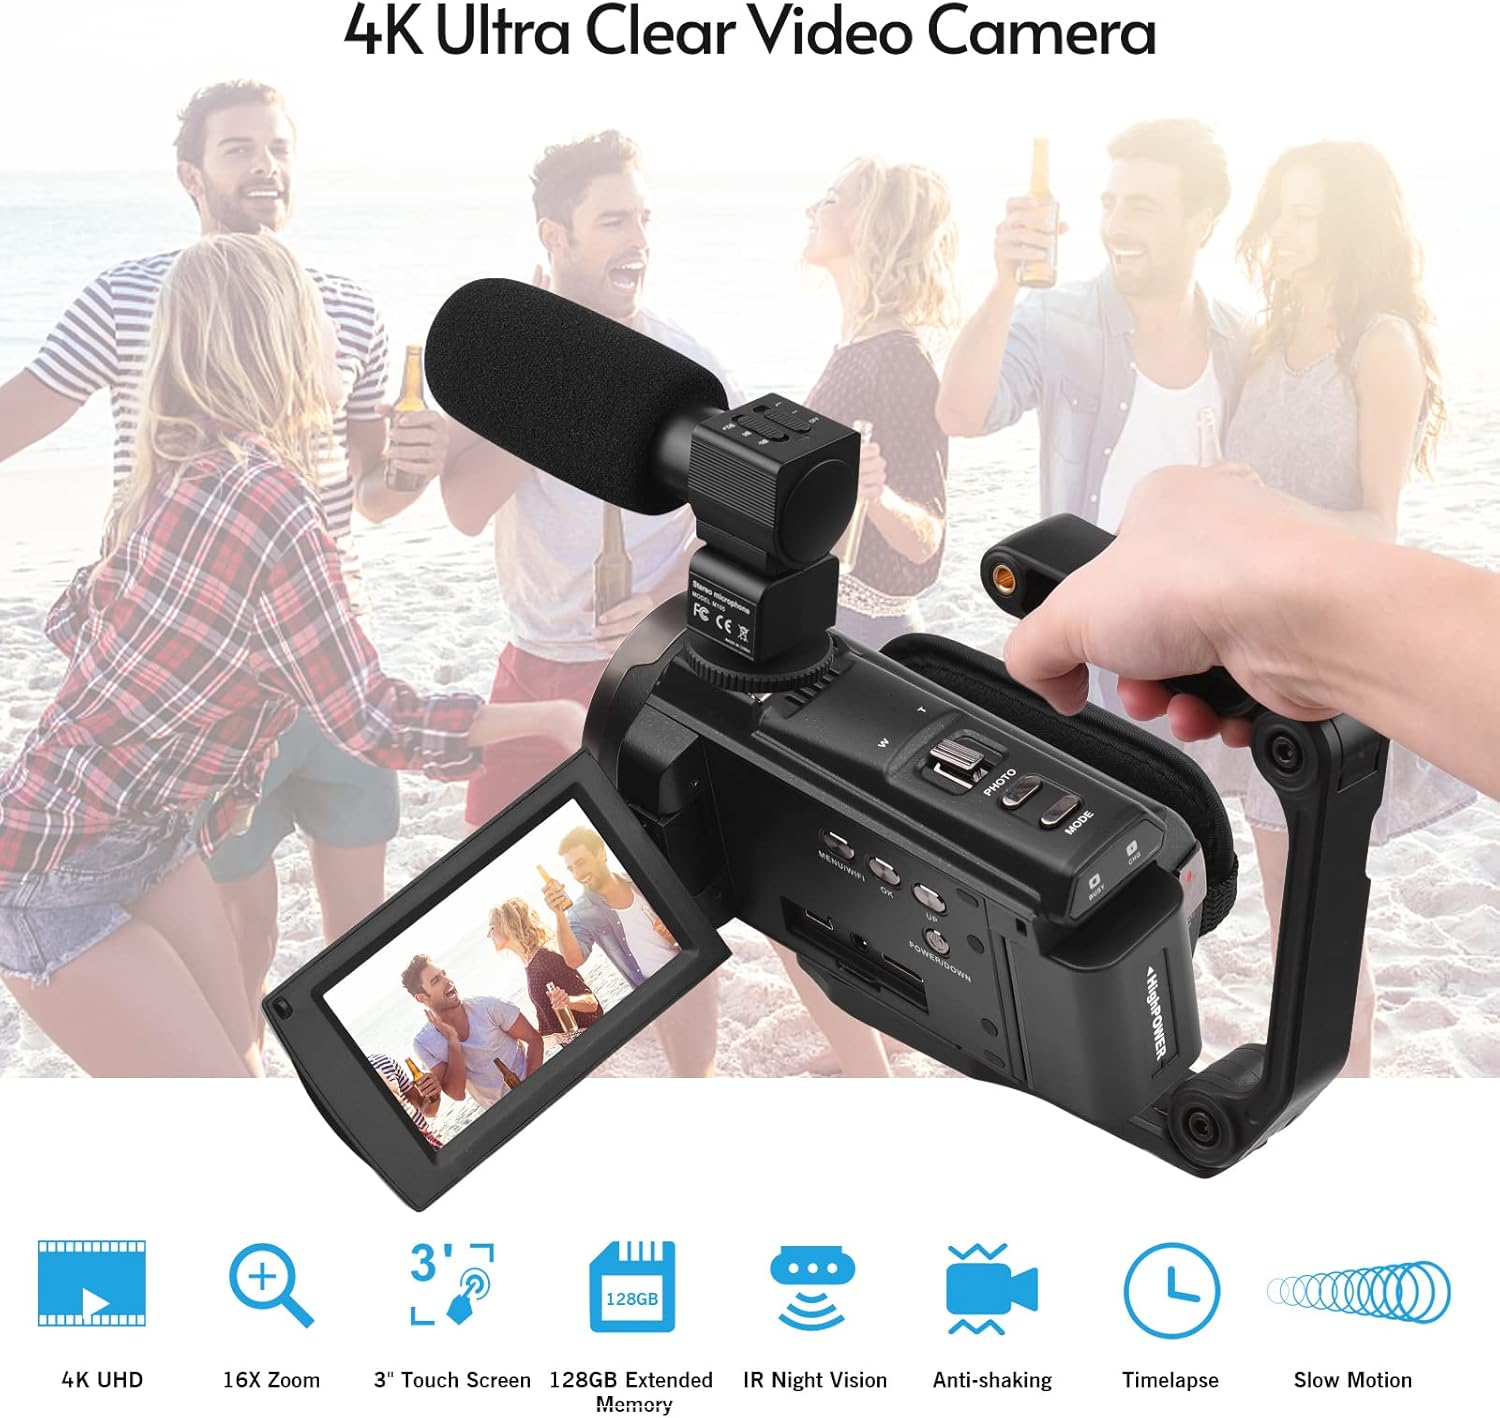
Image 4.2: External microphone attached to the camcorder.
4.4 Attaching the Wide-Angle Macro Lens
To use the wide-angle macro lens, first attach the lens adapter ring to the camcorder's main lens. Then, screw the wide-angle macro lens onto the adapter ring. This lens provides a broader perspective for your shots.

Image 4.3: Wide-angle macro lens for expanded field of view.
4.5 Attaching the Handgrip
The included handgrip can be attached to the bottom of the camcorder via the 1/4" screw hole for more stable handheld recording.
5. Operating Instructions
5.1 Powering On/Off
To power on the camcorder, open the display screen and press the Power button. To power off, press and hold the Power button, or close the display screen.
5.2 Recording Video
- Turn on the camcorder.
- Press the Mode button to select video recording mode.
- Press the Start/Stop button to begin recording. The recording indicator will flash.
- Press the Start/Stop button again to stop recording.
The camcorder supports 4K/60FPS video resolution for clear and smooth footage.
5.3 Taking Photos
- Turn on the camcorder.
- Press the Mode button to select photo mode.
- Frame your shot using the display screen.
- Press the Photo button to capture a 48-megapixel image.
5.4 Using the 3" IPS Touch Screen
The capacitive touchscreen allows for intuitive navigation of menus and settings. Tap to select options, swipe to scroll, and pinch to zoom (if supported in specific modes).
5.5 WiFi Function
The built-in WiFi allows for wireless transmission of files to a compatible smartphone or tablet via a dedicated app. It also enables remote control of the camcorder from your mobile device.
- Activate WiFi on the camcorder via the menu.
- Download and install the specified app on your mobile device.
- Connect your mobile device to the camcorder's WiFi network.
- Use the app to control recording, view live footage, and transfer files.
5.6 IR Night Vision
For recording in low-light or dark conditions, activate the IR Night Vision feature. This utilizes infrared light to capture clear black and white footage.

Image 5.1: IR Night Vision in operation.
5.7 Digital Zoom
Use the W/T (Wide/Telephoto) button to adjust the 16x digital zoom. Note that digital zoom can reduce image quality compared to optical zoom.
5.8 Image Stabilization
The camcorder features 6-axis image stabilization to reduce blur and shakiness in your recordings, especially during handheld use.
5.9 Special Features
- Motion Detection: The camcorder can be set to automatically start recording when motion is detected.
- Face Detection/Recognition: Optimizes focus and exposure for faces in the frame.
- Remote Control: Use the included remote control to operate the camcorder from a distance, useful for self-recording or group shots.
- Self-Timer: Set a delay before capturing a photo or starting a video recording.

Image 5.2: Tripod mounting for self-timer and stable shots.
5.10 Connecting to External Devices
- USB: Connect to a computer for file transfer.
- HD (HDMI): Connect to a TV or monitor to view your recordings on a larger screen.
6. Maintenance
- Cleaning: Use a soft, dry cloth to clean the camcorder body. For the lens, use a specialized lens cleaning cloth and solution. Avoid harsh chemicals.
- Storage: Store the camcorder in a cool, dry place away from direct sunlight and extreme temperatures. Remove the battery if storing for extended periods.
- Battery Care: Do not expose batteries to high temperatures. Recharge regularly even if not in use to maintain battery health.
- Firmware Updates: Check the manufacturer's website periodically for any available firmware updates to ensure optimal performance and new features.
7. Troubleshooting
| Problem | Possible Cause | Solution |
|---|---|---|
| Camcorder does not power on. | Battery is depleted or not inserted correctly. | Ensure battery is fully charged and correctly inserted. Try the second battery. |
| Cannot record video/take photos. | Memory card is full, not inserted, or corrupted. Incorrect mode selected. | Check memory card status, ensure it's inserted and has free space. Format if necessary (backup data first). Select the correct mode. |
| Poor image/video quality. | Lens is dirty. Low light conditions without IR. Digital zoom used excessively. | Clean the lens. Activate IR Night Vision in dark environments. Avoid excessive digital zoom. Ensure sufficient lighting. |
| WiFi connection issues. | Incorrect WiFi settings. App not installed or updated. | Ensure WiFi is enabled on camcorder and mobile device. Re-establish connection. Update or reinstall the mobile app. |
| Microphone not recording audio. | Microphone not connected properly or settings incorrect. | Check microphone cable connection. Verify audio input settings in the camcorder menu. |
8. Specifications
| Feature | Detail |
|---|---|
| Model Number | ZOH0150584179474NZ |
| Video Resolution | 4K (3840x2160) at 60FPS |
| Photo Resolution | 48 Megapixels (8000x6000) |
| Image Stabilization | 6-axis |
| Display Screen | 3-inch IPS Capacitive Touch Screen |
| Digital Zoom | 16x |
| Connectivity | USB, Wi-Fi, HDMI |
| Memory Card Support | TF (MicroSD) up to 128GB (Class 10, V60 recommended) |
| Special Features | IR Night Vision, Motion Detection, Face Detection, Remote Control |
| Battery | 2 x 2000mAh Lithium-polymer |
| Lens Aperture | f/2.0 |
| Minimum Focal Length | 39mm |
| Compatible Devices | Tripod, Microphone, TV, Computer, Smartphone |
| Operating System Compatibility | Windows |
| Dimensions (Package) | 18 x 15 x 11 cm |
| Weight (Package) | 1.01 kg |
9. Warranty and Support
Andoer products are designed for reliability and performance. For any technical assistance, troubleshooting beyond this manual, or warranty inquiries, please contact Andoer customer support through their official website or your retailer.
Please retain your proof of purchase for warranty claims.