Introduction
This manual provides essential information for the safe and effective use, maintenance, and care of your FASTPRO 4-Piece Locking Pliers Set and 7-Piece Utility Pliers Set. Please read this manual thoroughly before using the tools to ensure proper operation and to prevent injury or damage.
Product Overview
The FASTPRO Pliers Set includes a comprehensive collection of tools designed for various gripping, cutting, and manipulating tasks. The set comprises:
- 4-Piece Locking Pliers Set: Designed for secure gripping and holding, featuring adjustable force and quick release.
- 7-Piece Utility Pliers Set: A versatile collection of pliers for general purpose tasks, including combination, diagonal cutting, and long nose pliers.

Figure 1: Overview of the complete FASTPRO 4-Piece Locking Pliers Set and 7-Piece Utility Pliers Set.
Locking Pliers Features
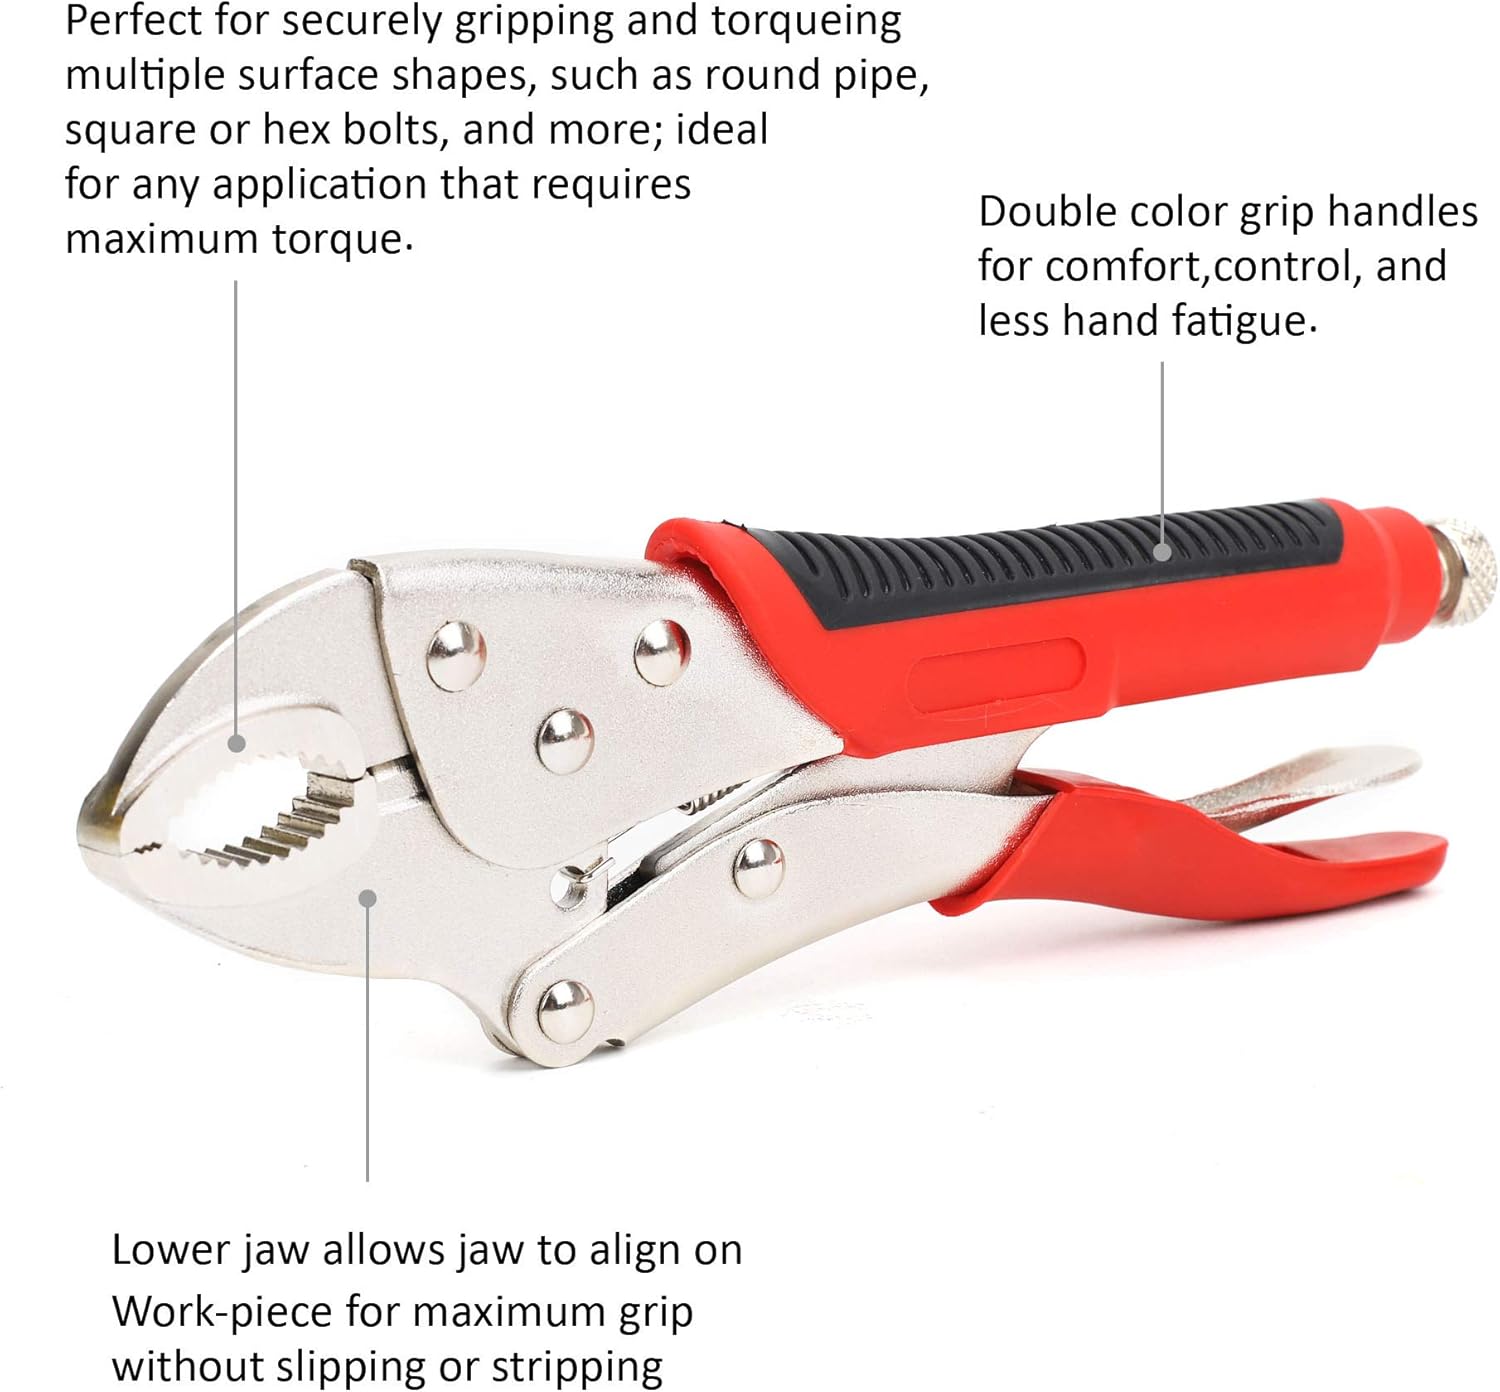
Figure 2: Key features of the FASTPRO Locking Pliers, including the double color grip handles for comfort and control, and the lower jaw designed for secure workpiece alignment.

Figure 3: Close-up view of the machined jaws of the FASTPRO Locking Pliers, designed for secure gripping.
- Anti-pinch and Non-slip Grip: Ergonomically designed FASTPRO grip provides comfort, leverage, and reduces vibration and hand fatigue.
- High-grade Heat-treated Alloy Steel: Ensures durability and strength for demanding tasks.
- Adjustable Locking Mechanism: Allows for custom grip force that securely locks onto various shapes without slipping.
- Machined Jaws: Designed to grip items securely for ultimate control and prevent stripping.
- One-handed Squeeze Action and Trigger Release: Facilitates quick re-positioning and ease of use.
Utility Pliers Features

Figure 6: The complete FASTPRO 7-piece Utility Pliers Set, showcasing the variety of tools included.

Figure 7: Detailed view of FASTPRO Combination Pliers, highlighting precision machined cutting edges and heat-treated crushing area.

Figure 8: Detailed view of FASTPRO Diagonal Cutting Pliers, showing HRC 56 hardness and laser heat-treated cutting edges.

Figure 9: Detailed view of FASTPRO Long Nose Pliers, illustrating heat-treated teeth for better holding power and carbon steel construction.
- Basic Type Pliers: Multiple sizes and types for use on almost any object.
- Carbon Steel Construction: Provides superior performance and durability.
- Precision Machined Cutting Edges: Ensures perfect mating and extended cutting edge life (for cutting pliers).
- Heat-treated Teeth/Crushing Area: Improves holding power and overall tool longevity.
- Double Dipped Grips: Offers enhanced comfort during prolonged use.
Setup
The FASTPRO pliers sets are ready for immediate use upon unboxing. No assembly is required. Before first use, perform the following checks:
- Inspect Tools: Visually inspect each plier for any signs of damage, such as bent jaws, cracked handles, or loose components. Do not use damaged tools.
- Clean Tools: Wipe down tools with a clean, dry cloth to remove any manufacturing residues or protective coatings.
- Lubricate Joints: Apply a small amount of light machine oil to the pivot points of all pliers to ensure smooth operation.
Operating Instructions
Using Locking Pliers

Figure 4: Demonstrating the adjustment and locking mechanism of the FASTPRO Locking Pliers for secure gripping.

Figure 5: A person holding a FASTPRO Locking Plier, illustrating its ergonomic design and comfortable grip.
- Adjust Jaw Opening: Rotate the screw at the end of the handle to adjust the jaw opening to slightly wider than the object you intend to grip.
- Position Pliers: Place the jaws around the workpiece.
- Lock Pliers: Squeeze the handles together firmly until the jaws lock onto the workpiece. The locking mechanism will engage, holding the jaws in place.
- Release Pliers: To release, press the lever located on one of the handles. This will disengage the locking mechanism, allowing the jaws to open.
- Safety Note: Always ensure a secure grip before applying significant force. Avoid over-tightening, which can damage the workpiece or the tool.
Using Utility Pliers
The utility pliers set includes various types, each designed for specific tasks:
- Combination Pliers: Use for gripping, bending, and cutting wires. The serrated jaws provide a strong grip, while the cutting edges are suitable for various wire types.
- Diagonal Cutting Pliers: Specifically designed for cutting wires and small metal components. Position the wire deep into the jaws for a clean cut.
- Long Nose Pliers: Ideal for reaching into tight spaces, bending small loops in wire, or holding small components. The fine tips allow for precision work.
- Slip Joint Pliers: Features a pivot that can be shifted to change the jaw opening, allowing for gripping objects of different sizes.
- Groove Joint Pliers: Offers multiple jaw positions for gripping larger or irregularly shaped objects.
- Safety Note: Always wear appropriate eye protection when using cutting pliers. Do not use pliers as hammers or pry bars.
Maintenance
Proper maintenance extends the life of your tools and ensures their continued performance.
- Cleaning: After each use, wipe down pliers with a clean, dry cloth to remove dirt, grease, and moisture. For stubborn grime, use a mild degreaser and then wipe dry.
- Lubrication: Periodically apply a light coat of machine oil to the pivot points and jaw mechanisms to prevent rust and ensure smooth operation.
- Storage: Store pliers in a dry environment to prevent corrosion. Keep them organized in a tool roll or box to protect the jaws and handles from damage.
- Inspection: Regularly inspect tools for wear, damage, or dull cutting edges. Replace or repair damaged tools promptly.
Troubleshooting
| Problem | Possible Cause | Solution |
|---|---|---|
| Locking pliers difficult to lock/unlock | Lack of lubrication; debris in mechanism; adjustment screw too tight. | Apply lubricant to pivot points and locking mechanism. Clean any visible debris. Loosen the adjustment screw slightly. |
| Utility pliers feel stiff | Lack of lubrication; rust buildup. | Apply light machine oil to the pivot joint. If rust is present, use a rust remover and then lubricate. |
| Cutting edges are dull or damaged | Normal wear and tear; improper use (e.g., cutting hardened materials). | Cutting edges on these tools are not typically user-sharpenable. If severely dull or damaged, consider replacing the plier. |
| Pliers slipping on workpiece | Jaws are worn; incorrect plier type for task; insufficient grip. | Ensure jaws are clean and free of grease. For locking pliers, adjust the screw for a tighter grip. Use the correct plier type for the material and shape. If jaws are severely worn, replacement may be necessary. |
Specifications
| Attribute | Detail |
|---|---|
| Brand | FASTPRO |
| Model Number | FASTPRO_SOMETHING |
| Material | Alloy Steel |
| Handle Material | Alloy Steel |
| Color | Red (Handles) |
| Style | FASTPRO Locking Pliers & Utility Pliers Set |
| Usage | Gripping, Adjusting, Manipulating, Cutting |
| Grip Type | Ergonomic |
Warranty and Support
FASTPRO stands behind the quality of its products. For information regarding warranty coverage, product support, or to report any issues, please refer to the contact information provided with your purchase or visit the official FASTPRO website. Keep your purchase receipt as proof of purchase.