
BetterSub BYBS-XY008B1
BetterSub 5-in-1 Heat Press Machine User Manual
Model: BYBS-XY008B1
1. Introduction
Thank you for choosing the BetterSub 5-in-1 Heat Press Machine. This industrial-quality, multifunction heat transfer machine is designed for sublimation printing on various items including T-shirts, hats, mugs, and plates. It features a 12x15 inch heat plate and operates on 110V with 1000W power, ensuring quick heating and safe operation. This manual provides detailed instructions for setup, operation, maintenance, and troubleshooting to help you achieve optimal results.
2. Safety Instructions
- Always operate the machine on a stable, heat-resistant surface.
- Keep hands and clothing clear of the heating elements during operation. The heat plate reaches high temperatures.
- Ensure proper ventilation in your workspace to dissipate heat and fumes.
- Do not touch the heating plate or mug/cap/plate attachments immediately after use; allow them to cool down.
- Unplug the machine from the power outlet when not in use or before cleaning and maintenance.
- Do not immerse the machine or its electrical components in water or other liquids.
- Keep out of reach of children.
- Use only with a grounded 110V power supply.
3. Package Contents
The BetterSub 5-in-1 Heat Press Machine package includes the following components:
- Main Heat Press Unit (12x15 inch flat press)
- Cap Press Attachment (8x15 cm)
- Cylinder-shaped Mug Press Attachment (11 oz)
- Plate Press Attachment (12.5 cm)
- Plate Press Attachment (15 cm)
- Power Cord
- User Manual

Image 3.1: Overview of the BetterSub 5-in-1 Heat Press Machine and its included attachments.

Image 3.2: Detailed dimensions of the main unit and various attachments, including the cap heater and cylindrical mug press.
4. Product Features
- 360-Degree Rotation Design: The swing-away design allows the heating element to be moved safely to the side, reducing the chance of accidental contact and providing a full view of your work.
- Convenient LCD Control Board: Features a digital LCD display for precise control over temperature (0-440℉) and time (0-999s).
- Upgraded Heating Tubes: Designed for rapid and even heating, ensuring consistent results and a fireproof design for enhanced safety.
- Adjustable Pressure Knob: Allows for fine-tuning of pressure to suit different material thicknesses.
- Solid-State Relays: Provides superior circuit protection compared to electronic relays, preventing over-voltage issues.

Image 4.1: Illustration of the 360-degree rotation design and key components like the adjustable pressure knob, portable handle, and LCD control board.
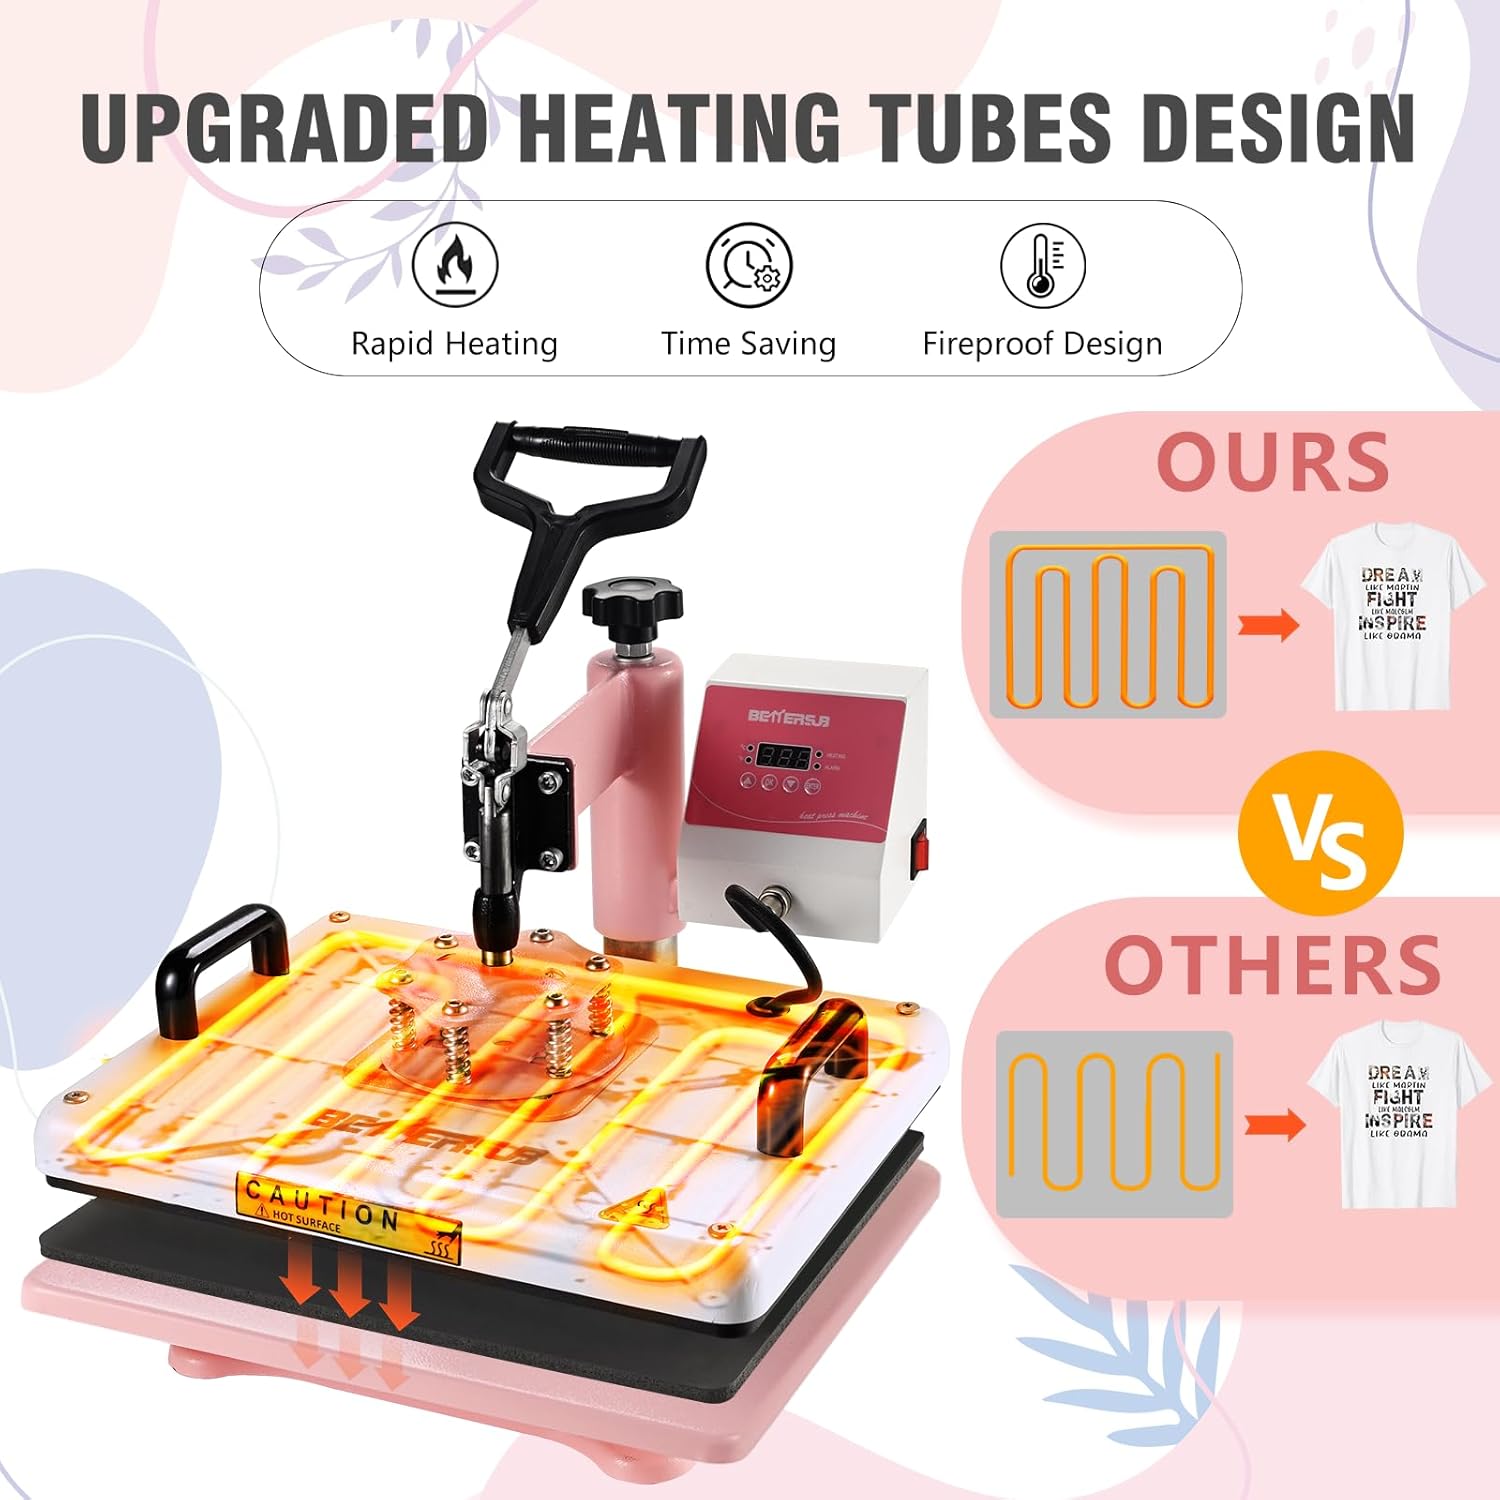
Image 4.2: Comparison showing the upgraded heating tube design for rapid, time-saving, and fireproof heating.
5. Setup
Before operating your heat press machine, ensure it is properly set up.
5.1 Initial Assembly
- Place the main heat press unit on a sturdy, flat, and heat-resistant surface.
- Ensure there is adequate space around the machine for safe operation and heat dissipation.
- Connect the power cord to the machine and then to a grounded 110V power outlet.
5.2 Attaching Accessories
The machine comes with various attachments for different items. Follow these general steps to attach them:
- For Mug/Cap/Plate Attachments: Locate the appropriate connection points on the main unit. These usually involve unscrewing the existing flat press platen (if necessary) and securely fastening the desired attachment using the provided screws or quick-release mechanisms.
- Ensure all connections are tight and secure before powering on the machine.
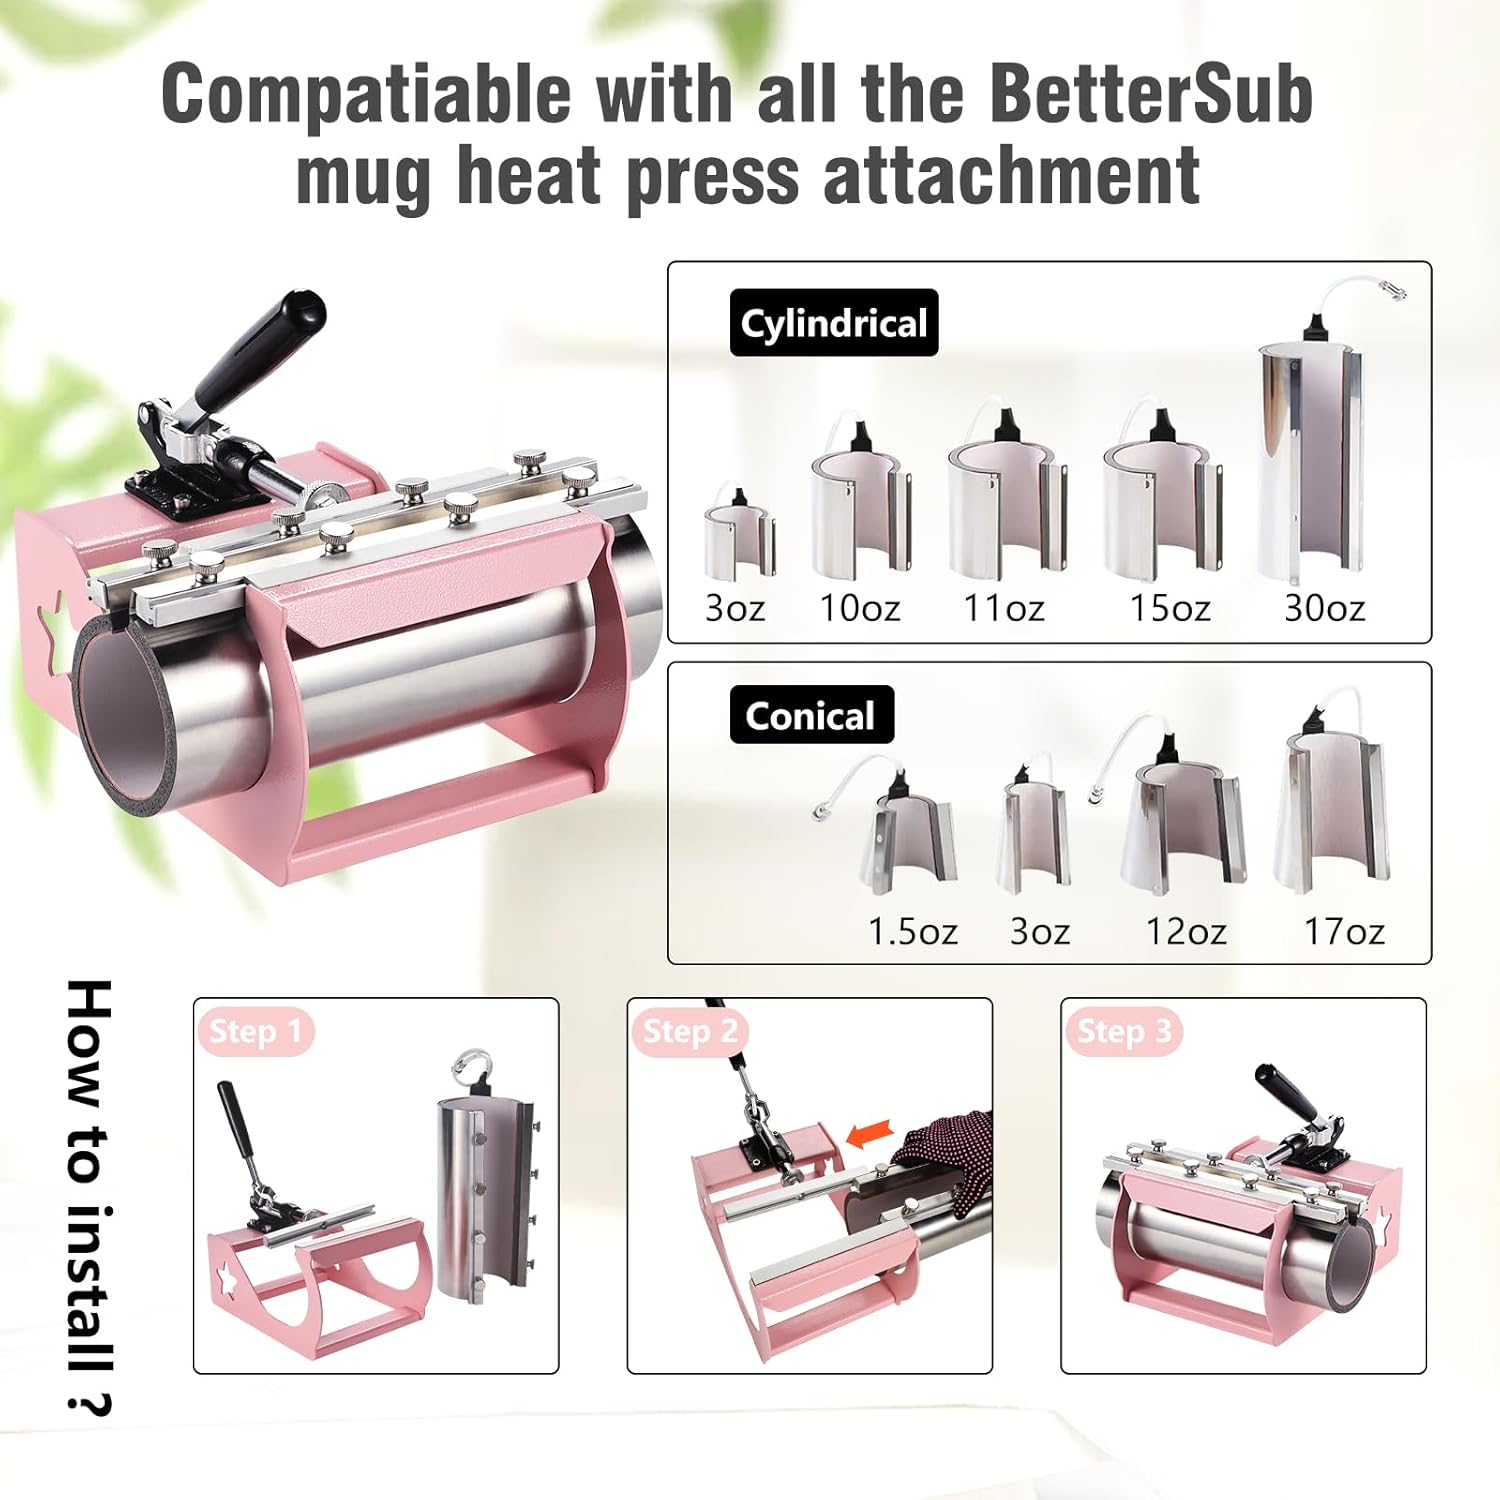
Image 5.1: Step-by-step guide for installing the cylindrical mug press attachment onto the main unit.
6. Operating Instructions
This section outlines the general operation of the heat press machine and specific instructions for each attachment.
6.1 General Operation
- Power On: Plug the machine into a grounded 110V outlet and turn on the power switch, usually located on the side or back of the control box. The LCD display will illuminate.
- Set Temperature: Use the digital control panel to set your desired temperature. Refer to your transfer material's instructions for recommended settings. Press the 'SET' button, then use the arrow keys to adjust the temperature, and press 'SET' again to confirm.
- Set Time: Similarly, set the desired pressing time using the digital control panel. Press 'SET', adjust with arrow keys, and press 'SET' to confirm.
- Preheating: Allow the machine to preheat until it reaches the set temperature. The display will show the current temperature rising.
- Adjust Pressure: Use the pressure adjustment knob (typically located on top of the main platen) to set the appropriate pressure for your item. Turn clockwise for more pressure, counter-clockwise for less. Test on a scrap item if unsure.
6.2 T-Shirt/Flat Item Pressing
- Ensure the flat platen is installed.
- Place your T-shirt or flat item onto the silicone pad on the lower platen. Smooth out any wrinkles.
- Position your transfer design onto the item.
- Swing the upper platen over the item.
- Lower the handle to engage the press. The timer will start automatically.
- Once the timer alarms, lift the handle and swing the upper platen away.
- Carefully remove the transfer and the item.
6.3 Mug Pressing
- Install the mug press attachment.
- Wrap your transfer design around the mug and secure it with heat-resistant tape.
- Place the mug into the mug press attachment.
- Close the clamp to apply pressure. The timer will start.
- When the timer alarms, open the clamp and carefully remove the hot mug. Use heat-resistant gloves.
- Allow the mug to cool before removing the transfer paper.
6.4 Cap Pressing
- Install the cap press attachment.
- Place the cap onto the lower platen of the cap press.
- Position your transfer design onto the cap.
- Lower the upper platen and engage the press. The timer will start.
- After the timer alarms, lift the platen and remove the cap.
6.5 Plate Pressing
- Install the appropriate size plate press attachment.
- Place the plate onto the lower platen of the plate press.
- Position your transfer design onto the plate.
- Lower the upper platen and engage the press. The timer will start.
- After the timer alarms, lift the platen and carefully remove the hot plate. Use heat-resistant gloves.
7. Maintenance
- Cleaning: Regularly wipe down the exterior of the machine with a damp cloth when it is cool and unplugged. Do not use abrasive cleaners.
- Platen Care: For the flat platen, if any residue builds up, gently clean it with a non-abrasive cloth and a specialized heat press platen cleaner (when cool).
- Storage: Store the machine in a dry, dust-free environment when not in use.
- Inspection: Periodically check all cables and connections for any signs of wear or damage.
8. Troubleshooting
| Problem | Possible Cause | Solution |
|---|---|---|
| Machine does not power on | Power cord not connected; Power switch off; Outlet issue | Check power cord connection; Turn on power switch; Test outlet with another device |
| Uneven heating | Faulty heating element; Incorrect temperature setting | Contact customer support; Verify temperature settings |
| Transfer not adhering | Insufficient temperature; Insufficient pressure; Incorrect time; Wrong transfer paper | Increase temperature; Increase pressure; Extend pressing time; Ensure correct transfer paper for material |
| Transfer image is faded or blurry | Too much pressure; Too high temperature; Too long time | Reduce pressure; Lower temperature; Shorten pressing time |
| LCD display not working | Loose connection; Control board issue | Check connections (if accessible); Contact customer support |
9. Specifications
| Feature | Specification |
|---|---|
| Model Number | BYBS-XY008B1 |
| Brand | BetterSub |
| Main Platen Size | 12 x 15 inches (29 x 38 cm) |
| Cap Press Size | 8 x 15 cm |
| Mug Press Size | 11 oz (Cylinder-shaped) |
| Plate Press Size 1 | 12.5 cm |
| Plate Press Size 2 | 15 cm |
| Voltage | 110 Volts |
| Wattage | 1000 Watts |
| Temperature Range | 0-440℉ (0-226℃) |
| Time Range | 0-999 seconds |
| Product Dimensions | 20.08 x 18.5 x 16.54 inches |
| Item Weight | 49.5 pounds |
| Material | Metal |
10. Support
For further assistance, detailed videos, or if you encounter issues not covered in this manual, please refer to the official BetterSub support channels. Professional instructions and additional resources are available to help you use your machine effectively.
Please visit the BetterSub Store on Amazon for more information: BetterSub Store
Ask a question about this manual
Ask about setup, troubleshooting, compatibility, parts, safety, or missing instructions. Manuals+ will review the question and use this page’s manual context to help answer it.