1. Introduction and Product Overview
This manual provides detailed instructions for the safe and effective use of your CIGARLOONG Cigar Cutter and Lighter Set. Please read all instructions carefully before use and retain this manual for future reference.

Image 1.1: The CIGARLOONG Cigar Cutter and Lighter Set, presented in its gift packaging.
2. Setup and Initial Use
2.1 Lighter Refilling Instructions
The cigar lighter is shipped without butane fuel due to shipping regulations. It must be refilled before first use. Use only high-quality butane gas for refilling.
- Exhaust Air: Before refilling, ensure all residual air is exhausted from the lighter. Use a small screwdriver or a similar tool to press the inflation port (located at the bottom of the lighter) firmly until all gas is released.
- Refill Butane: Invert the butane gas canister and insert its nozzle into the lighter's inflation port. Press down firmly for 5-8 seconds. Repeat this process 3-5 times. Stop filling once the gas begins to overflow, indicating it is full.
- Warm-up: After refilling, the lighter may not ignite immediately due to temperature differences or air trapped inside. Hold the lighter in your hands for a minute or two to allow the gas temperature to stabilize.

Image 2.1: Using a screwdriver to exhaust air from the lighter's inflation port.

Image 2.2: Close-up of the lighter's bottom, indicating the inflation port and flame adjustment screw.
2.2 Flame Adjustment
The flame height can be adjusted using the screw located at the bottom of the lighter. Use a small screwdriver to turn the screw:
- Turn towards '–' to decrease flame height.
- Turn towards '+' to increase flame height.
3. Operating Instructions
3.1 Cigar Cutter Usage
The V-cut cigar cutter is designed to provide a deep, precise cut for optimal draw and flavor. It is suitable for cigars up to 60 ring gauge.
- Open Cutter: Pull the tab to open the cutter blades.
- Insert Cigar: Place the head of the cigar into the V-shaped opening. Ensure the cigar is positioned correctly for the desired depth of cut.
- Cut Cigar: Firmly and swiftly push the tab to close the blades, cutting the cigar. The stainless steel blades ensure a sharp and clean cut.

Image 3.1: The sharp stainless steel V-cut blade of the cigar cutter.

Image 3.2: Demonstrating the use of the V-cut cigar cutter on a cigar, suitable for diameters up to 23mm.
3.2 Lighter Operation
The lighter features a powerful jet flame for efficient cigar lighting.
- Activate Flame: Press the ignition button or lever to activate the jet flame.
- Light Cigar: Hold the cigar at a slight angle above the flame, rotating it to ensure an even light.
- Release: Release the ignition button to extinguish the flame.
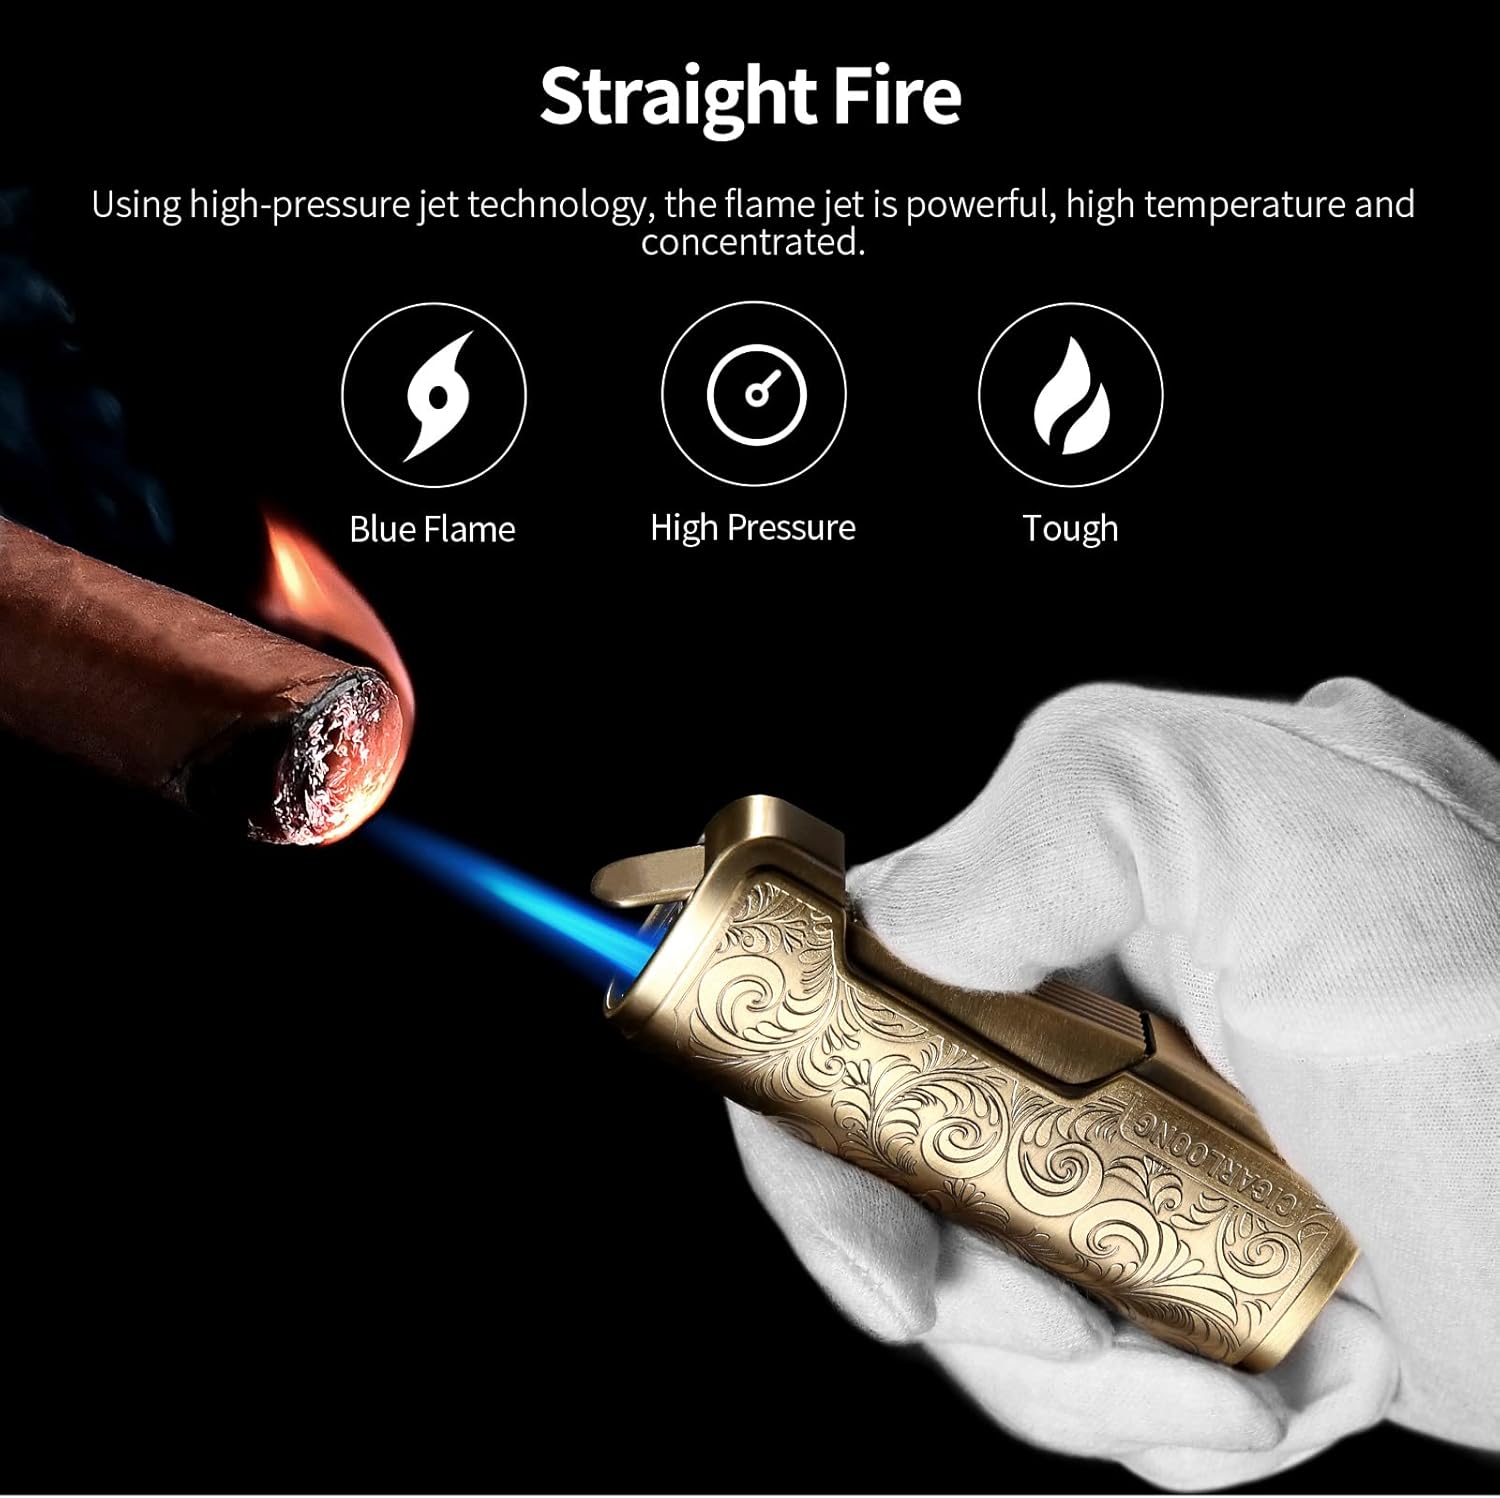
Image 3.3: The lighter producing a strong, concentrated blue jet flame for lighting cigars.
Video 3.1: An overview of the CIGARLOONG Cigar Cutter and Lighter Set, demonstrating its features and general operation.
4. Care and Maintenance
To ensure the longevity and optimal performance of your CIGARLOONG set, follow these maintenance guidelines:
- Cleaning: Wipe the cigar cutter and lighter with a soft, dry cloth after each use to remove any residue or fingerprints. For engraved surfaces, use a soft brush to gently clean crevices.
- Storage: Store the set in its original packaging or a protective case when not in use to prevent scratches and damage.
- Lighter Fuel: Always use high-quality butane fuel to prevent clogging and ensure consistent performance.
5. Troubleshooting Guide
If you encounter issues with your lighter, refer to the common problems and solutions below. For visual guidance, please refer to Video 5.1.
Video 5.1: Detailed instructions on troubleshooting common issues with CIGARLOONG lighters, including gas inflation, valve adjustment, and fuse positioning.
5.1 Lighter Does Not Ignite After Refill (Gas Inflation Issue)
Problem: The lighter does not ignite after refilling, or only produces a weak flame.
Solution: Ensure all air is exhausted from the lighter before refilling. After refilling, cover the lighter with your hands or wait 1-2 minutes to allow the gas temperature inside the lighter to warm up and stabilize. This helps prevent ignition issues due to lack of oxygen or gas volatilization.
5.2 Lighter Hears Gas but No Flame (Valve Too Large)
Problem: When attempting to light, you hear gas escaping but no flame ignites.
Solution: This indicates the gas valve is set too large. Use a small screwdriver to adjust the valve towards the '–' direction (smaller value) until proper ignition is achieved.

Image 5.1: Adjusting the lighter's gas valve using a screwdriver.
5.3 Lighter Burns Briefly Then Goes Out (Valve Too Small)
Problem: The lighter ignites but the flame quickly extinguishes.
Solution: This suggests the gas valve is set too small. Use a small screwdriver to adjust the valve towards the '+' direction (larger value) to increase gas flow and maintain a stable flame.
5.4 Gas Comes Out, But No Fire (Fuse Position Shifted)
Problem: Gas is released, but the lighter fails to produce a flame.
Solution: Turn off the gas flow first. Check if the fuse position of the burner has shifted. If it has moved, use a suitable tool to gently correct its position and align it towards the center of the burner hole (crater).

Image 5.2: Adjusting the fuse position within the lighter's burner.
6. Product Specifications
| Feature | Detail |
|---|---|
| Brand | CIGARLOONG |
| Model | B09SFNMR6D |
| Material | Stainless Steel (Cutter), Alloy (Lighter) |
| Cutter Type | V-Cut |
| Max Cigar Diameter (Cutter) | Up to 23mm (approx. 60 ring gauge) |
| Lighter Fuel Type | Butane (Liquefied Petroleum Gas) |
| Lighter Flame Type | Jet Flame |
| Item Weight | 12.1 ounces (total set) |
| Package Dimensions | 6.03 x 5.56 x 1.62 inches |
7. Warranty and Customer Support
CIGARLOONG is committed to ensuring a positive experience with our products. If you have any questions, concerns, or encounter any issues with your Cigar Cutter and Lighter Set, please do not hesitate to contact our customer support team. We are dedicated to providing assistance and ensuring your satisfaction.
Please refer to your purchase documentation or the retailer's website for specific warranty details and contact information.