1. Introduction
This manual provides detailed instructions for the safe and efficient operation of your HCK Kegerator Model K150. This versatile appliance functions as both an outdoor kegerator and a beverage refrigerator, designed for optimal performance in various settings, including patios and home bars. Please read this manual thoroughly before installation and use to ensure proper functionality and longevity of your unit.

Figure 1.1: HCK Kegerator Model K150 with three taps and guard rail.
2. Safety Information
To reduce the risk of fire, electric shock, or injury when using your appliance, follow these basic precautions:
- Read all instructions before using the appliance.
- Do not touch cold surfaces immediately after turning on the unit.
- Ensure the appliance is properly grounded.
- Do not operate the appliance with a damaged cord or plug.
- Keep ventilation openings clear of obstruction.
- Allow the unit to sit upright for at least 24 hours before plugging it in to allow refrigerant fluids to settle.
3. Product Features
- 2-in-1 Kegerator & Refrigerator: Easily switch between modes. Accommodates one US-standard full-size keg, two quarter barrels, or three sixth barrels. Can also hold up to 161 cans with shelves installed.
- Enhanced Freshness & Beer Taste: Powerful compressor cooling system with adjustable temperature from 32°F to 50°F. Features auto-defrost and temperature memory.
- Complete Kegerator Kit: Includes D-system tapping kit, guard rail, drip tray, casters, three wire shelves, and a lockable CO₂ tank bracket.
- Flexible Installation: Designed for freestanding or built-in use. Features a reversible stainless steel door and four casters (two lockable) for mobility and stability.

Figure 3.1: The kegerator's interior configured for both kegs and canned beverages.

Figure 3.2: Digital temperature control panel for precise cooling.
4. Setup and Installation
4.1 Unpacking and Initial Placement
- Carefully remove all packaging materials.
- Place the unit on a flat, stable surface.
- Ensure adequate clearance (1.2 inches from the back wall, 0.4 inches from each side, and 0.6 inches from the top) for proper ventilation.
- Allow the unit to stand upright for 24 hours before plugging it in.

Figure 4.1: Kegerator dimensions and recommended clearance for installation.
4.2 Attaching the Guard Rail and Drip Tray
- The guard rail can be easily attached to the top surface of the kegerator to prevent items from falling.
- Place the drip tray directly below the beer taps to catch any spills. The drip tray is removable for easy cleaning.

Figure 4.2: Drip tray and guard rail in place on the kegerator.
4.3 Kegerator Kit Assembly
Your HCK Kegerator comes with a complete D-system tapping kit. Follow the instructions provided with the kit for detailed assembly of the CO₂ tank, regulator, beer lines, and taps.
- Mount the CO₂ tank bracket on the rear of the unit.
- Secure the CO₂ tank to the bracket.
- Attach the regulator to the CO₂ tank.
- Connect the air line from the regulator to the keg coupler.
- Connect the beer line from the keg coupler to the beer tower taps.

Figure 4.3: Complete D-system tapping kit components.
4.4 Door Reversal Guide
The door of your HCK Kegerator is reversible to suit your installation needs. Please keep all removed parts for potential future reversal.
- Detach the bottom hinge plate (3) from the fridge by removing the four locking screws (1). Hold the door firmly after screws are removed.
- Gently pull down to remove the door from the right top hinge piece (5) and place it on a padded surface to avoid damage.
- Transfer the cover caps (6) and (7) on the door to cover the holes (8) and (9).
- Detach the top right hinge piece (5) from the fridge by removing the locking screws (4).
- Transfer the locking screws for the top hinge piece (11) to the right top holes.
- Install the hinge plate (3) to the opposite side.
- Place the axes (2) on the hinge plate and put the door on it.
- Attach the top left hinge (10) and all fittings to the body of the fridge by locking screw onto the left-hand side of the fridge and tighten it after the door is leveled.

Figure 4.4: Overview of the door reversal process.

Figure 4.5: Detaching the bottom hinge plate.

Figure 4.6: Removing the top hinge piece.

Figure 4.7: Installing the hinge plate on the opposite side.
5. Operating Instructions
5.1 Powering On and Temperature Adjustment
- After the 24-hour settling period, plug the unit into a grounded electrical outlet.
- Use the digital control panel to set your desired temperature between 32°F and 50°F. The unit will automatically maintain this setting.
- The auto-defrost feature ensures consistent performance without manual intervention.
5.2 Switching Between Kegerator and Refrigerator Modes
- Kegerator Mode: Install the kegs and tapping kit as described in Section 4.3. Ensure the wire shelves are removed to accommodate the kegs.
- Refrigerator Mode: Remove the kegs and tapping kit. Insert the provided wire shelves to organize canned or bottled beverages.

Figure 5.1: Kegerator interior configured for two kegs.
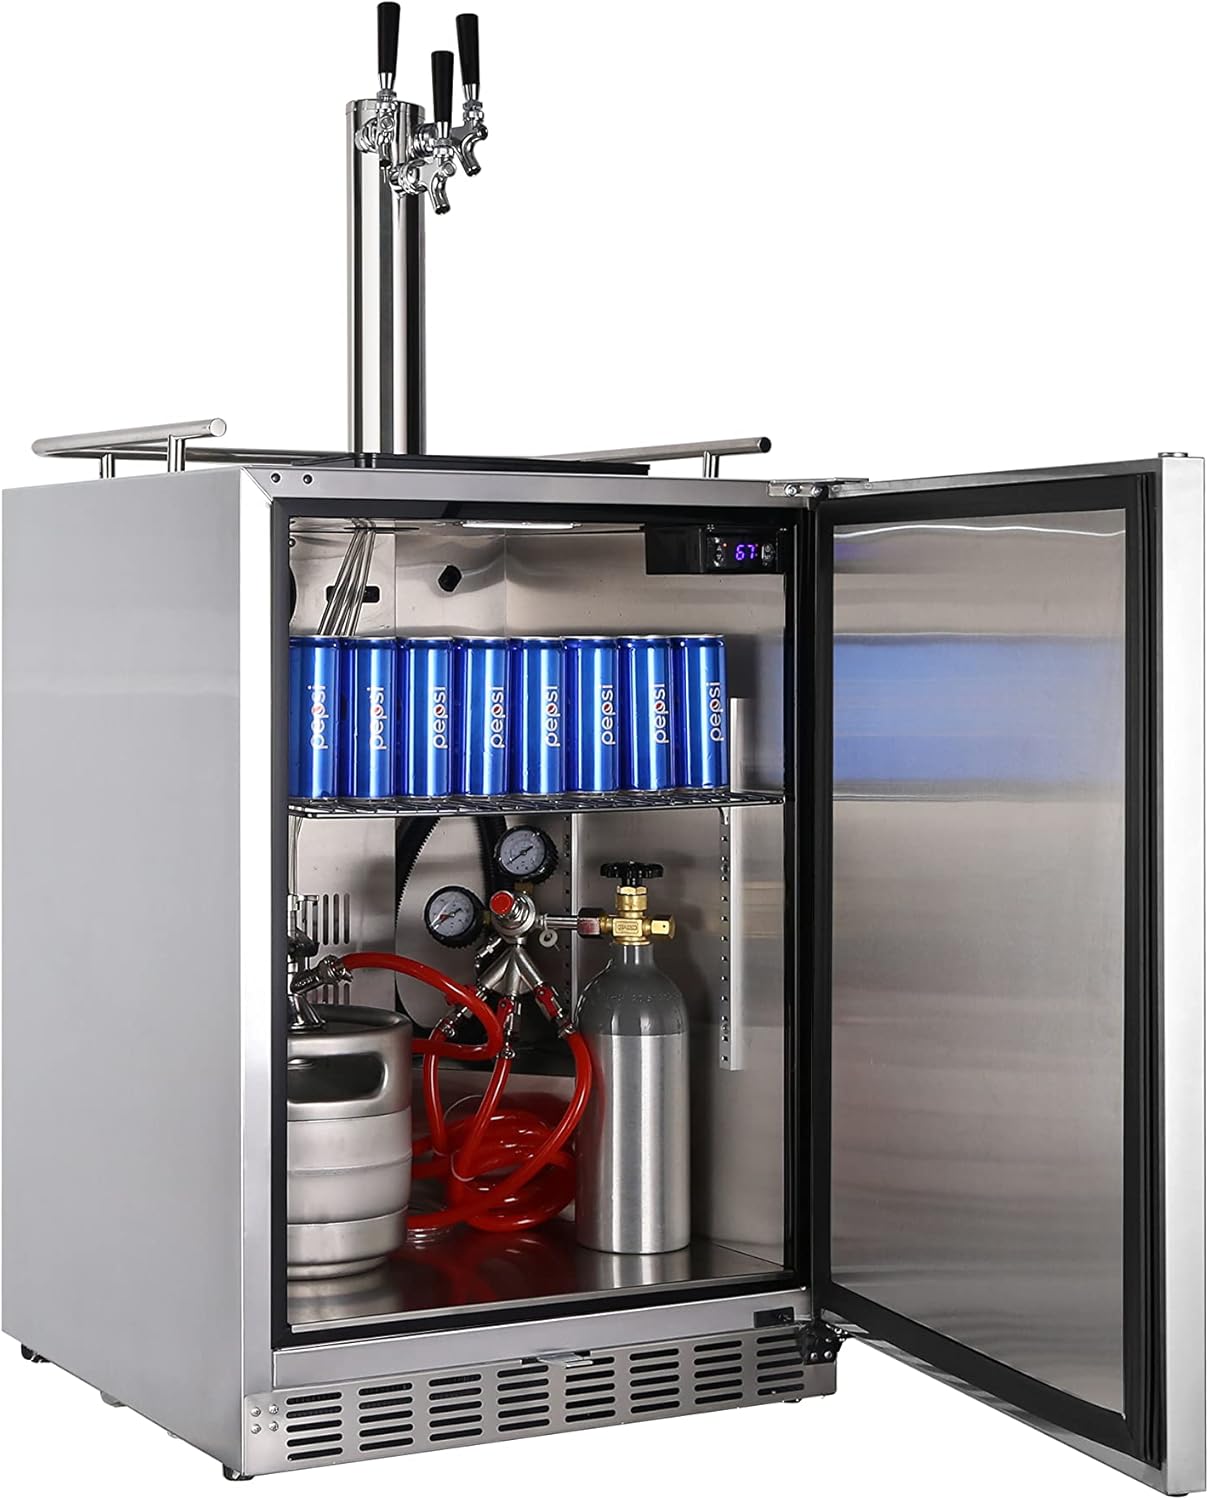
Figure 5.2: Kegerator interior configured as a beverage refrigerator with shelves.
5.3 Dispensing Beverages
- Ensure the CO₂ tank is open and the regulator is set to the appropriate pressure for your beverage.
- Place a glass under the tap.
- Pull the tap handle forward to dispense. Push it back to close.
6. Maintenance
6.1 Cleaning the Drip Tray
The drip tray should be emptied and cleaned regularly to prevent odors and maintain hygiene. Simply lift the tray, empty its contents, wash with mild soap and water, rinse, and dry before replacing.
6.2 Interior Cleaning
Clean the interior of the kegerator periodically with a solution of mild soap and water. Avoid abrasive cleaners or sharp objects that could damage the surfaces. Ensure the unit is unplugged before cleaning.
6.3 Beer Line Cleaning
Regular cleaning of beer lines is crucial for maintaining beverage quality and preventing bacterial growth. Refer to your D-system tapping kit instructions for specific beer line cleaning procedures and recommended cleaning solutions.
7. Troubleshooting
If you experience issues with your HCK Kegerator, consult the following common troubleshooting steps:
| Problem | Possible Cause | Solution |
|---|---|---|
| Unit does not operate | No power; Temperature set too high | Check power connection; Lower temperature setting |
| Temperature is not cold enough | Door not closed properly; Excessive door openings; Poor ventilation | Ensure door is sealed; Minimize door openings; Check for obstructions around vents |
| Beer is foamy | Incorrect CO₂ pressure; Beer line not cold enough; Warm beer | Adjust regulator pressure; Ensure beer line is chilled; Allow keg to cool completely |
| No beer dispenses | Empty keg; CO₂ tank empty; Coupler not properly engaged | Replace keg; Check CO₂ level; Re-engage coupler |
8. Specifications
| Feature | Specification |
|---|---|
| Brand | HCK |
| Model Info | K150 |
| Item Weight | 132.3 pounds |
| Product Dimensions | 23.81 x 24.8 x 34.05 inches |
| Capacity | 6.04 Cubic Feet |
| Annual Energy Consumption | 310 Kilowatt Hours Per Year |
| Noise Level | 45 Decibels |
| Installation Type | Undercounter / Freestanding |
| Special Features | Automatic Defrost, Reversible Door |
| Color | Silver |
| Voltage | 110 Volts (AC) |
| Wattage | 110 watts |
| Number of Shelves | 3 (Wire) |
| Certifications | ETL, DOE |
9. Warranty and Support
Your HCK Kegerator is backed by a 1-year warranty on non-consumable parts and a 3-year warranty on the compressor. For any questions or assistance, please contact our dedicated support team. Ensure you have your model number (K150) and purchase information available when contacting support.