1. Important Safety Instructions
Always follow basic safety precautions when using electrical tools to reduce the risk of fire, electric shock, and personal injury. Read all instructions before operating this tool.
- Work Area Safety: Keep your work area clean and well-lit. Cluttered or dark areas invite accidents. Do not operate power tools in explosive atmospheres, such as in the presence of flammable liquids, gases, or dust.
- Electrical Safety: Power tool plugs must match the outlet. Never modify the plug in any way. Avoid body contact with earthed or grounded surfaces such as pipes, radiators, ranges, and refrigerators.
- Personal Safety: Always wear eye protection (safety glasses or goggles) and hearing protection. Use a dust mask if cutting operations create dust. Dress properly; avoid loose clothing or jewelry. Keep hair, clothing, and gloves away from moving parts.
- Tool Use and Care: Do not force the power tool. Use the correct power tool for your application. Disconnect the plug from the power source before making any adjustments, changing accessories, or storing power tools.
- Circular Saw Specific Safety:
- Keep hands away from the cutting area and the blade. Keep your second hand on the auxiliary handle, or motor housing.
- Do not reach underneath the workpiece.
- Adjust the cutting depth to the thickness of the workpiece. Less than a full tooth of the blade should be visible below the workpiece.
- Never hold the workpiece in your hands or across your leg when cutting. Secure the workpiece to a stable platform.
- Check the lower guard for proper closing before each use. Do not operate the saw if the lower guard does not move freely and close instantly.
- Always use blades of the correct size and shape (diamond vs. round) with the correct arbor hole.
- Never use damaged or incorrect blade washers or bolts.
2. Product Overview
Familiarize yourself with the components of your Enventor 11A Corded Circular Saw before operation.
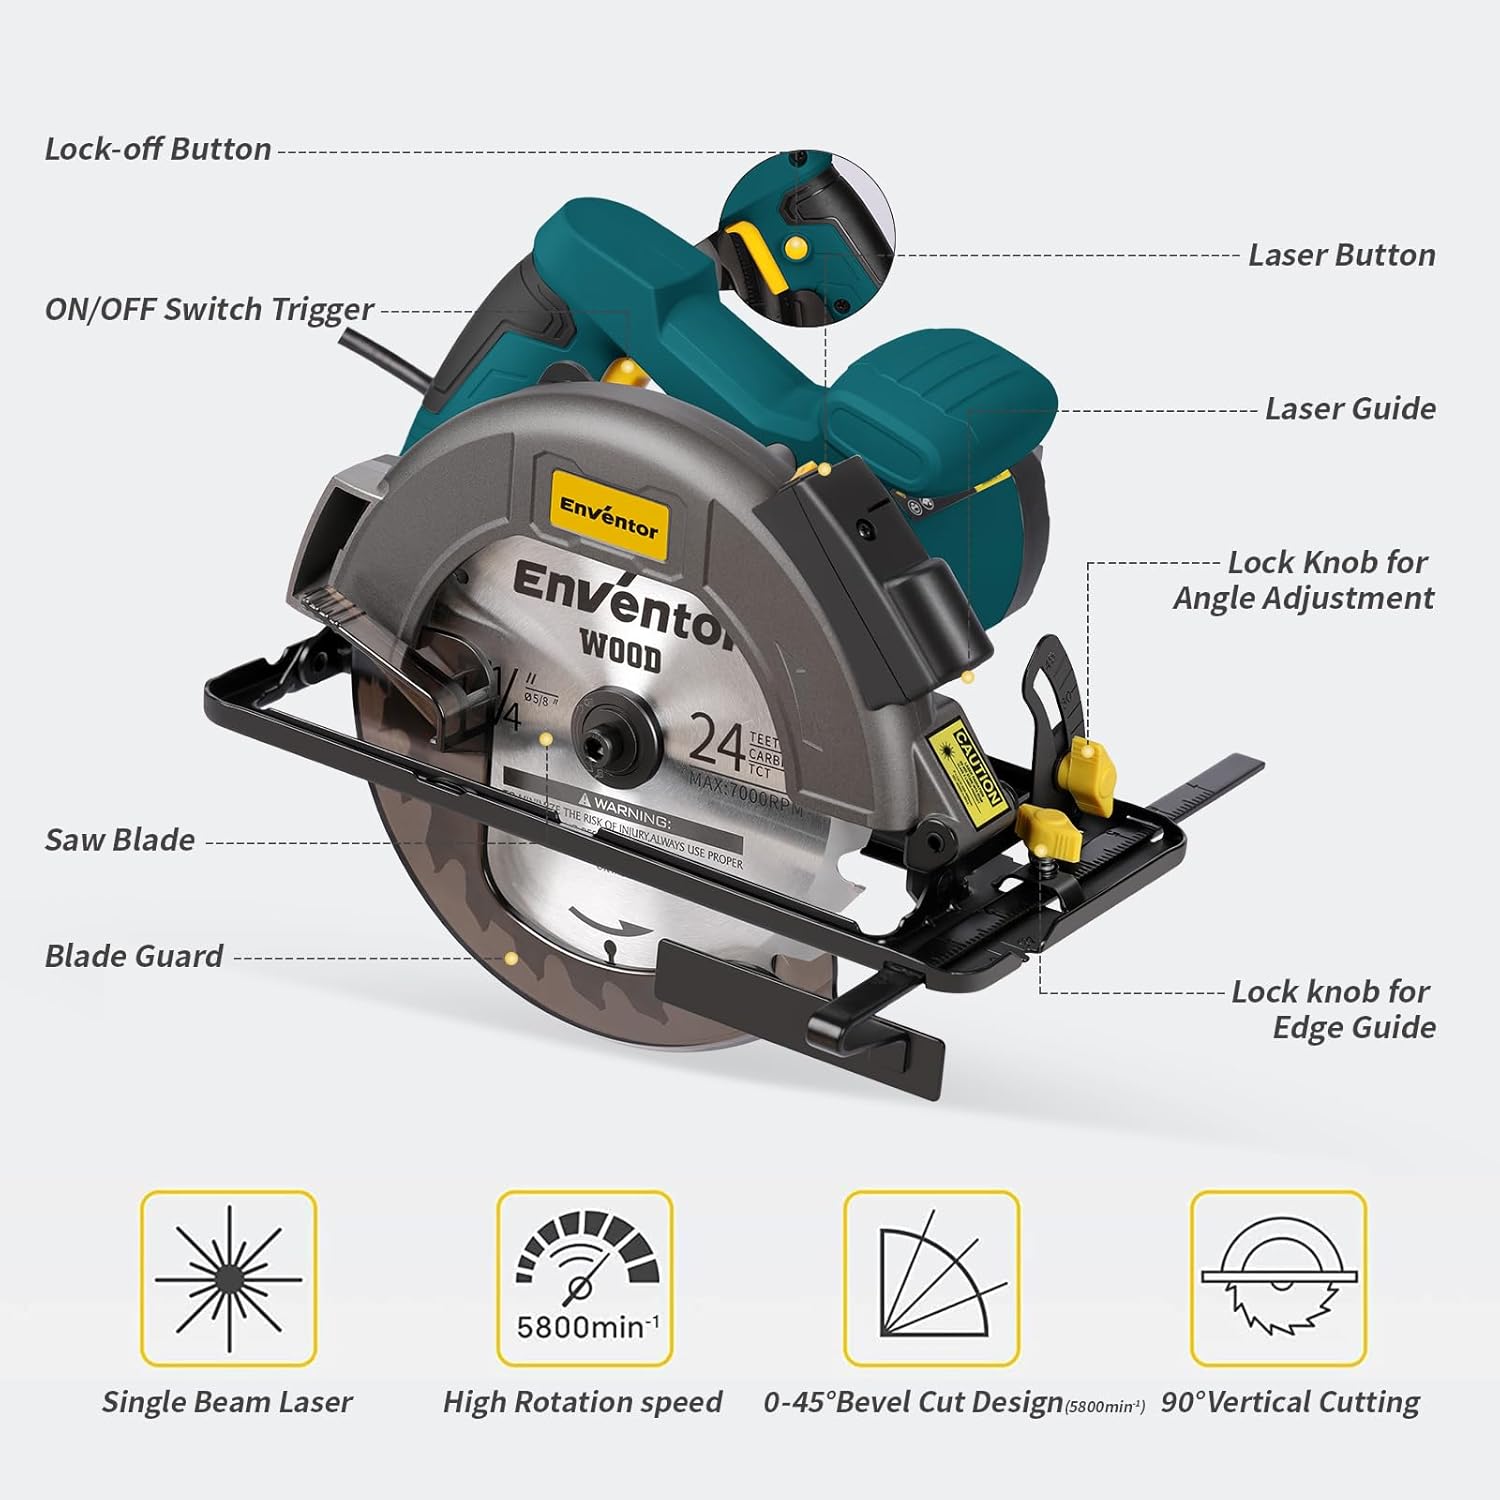
Figure 1: Key components of the Enventor 11A Circular Saw. Labels include Lock-off Button, ON/OFF Switch Trigger, Laser Button, Laser Guide, Lock Knob for Angle Adjustment, Lock Knob for Edge Guide, Saw Blade, and Blade Guard.
- Lock-off Button: Prevents accidental starting. Must be pressed before the ON/OFF Switch Trigger.
- ON/OFF Switch Trigger: Activates the saw.
- Laser Button: Engages the laser guide for precise cutting lines.
- Laser Guide: Projects a laser line onto the workpiece for accurate cuts.
- Lock Knob for Angle Adjustment: Secures the base plate at the desired bevel angle.
- Lock Knob for Edge Guide: Secures the rip guide for parallel cuts.
- Saw Blade: The cutting component of the tool. This model includes 40T and 24T blades.
- Blade Guard: Retractable guard that covers the blade for safety.
3. Setup
3.1 Blade Installation
Ensure the saw is unplugged from the power source before installing or changing blades.

Figure 2: Step-by-step guide for installing the saw blade.
- Step 1: Press and hold the machine rear axle lock switch to prevent the blade from rotating.
- Step 2: Use the provided hexagonal spanner to remove the nut securing the outer blade washer. Turn the nut in the direction indicated on the blade (usually clockwise for loosening).
- Step 3: Carefully place the new saw blade onto the arbor, ensuring the teeth are pointing in the correct direction (usually indicated by an arrow on the blade and the saw).
- Step 4: Reinstall the outer blade washer and tighten the nut firmly with the hexagonal spanner. Ensure the blade is securely fastened.
3.2 Adjusting Cutting Depth
Adjust the cutting depth to slightly exceed the thickness of your workpiece for optimal cutting performance and safety.

Figure 3: The circular saw demonstrating depth adjustment (bottom) and angle adjustment (top).
- Loosen the depth adjustment lever/knob located on the side of the saw.
- Raise or lower the base plate until the blade extends approximately 1/8 inch (3mm) below the material to be cut.
- Tighten the depth adjustment lever/knob securely.
3.3 Adjusting Bevel Angle (0-45°)
The saw allows for bevel cuts from 0° to 45°.
- Loosen the lock knob for angle adjustment.
- Tilt the base plate to the desired angle, aligning the indicator with the angle scale.
- Tighten the lock knob for angle adjustment firmly to secure the setting.
4. Operating Instructions
4.1 Starting and Stopping the Saw
- To start the saw, press the double protection switch (lock-off button) and then squeeze the ON/OFF switch trigger.
- To stop the saw, release the ON/OFF switch trigger.
4.2 Using the Laser Guide
The integrated laser guide helps maintain a straight cutting line.

Figure 4: The laser guide assists in making precise, straight cuts.
- Press the Laser Button to activate the laser guide.
- Align the projected laser line with your desired cutting mark on the workpiece.
- Proceed with the cut, keeping the laser line aligned for accuracy.
4.3 Making a Cut
Always ensure the workpiece is securely clamped before cutting.

Figure 5: The Enventor Circular Saw is suitable for cutting wood, PVC, plasterboard, and bamboo.
- Plug in the saw.
- Hold the saw firmly with both hands.
- Place the front edge of the saw's base plate on the workpiece, ensuring the blade is not touching the material.
- Start the saw by pressing the lock-off button and then the trigger. Allow the blade to reach full speed.
- Slowly guide the saw into the workpiece, maintaining a steady, even pressure. Do not force the saw.
- Once the cut is complete, release the trigger and allow the blade to stop completely before lifting the saw from the workpiece.
5. Maintenance
Regular maintenance ensures the longevity and safe operation of your circular saw. Always unplug the tool before performing any maintenance.
- Cleaning: After each use, clean the saw with a soft cloth to remove dust and debris. Use compressed air to clear ventilation openings. Do not use harsh chemicals or abrasive cleaners.
- Blade Care: Inspect blades regularly for sharpness and damage. Replace dull or damaged blades promptly. Store blades properly to prevent damage.
- Cord Inspection: Periodically check the power cord for cuts, fraying, or damage. If damaged, have it repaired by a qualified technician.
- Lubrication: This tool is designed for maintenance-free operation. No additional lubrication is required.
6. Troubleshooting
Refer to this section for common issues and their solutions.
| Problem | Possible Cause | Solution |
|---|---|---|
| Saw does not start. | No power supply; Lock-off button not pressed; Faulty switch. | Check power connection; Ensure lock-off button is pressed before trigger; Contact customer support if switch is faulty. |
| Blade binds or stalls during cut. | Dull blade; Incorrect cutting depth; Workpiece not properly supported; Forcing the saw. | Replace or sharpen blade; Adjust cutting depth; Secure workpiece; Reduce feed pressure. |
| Inaccurate cuts. | Laser guide misaligned; Blade wobble; Incorrect angle setting. | Check laser guide alignment; Ensure blade is installed correctly and not bent; Verify angle setting. |
| Excessive vibration or noise. | Loose blade; Damaged blade; Internal component issue. | Tighten blade nut; Replace damaged blade; Contact customer support. |
7. Specifications
Technical details for the Enventor 11A Corded Circular Saw (Model SGCS1400).
- Model Number: SGCS1400
- Power Source: Corded Electric
- Current Rating: 11 Amps
- Wattage: 1400 Watts
- Voltage: 110 Volts
- Blade Diameter: 7-1/4 inches (185mm)
- Blade Material: High Speed Steel (TCT Blades included)
- No-Load Speed: Up to 6000 RPM
- Max Cutting Depth (90°): 2-7/16 inches (62mm)
- Max Cutting Depth (45°): 1-8/9 inches (48mm)
- Bevel Capacity: 0-45 Degrees
- Laser Guide: Class II, < 1 mW
- Item Weight: 4.26 Kilograms
- Item Dimensions (L x W x H): 9.5"L x 7"W x 12"H
- Included Components: 1 x 7-1/4" 24T TCT Blade, 1 x 7-1/4" 40T TCT Blade, 1 x Allen Wrench, 1 x Rip Guide, 1 x User Manual
8. Warranty and Support
Enventor provides a Customer Support Warranty for this product. For any questions or issues during use, please contact Enventor customer support.
- Warranty Type: Customer Support Warranty
- Contact: Please refer to the contact information provided in your purchase documentation or visit the official Enventor website for support.
- Response Time: Enventor aims to reply to inquiries within 24 hours.