Product Overview
The JIFETOR 4 Way AC Manifold Gauge Set is a comprehensive HVAC diagnostic and refrigerant charging tool designed for both automotive and household air conditioning systems. It is compatible with R404A, R134A, and R410A refrigerants. This set includes a durable aluminum manifold gauge, four 5-foot color-coded hoses, adjustable quick couplers, an adjustable can tap, and various adapters, all organized in a custom blow-molded case.
What's in the Box

Image: Detailed view of all components included in the JIFETOR 4 Way AC Manifold Gauge Set, showing the manifold, hoses, couplers, can tap, adapters, and valve repair tool kit neatly arranged in the carrying case.
- 1x 4 Way AC Diagnostic Manifold Gauge
- 4x 5FT Color-Coded Charging Hoses (Red, Blue, Yellow, Black)
- 2x Adjustable R134A Quick Couplers (Blue for Low Pressure, Red for High Pressure)
- 1x Adjustable Can Tap (Piercing Type)
- 1x Adapter with Shut Off Valve (1/4" Male to 1/2" Female)
- 1x L-Type Tank Adapter (1/4" Male to 5/16" Female)
- 1x Hose Valve Repair Tool Kit
- 1x Blow Molding Case (14"L x 12"W x 3-1/2"H)
- 1x Instruction Manual
Key Components
AC Manifold Gauge

Image: Close-up view of the 4-way AC manifold gauge, clearly labeling its components including the LP and HP gauges, manifold valves, sight window, evacuation port, charging port, and pressure release valve.
The 4-way, 4-valve double movement heavy-duty aluminum manifold features a blue low-pressure gauge with a range of -30 inHg to 500 PSI and a red high-pressure gauge with a range of -30 inHg to 800 PSI, both in Celsius units. The 3-inch easy-to-read dials and sight window facilitate refrigerant monitoring. A built-in calibration screw and no-flutter pointer ensure accuracy. The purge valve assists in clearing air from the system.
5FT Color-Coded Charging Hoses

Image: A coiled set of four 5-foot color-coded charging hoses (red, blue, yellow, black) with brass fittings, highlighting their robust construction.
- Constructed from rubber nylon resin for anti-corrosion, low fluid resistance, and high bearing pressure.
- Maximum working pressure: 800 PSI. Burst pressure: up to 4000 PSI.
- Each hose is equipped with 1/4" female brass fittings.
- Red Hose: For high pressure.
- Blue Hose: For low pressure.
- Yellow Hose: For charging.
- Black Hose: For evacuation.
Adjustable AC R134A Quick Couplers

Image: A blue low-pressure quick coupler and a red high-pressure quick coupler attached to an automotive AC system's service ports, demonstrating their connection.
These couplers are made from premium brass and aluminum, featuring a quick interface design with an accurate snap lock and anti-slip knurled grip ring. They are compatible with all models using R134A service ports. The blue coupler connects to the AC suction service port, and the red coupler connects to the AC discharge service port. The adjustable red/blue knobs allow for easy clockwise opening and anticlockwise closing, minimizing Schrader valve wear and ensuring leak-free connection/disconnection.
Adjustable Can Tap and Tank Adapters

Image: A collection of accessories including the adjustable can tap, various tank adapters, and the hose valve repair tool kit.
The adjustable can tap is suitable for refrigerant cans with a neck ring diameter smaller than 1.3 inches. It features T-type knobs for easy fingertip operation and an internal pin with a sharp tip for quick piercing of refrigerant bottles. The set also includes tank adapters (1/4" Male to 1/2" Female and 1/4" Male to 5/16" Female) and a hose valve repair tool kit.
Important Safety Information
Please read and understand all safety warnings before operating this equipment. Failure to follow these instructions may result in injury or damage to the equipment.
- Always wear appropriate personal protective equipment, including gloves and safety goggles, when using this tool set.
- This AC refrigerant recharge kit should be used by professionals or under the guidance of a qualified professional.
- Always refer to the equipment manufacturer's operation instructions and compare readings to the manufacturer's recommended specifications.
- Do not use this AC gauge set when pressure exceeds the maximum scale of the high-pressure gauge.
- Do not use this tool as a pressure regulator.
- Ensure the gauge pointer points to zero before use. If not, unscrew the dial screen and reset the pointer by adjusting the calibration screw.
- There is no purge valve for the yellow line. You can slightly loosen it to fill the line with refrigerant before opening the valve.
- When using the adjustable quick coupler to open the AC service port Schrader valve, stop twisting once the gauge pointer begins to move. Over-tightening may wear out the Schrader valve.
Setup and Connection
Proper connection of the manifold gauge set is crucial for accurate diagnostics and safe operation. Follow these steps for initial setup:
- Prepare the Manifold: Ensure all manifold valves are closed before connecting hoses. Check that gauge pointers are at zero.
- Connect Hoses to Manifold:
- Connect the Red Hose to the high-pressure (HP) port on the manifold.
- Connect the Blue Hose to the low-pressure (LP) port on the manifold.
- Connect the Yellow Hose to the charging port (REF) on the manifold.
- Connect the Black Hose to the evacuation port (VAC) on the manifold.
- Connect Quick Couplers:
- Attach the Red Adjustable Quick Coupler to the free end of the Red Hose.
- Attach the Blue Adjustable Quick Coupler to the free end of the Blue Hose.
- Connect Can Tap/Adapters: Depending on the operation, connect the adjustable can tap or appropriate tank adapters to the free end of the Yellow Hose.
- Connect to AC System:
- Connect the Blue Quick Coupler to the AC suction service port (LP side).
- Connect the Red Quick Coupler to the AC discharge service port (HP side).
- To connect, pull up the knurled grip ring on the quick coupler, aim at the service port, press in, then release the ring to lock.
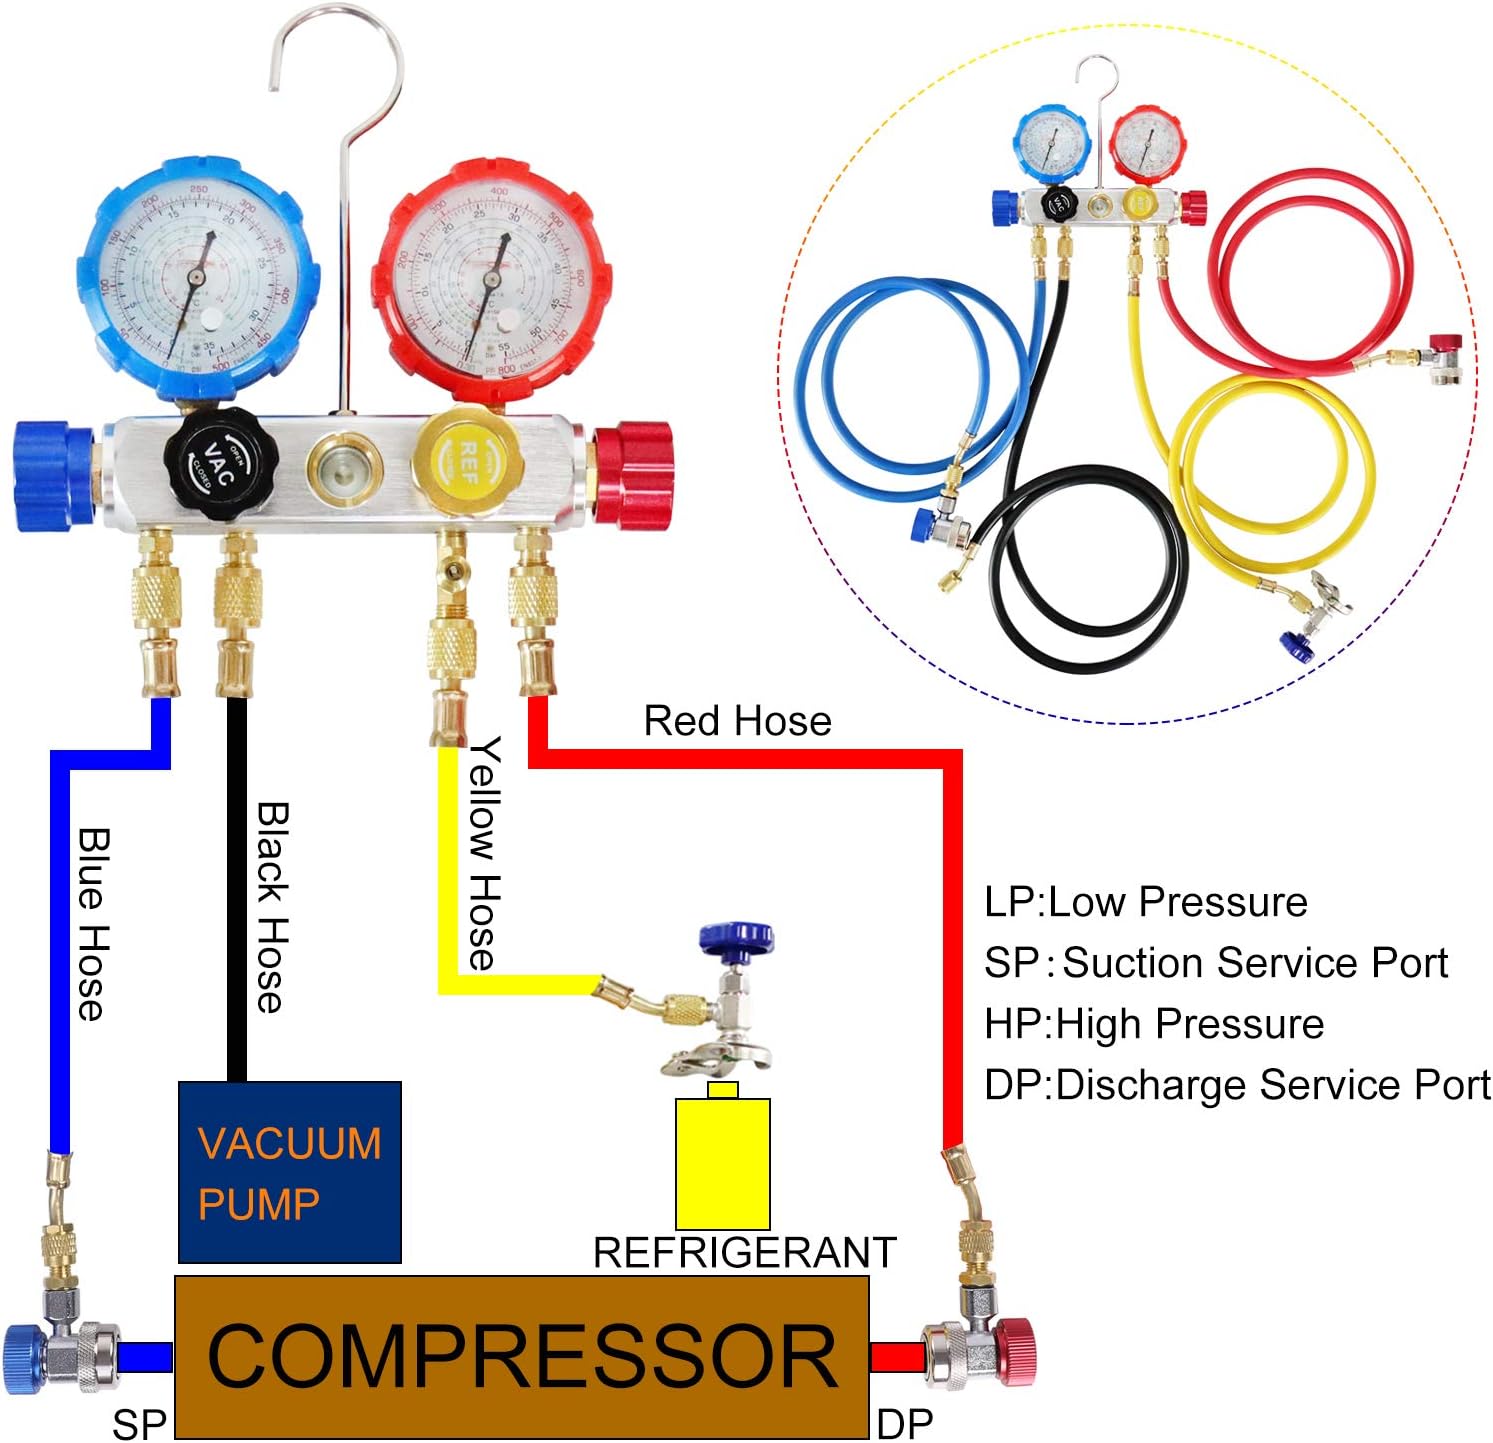
Image: A schematic diagram illustrating the correct hose connections from the manifold gauge to an AC compressor, vacuum pump, and refrigerant tank for various operations.
Operating Instructions
This manifold gauge set is designed for various AC system operations, including diagnostic checks, evacuation/vacuum, refrigerant charging, and recovery. Always consult a professional or refer to specific vehicle/appliance service manuals for detailed procedures and refrigerant specifications.
General Operation Principles
- System Dynamic Pressure Measurement: Connect the blue and red quick couplers to the respective low and high-pressure service ports. With the engine running and AC on, observe the gauge readings to diagnose system performance.
- Refrigerant Recovery and Vacuuming: Connect the black hose to a vacuum pump. Open the appropriate manifold valves to evacuate the system. For recovery, connect to a recovery machine.
- Refrigerant Filling or Replacing: Connect the yellow hose to the refrigerant source (can tap or tank adapter). Ensure the system is properly evacuated before charging. Slowly open the manifold valves to allow refrigerant into the system, monitoring the gauges carefully.
For detailed step-by-step procedures for specific tasks, refer to the included instruction manual and relevant service guides for your AC system.
Maintenance
Regular maintenance ensures the longevity and accuracy of your JIFETOR AC Manifold Gauge Set.
- Cleaning: After each use, wipe down the manifold, hoses, and couplers with a clean, dry cloth to remove any refrigerant residue or dirt.
- Storage: Store the entire set in its customized blow-molded case to protect components from damage and keep them organized. Store in a cool, dry place.
- Hose Inspection: Periodically inspect hoses for cracks, cuts, or signs of wear. Replace damaged hoses immediately to prevent leaks.
- Gauge Calibration: If the gauge pointers do not return to zero, use the built-in calibration screw to adjust them for accuracy.
- O-Ring/Seal Check: Regularly inspect O-rings and seals on couplers and adapters for wear or damage. Replace as needed to maintain a tight seal and prevent refrigerant leaks. The included hose valve repair tool kit can assist with this.
Troubleshooting
This section addresses common issues you might encounter during operation.
- Leakage at Connections:
- Ensure all connections are tightened securely.
- Check O-rings and seals for damage or improper seating. Replace if necessary.
- Verify quick couplers are fully engaged and locked onto service ports.
- Inaccurate Gauge Readings:
- Check if the gauge pointers are properly calibrated to zero before use. Adjust with the calibration screw if needed.
- Ensure the correct refrigerant type is selected and the system is not over-pressurized beyond the gauge's maximum limit.
- Difficulty Piercing Refrigerant Can (Can Tap):
- Ensure the can tap is correctly threaded onto the refrigerant can.
- Verify the can tap's internal pin is sharp and not bent.
- Confirm the can tap is suitable for the can's neck ring diameter (less than 1.3 inches).
- Hoses Not Punching Can Core (if using a different can tap type):
- This specific JIFETOR can tap is a piercing type. If using a different can tap, ensure it is designed to properly engage and open the can's valve.
Specifications
| Brand | JIFETOR |
| Model Number | JT009S4-2 |
| Compatible Refrigerants | R404A, R134A, R410A |
| Low Pressure Gauge Range | -30 inHg to 500 PSI |
| High Pressure Gauge Range | -30 inHg to 800 PSI |
| Hose Length | 5 feet (152 cm) |
| Hose Working Pressure | 800 PSI (Max) |
| Hose Burst Pressure | 4000 PSI |
| Hose Fittings | 1/4" Female Brass |
| Material | Aluminum, Brass, Plastic, Rubber, Steel |
| Product Dimensions (Case) | 14 x 12 x 3.5 inches |
| Item Weight | 7.27 Pounds |
| Thread Type | 1/4-28 Npt |
| UPC | 690770904556 |
Official Product Video
Video: An official product video from JIFETOR demonstrating the features and components of the JT009S4 4 Way AC Manifold Gauge Set, including its various parts and their functions.
Warranty and Support
JIFETOR products are designed for quality and durability. For information regarding product warranty, technical support, or replacement parts, please refer to the contact information provided with your purchase or visit the official JIFETOR website. Always retain your proof of purchase for warranty claims.