Introduction
Thank you for purchasing the H-Tech Car Stereo Auto FM Radio HT-1023. This manual provides essential information for the proper installation, operation, and maintenance of your new car stereo. Please read this manual thoroughly before using the product to ensure optimal performance and safety.
Product Features
- Integrated Bluetooth for wireless audio streaming and hands-free calling.
- Two USB ports: one for mobile phone charging and one for flash drive media playback.
- Four channels with 24W output power for clear audio.
- FM Radio tuner for accessing your favorite stations.
- Includes a remote control for convenient operation.
- Auxiliary input for connecting external audio devices.

Figure 1: Front view of the H-Tech HT-1023 Car Stereo with its display illuminated, showing the FM frequency and various control buttons.
Package Contents
Upon opening the package, please verify that all the following items are included:
- H-Tech HT-1023 Car Stereo Unit
- Remote Control
- Wiring Harness
- User Manual (this document)
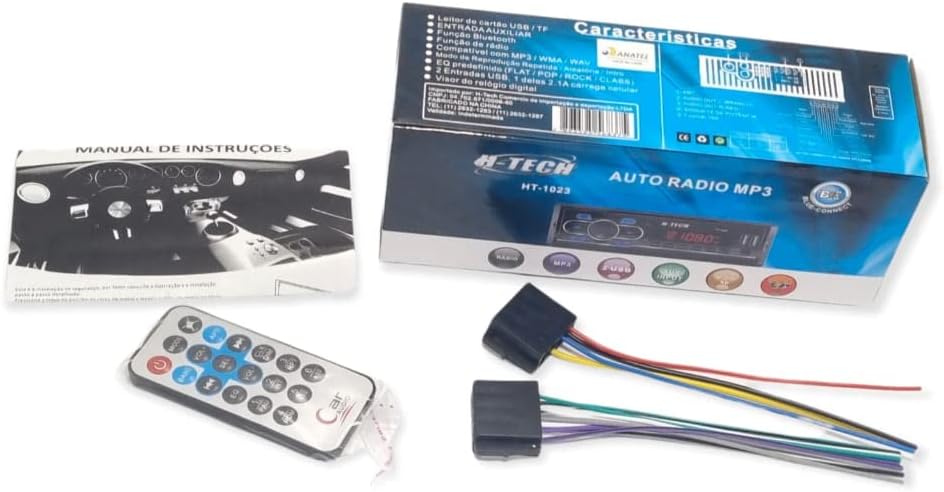
Figure 2: The complete package contents including the H-Tech HT-1023 car stereo unit, its retail box, the remote control, wiring harness, and the instruction manual.
Setup and Installation
The H-Tech HT-1023 is designed for standard 1-DIN car stereo slots. Professional installation is highly recommended to ensure correct wiring and prevent damage to your vehicle's electrical system or the stereo unit.
Wiring Connections
Refer to the wiring diagram provided with the wiring harness. Ensure all connections are secure and properly insulated. Incorrect wiring can lead to malfunction or damage.
- Power (Yellow): Connect to constant 12V power.
- Accessory (Red): Connect to switched 12V power (ignition).
- Ground (Black): Connect to a clean chassis ground point.
- Speaker Wires: Connect to your vehicle's speakers, ensuring correct polarity.
- Antenna: Connect your vehicle's FM antenna.
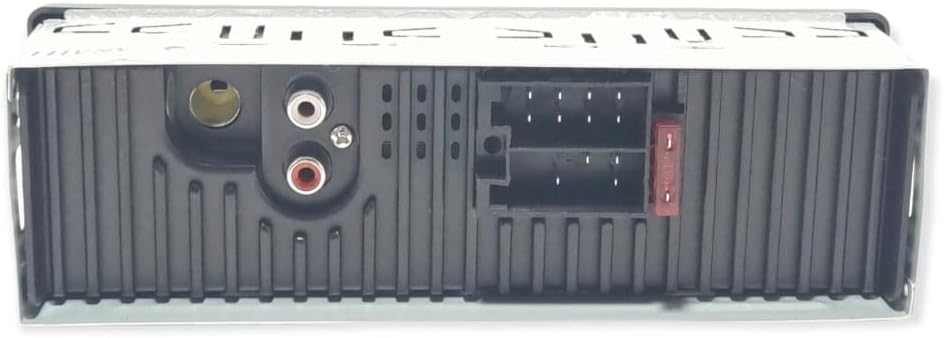
Figure 3: Rear view of the H-Tech HT-1023 Car Stereo, showing the wiring harness connector port, RCA outputs, and antenna input.
Operating Instructions
Front Panel Controls
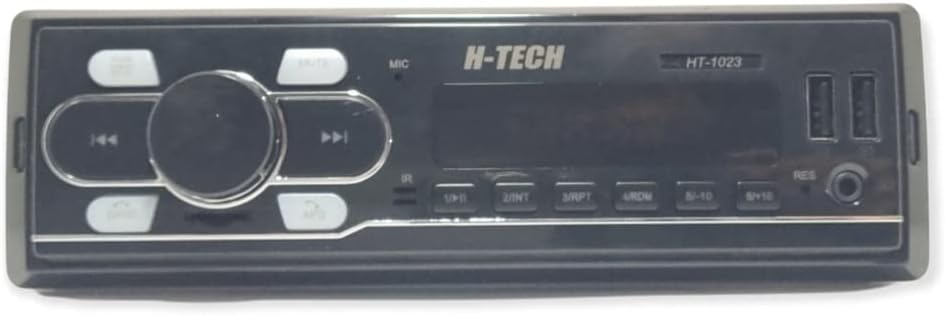
Figure 4: Front panel of the H-Tech HT-1023 Car Stereo, highlighting the various buttons and ports for operation.
- PWR/MOD Button: Press to turn on/off. Short press to cycle through modes (FM, Bluetooth, USB, AUX).
- MUTE Button: Mutes/unmutes audio.
- Volume Knob: Rotate to adjust volume. Press to access menu options (Bass, Treble, Balance, Fader, EQ, Loudness).
- ◀◀ / ▶▶ Buttons: Short press for previous/next track (USB/Bluetooth) or seek (FM). Long press for fast rewind/forward.
- BAND Button: In FM mode, cycles through FM1, FM2, FM3 bands.
- APS Button: In FM mode, automatically scans and stores strong stations.
- USB Ports: One for media playback (flash drive), one for mobile charging.
- MIC: Built-in microphone for Bluetooth hands-free calls.
- RESET Button: Small pinhole button to reset the unit to factory settings.
FM Radio Operation
- Press the PWR/MOD button to select FM mode.
- Press BAND to select FM1, FM2, or FM3.
- Short press ◀◀ or ▶▶ to seek for the next/previous station.
- Long press ◀◀ or ▶▶ to manually tune the frequency.
- Press APS to automatically scan and store strong stations into the current band.
Bluetooth Operation
- Press the PWR/MOD button to select Bluetooth mode. The display will show "BT" or "Bluetooth".
- On your mobile device, enable Bluetooth and search for available devices.
- Select "H-Tech HT-1023" (or similar name) from the list. No password is typically required.
- Once paired, you can stream audio from your device or make/receive calls.
- Use the ◀◀ / ▶▶ buttons to control track playback.
USB Playback
- Insert a USB flash drive into the designated USB port (usually the one not marked for charging).
- The unit will automatically switch to USB mode and begin playing compatible audio files.
- Use the ◀◀ / ▶▶ buttons to navigate tracks.
AUX Input
Connect an external audio device (e.g., MP3 player) to the 3.5mm AUX input jack on the front panel using an audio cable (not included). Press the PWR/MOD button to select AUX mode.
Maintenance
- Cleaning: Use a soft, dry cloth to clean the unit's surface. Do not use abrasive cleaners or solvents.
- Avoid Liquids: Keep the unit away from water and other liquids to prevent damage.
- Temperature: Do not expose the unit to extreme temperatures or direct sunlight for prolonged periods.
Troubleshooting
| Problem | Possible Cause | Solution |
|---|---|---|
| No Power | Incorrect wiring; Blown fuse; Loose connection. | Check power and ground connections. Inspect vehicle's fuse box and the unit's fuse. Ensure connections are secure. |
| No Sound | Speaker wires disconnected; Volume too low; Mute activated; Incorrect mode. | Check speaker connections. Increase volume. Deactivate mute. Ensure correct input mode (FM, BT, USB, AUX). |
| Bluetooth Not Connecting | Bluetooth not enabled on device; Unit not in pairing mode; Interference. | Ensure Bluetooth is on your device. Select Bluetooth mode on the stereo. Move closer to the unit. Try resetting both devices. |
| USB Not Reading | Incompatible file format; Damaged USB drive; USB drive too large; Incorrect USB port. | Ensure files are compatible (e.g., MP3). Try a different USB drive. Use a smaller capacity drive. Ensure you are using the media playback USB port. |
| Remote Control Not Working | Dead battery; Obstruction; Not pointed correctly. | Replace remote battery. Remove any obstructions between remote and unit. Point remote directly at the unit's IR sensor. |
Specifications
| Feature | Detail |
|---|---|
| Model | HT-1023 |
| Product Dimensions | 11 x 21 x 15 cm |
| Item Weight | 650 Grams |
| Output Power | 24 Watts per channel |
| Number of Channels | 4 |
| Connectivity Technology | Auxiliary, Bluetooth, USB |
| Special Features | 2 USB ports (charging & pendrive), Exchange folder function |
| Compatible Devices | Smartphone |
| Connector Type | USB Type A |
| Audio Output Mode | Stereo |
Warranty and Support
For warranty information and technical support, please refer to the documentation provided at the time of purchase or contact your retailer. You may also visit the official H-Tech website for further assistance and updated information.


