
1. Introduction
This instruction manual provides essential information for the proper installation, operation, and maintenance of the 2" Low Profile Vent for BTX, BTXL 100 (Series 130/131). This product is designed as a replacement part for specific BTX and BTXL 100 series units. Please read this manual thoroughly before installation and keep it for future reference.
2. Product Overview
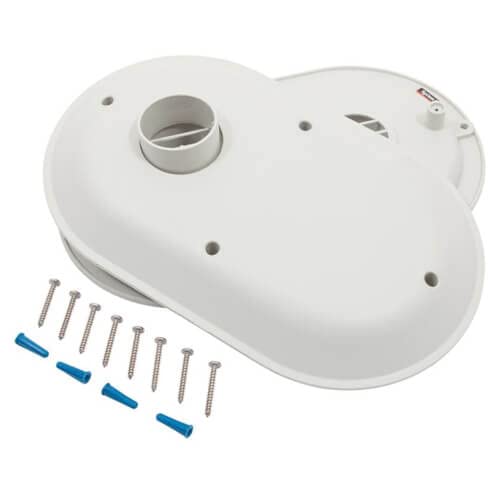
Figure 1: The 2" Low Profile Vent, showing its main body, vent opening, and included mounting hardware (screws and blue wall anchors).
The 2" Low Profile Vent is a crucial component designed to facilitate proper air circulation and exhaust for compatible BTX and BTXL 100 series systems. Its low-profile design ensures minimal protrusion while maintaining effective ventilation. The package includes the vent unit, mounting screws, and wall anchors for secure installation.
3. Setup and Installation
Before beginning installation, ensure the power to the unit requiring the vent replacement is turned off and disconnected. Safety precautions should always be observed.
3.1 Tools Required
- Screwdriver (Phillips head recommended)
- Drill (if new mounting holes are needed)
- Pencil or marker
- Measuring tape (optional)
3.2 Installation Steps
- Remove Old Vent: Carefully remove the existing vent from the unit. Note the orientation and connection points.
- Position New Vent: Align the new 2" Low Profile Vent with the existing mounting holes or the designated area on the BTX/BTXL 100 unit. Ensure the vent opening is correctly oriented for airflow.
- Mark Mounting Points: If new holes are required, use a pencil to mark the positions for the mounting screws through the vent's pre-drilled holes.
- Drill Pilot Holes (if necessary): If mounting into drywall or masonry, drill pilot holes at the marked locations. Insert the blue wall anchors into these pilot holes until flush with the surface.
- Secure the Vent: Place the vent back into position. Insert the provided screws through the vent's mounting holes and into the wall anchors or directly into the mounting surface.
- Tighten Screws: Hand-tighten the screws until the vent is securely fastened. Do not overtighten, as this may damage the vent or the mounting surface.
- Verify Connection: Ensure the vent is firmly attached and the vent opening is clear and unobstructed.
Note: For optimal performance, ensure the vent is installed in a location that allows for unrestricted airflow.
4. Operation
The 2" Low Profile Vent is a passive component designed to facilitate air movement. Once properly installed, it operates continuously without user intervention. Its function is to allow for the necessary exhaust or intake of air as required by the connected BTX or BTXL 100 series unit.
Ensure that the vent opening remains clear of obstructions to maintain optimal airflow.
5. Maintenance
Regular maintenance of the vent ensures its longevity and efficient operation.
5.1 Cleaning
- Frequency: Inspect the vent periodically, at least once every 3-6 months, or more frequently in dusty environments.
- Procedure:
- Gently wipe the exterior of the vent with a soft, damp cloth to remove dust and debris.
- If accessible, carefully remove any accumulated dust or lint from the vent opening using a soft brush or a vacuum cleaner with a brush attachment.
- Avoid using harsh chemicals or abrasive cleaners, as these can damage the vent's material.
5.2 Inspection
- Check for any signs of damage, cracks, or loose connections.
- Ensure the vent is still securely fastened to the mounting surface.
- Verify that the vent opening is not blocked by foreign objects or excessive buildup.
6. Troubleshooting
The 2" Low Profile Vent is a simple, passive component. Most issues are related to installation or obstruction.
| Problem | Possible Cause | Solution |
|---|---|---|
| Reduced Airflow | Vent opening is obstructed by dust, debris, or foreign objects. | Clean the vent opening as described in the Maintenance section. Ensure nothing is blocking the vent. |
| Vent is Loose | Mounting screws have loosened over time. | Gently re-tighten the mounting screws. Do not overtighten. |
| Visible Damage | Physical impact or material degradation. | If the vent is cracked or severely damaged, it should be replaced. |
7. Specifications
- Application: Replacement Part
- Manufacturer: Generic
- Part Number: �
- ASIN: B09RX1J97R
- First Available: February 7, 2022
8. Warranty and Support
For information regarding product warranty, returns, or technical support, please refer to the manufacturer's official website or contact their customer service directly. Details may also be available on the product packaging or purchase documentation.
As this product is listed under the "Generic" brand, specific warranty terms may vary. It is recommended to consult the seller or the original equipment manufacturer (OEM) of your BTX/BTXL 100 unit for compatibility and support details.