1. Introduction
This manual provides essential information for the installation, operation, and maintenance of your Pioneer DVR-S21WBK/PLUS 24X SATA DVD/RW Dual Layer Burner Drive. This internal optical drive is designed for desktop computers, offering high-speed data reading and writing capabilities for various DVD and CD formats.
The DVR-S21WBK/PLUS supports up to 24x writing speed for DVD-R/+R media and up to 8x for DVD-R/+R Dual Layer discs. It enables users to create personal DVD movies, digital photo slideshows, music CDs, and backup data files efficiently. The drive is compatible with dual layer discs, expanding storage capacity from 4.7 GB to 8.5 GB.
2. Safety Information
Please read and understand the following safety precautions before installing or operating the drive:
- Power Disconnection: Always disconnect your computer from the power source before opening the case or performing any installation.
- Static Electricity: Wear an anti-static wrist strap or frequently touch a grounded metal object (like the computer chassis) to discharge static electricity before handling internal components.
- Component Handling: Handle the drive by its edges. Avoid touching the circuit board or optical lens.
- Ventilation: Ensure proper airflow within your computer case to prevent overheating.
- Laser Safety: This product contains a laser diode. Do not attempt to open the drive casing or look directly into the laser aperture.
3. Package Contents
The Pioneer DVR-S21WBK/PLUS is typically supplied as a bulk item. The package should contain:
- Pioneer DVR-S21WBK/PLUS 24X SATA DVD/RW Dual Layer Burner Drive
Note: Mounting screws, SATA data cables, SATA power cables, and burning software are generally not included with bulk packaging and must be acquired separately.
4. Setup and Installation
4.1 Physical Installation
- Prepare Your Computer: Power off your computer completely and disconnect the power cord from the wall outlet.
- Open the Case: Remove the side panel(s) of your computer case to access the internal components.
- Locate a Drive Bay: Identify an available 5.25-inch drive bay. You may need to remove a front panel cover or a bay cover.
- Mount the Drive: Slide the Pioneer DVR-S21WBK/PLUS drive into the chosen 5.25-inch bay from the front of the case until the screw holes align. Secure the drive with appropriate screws on both sides.
- Connect SATA Data Cable: Connect one end of a SATA data cable to the SATA data port on the back of the drive. Connect the other end to an available SATA port on your computer's motherboard.
- Connect SATA Power Cable: Connect a SATA power cable from your power supply unit to the SATA power connector on the back of the drive.

Image: Rear view of the Pioneer DVR-S21WBK/PLUS drive, illustrating the SATA data and power connection ports. The larger L-shaped connector is for power, and the smaller L-shaped connector is for data.
- Close the Case: Reattach the side panel(s) of your computer case.
- Reconnect Power: Plug the power cord back into the wall outlet and power on your computer.
4.2 Software Installation (Drivers)
Most modern operating systems (Windows, macOS, Linux) will automatically detect and install the necessary drivers for the Pioneer DVR-S21WBK/PLUS drive upon startup. It is typically a plug-and-play device.
- If the drive is not recognized, check your operating system's Device Manager (Windows) or System Information (macOS) to confirm its presence.
- Should a specific driver be required, visit the Vinpower Digital support website for the latest driver downloads.
5. Operation
5.1 Loading and Ejecting Discs

Image: Front view of the Pioneer DVR-S21WBK/PLUS drive, showing the disc tray in the closed position and the eject button.
- To Open the Disc Tray: Press the eject button located on the front bezel of the drive. The disc tray will slide out.
- To Load a Disc: Place the disc onto the tray with the label side facing up. Gently push the tray back into the drive until it clicks shut.
- To Eject a Disc: Press the eject button again. The tray will open, allowing you to remove the disc.
- Manual Eject (Emergency): In case of a power failure or if the eject button does not work, locate the small pinhole on the front bezel of the drive. Insert a straightened paperclip into the pinhole and push gently until the tray partially opens. You can then pull the tray out manually.

Image: The Pioneer DVR-S21WBK/PLUS drive with its disc tray extended, showing a disc placed within the tray, ready for loading or removal.
5.2 Reading Discs
Once a disc is loaded, your operating system should automatically detect it. You can access the disc's contents through your computer's file explorer (e.g., 'This PC' on Windows) or by using media playback software.
5.3 Writing Discs
To write data to a recordable DVD or CD, you will need compatible disc burning software (not included with the drive). Follow the instructions provided with your chosen software. The Pioneer DVR-S21WBK/PLUS incorporates advanced technologies to ensure reliable burning:
- Secure Media Speed Stability: This feature ensures that the duplication speed does not exceed the encoded maximum rates of the media, contributing to better burning quality and disc longevity.
- Stable Recording Control: The drive utilizes an extensive database of media specifications to optimize communication and convey details for consistent recording performance.
- Stable Burning Throughout: This provides consistent and reliable burning of any file type for the duration of the duplication process, enhancing the reliability of playback for recorded media.
6. Maintenance
Proper maintenance helps ensure the longevity and optimal performance of your optical drive.
- Cleaning the Exterior: Use a soft, dry cloth to wipe the front bezel of the drive. Avoid using harsh chemicals or abrasive materials.
- Dust Prevention: Keep your computer environment clean and dust-free. Dust can accumulate inside the drive and affect its performance.
- Disc Handling: Always handle discs by their edges. Avoid touching the recording surface. Store discs in protective cases to prevent scratches and dust accumulation.
- No Internal Cleaning: Do not attempt to clean the internal components, such as the laser lens, yourself. This can cause damage and void your warranty.
7. Troubleshooting
If you encounter issues with your Pioneer DVR-S21WBK/PLUS drive, refer to the following common problems and solutions:
- Drive Not Detected:
- Ensure all SATA data and power cables are securely connected.
- Check your computer's BIOS/UEFI settings to confirm the SATA port is enabled and the drive is recognized.
- Verify that the drive appears in your operating system's Device Manager (Windows) or System Information (macOS).
- Disc Not Reading/Writing:
- Ensure the disc is clean and free of scratches or smudges.
- Try a different disc to rule out media issues.
- For writing, ensure you are using compatible recordable media (e.g., DVD-R, DVD+R, CD-R).
- Update your disc burning software to the latest version.
- Slow Performance:
- Close other applications that might be consuming system resources.
- Ensure your SATA cables are not damaged.
- Check for background processes that might be accessing the drive.
- Noisy Operation:
- Some discs may cause more vibration than others.
- Ensure the drive is securely mounted in its bay.
- Eject Button Not Working:
- Try the manual eject procedure using a paperclip (refer to Section 5.1).
- Restart your computer.
If these steps do not resolve your issue, contact technical support or consult the manufacturer's website.
8. Specifications
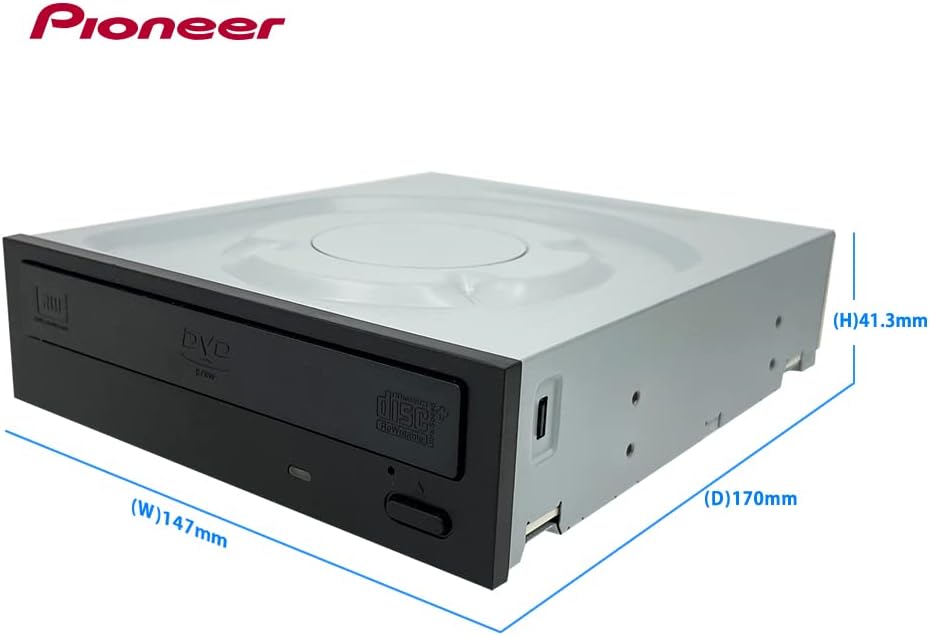
Image: Pioneer DVR-S21WBK/PLUS drive with its physical dimensions (Width, Height, Depth) indicated in millimeters.

Image: A detailed table outlining the drive specifications, including supported media, buffer memory, interface, dimensions, weight, and read/write speeds.
| Feature | Specification |
|---|---|
| Brand | Pioneer (Manufactured by Vinpower Digital) |
| Model Number | DVR-S21WBK/PLUS |
| Interface | Serial ATA (SATA) |
| Optical Storage Write Speed | 24x DVD-R/+R, 8x DVD-R/+R DL, 8x DVD+RW, 6x DVD-RW, 48x CD-R, 24x CD-RW |
| Optical Storage Read Speed | 16x DVD-ROM (SL), 8x DVD+/-R DL, 48x CD-ROM, 48x CD-R |
| Supported Writable Media | CD-R/RW, DVD±R/RW DL |
| Buffer Memory Size | 0.5 M Bytes |
| Mounting Orientation | Horizontal and Vertical |
| Dimensions (LxWxH) | 6.7 x 5.75 x 1.6 inches (170 x 147 x 41.3 mm) |
| Item Weight | 1.3 pounds (0.6 Kg) |
| Hardware Platform | PC |
| Color | Black |
9. Warranty and Support
For warranty information and technical support, please refer to the documentation provided by your retailer or the manufacturer, Vinpower Digital. Typically, warranty terms cover manufacturing defects for a specified period from the date of purchase.
You may find additional support resources, FAQs, and contact information on the official Vinpower Digital website or through your product vendor.