K KETTLER Avior P
Kettler Avior P Exercise Bike User Manual
Model: Avior P | Brand: K KETTLER
1. Product Overview
The Kettler AVIOR P exercise bike is your reliable companion for effective home training. Designed for ease of assembly, user-friendliness, and mobility, it features transport wheels allowing flexible placement within your home. It offers a wide range of training programs and resistance levels, catering to both beginners and ambitious athletes.
The AVIOR P includes 12 diverse training programs and 16 resistance levels, ensuring varied workouts. A pulse-controlled program adjusts resistance based on your heart rate, optimizing your training. The intuitive onboard computer displays essential metrics such as speed, calories burned, pulse, ambient temperature, RPM, distance, and training time, enabling you to set and monitor individual goals. It supports 4 user profiles and a guest profile. Integrated hand pulse sensors provide real-time heart rate feedback.

Figure 1: Kettler Avior P Exercise Bike
2. Important Safety Information
- Read all instructions before using the exercise bike.
- Consult your physician before starting any new exercise program.
- Keep children and pets away from the equipment during use.
- Place the exercise bike on a flat, stable surface.
- Ensure all bolts and nuts are securely tightened before each use.
- Wear appropriate exercise attire and footwear.
- Do not exceed the maximum user weight of 130 kg (286 lbs).
- Stop exercising immediately if you feel faint, dizzy, or experience pain.
3. Assembly and Setup
The Kettler Avior P exercise bike is designed for straightforward assembly. Follow the detailed instructions provided in the separate assembly guide included with your product. Ensure all components are present before beginning assembly.
3.1 Initial Placement
Utilize the integrated transport wheels to easily move the exercise bike to your desired training location. Ensure the surface is level and clear of obstructions.
3.2 Power Connection
Connect the exercise bike to a standard 230V mains power outlet. Ensure the power cable is not a tripping hazard.
4. Operating Instructions
4.1 LCD Training Computer
The clear LCD display provides all necessary training data. Use the controls to navigate through menus and select programs.

Figure 2: LCD Training Computer Display
4.2 Training Programs and Resistance
Choose from 12 pre-set training programs to vary your workouts. Adjust the resistance level from 1 to 16 using the computer controls to match your desired intensity. The motorized magnetic braking system ensures smooth and precise resistance changes.
4.3 Pulse Measurement
Integrated hand pulse sensors on the handlebars provide real-time heart rate monitoring. Grip the sensors firmly during your workout for accurate readings. An optional 5 kHz chest strap can also be used for pulse measurement.

Figure 3: Hand Pulse Sensors
4.4 Adjustable Components
- Saddle: The comfortable fitness saddle can be adjusted horizontally, vertically, and in tilt to find your optimal riding position.
- Handlebars: The handlebars are tilt-adjustable, allowing you to customize their position for comfort and effective training.
- Pedals: The self-righting pedals with straps ensure your feet remain securely in place during your workout.

Figure 4: Tilt-Adjustable Handlebars

Figure 5: Self-Righting Pedals
5. Maintenance
- Cleaning: Wipe down the exercise bike with a damp cloth after each use to remove sweat and dust. Do not use abrasive cleaners.
- Inspection: Regularly check all nuts, bolts, and moving parts for tightness and wear. Tighten any loose fasteners.
- Storage: Store the exercise bike in a dry, cool place away from direct sunlight and extreme temperatures.
6. Troubleshooting
| Problem | Possible Cause | Solution |
|---|---|---|
| Display not working | Power cable disconnected; power outage | Check power connection; ensure power outlet is functional |
| Resistance not changing | Magnetic brake system issue; console malfunction | Restart the machine; check connections; contact support if issue persists |
| Inaccurate pulse reading | Hands not firmly on sensors; dry hands | Ensure firm contact with sensors; slightly moisten hands if too dry |
| Unusual noise during operation | Loose parts; internal component issue | Check all assembly points for tightness; contact support if noise persists |
7. Technical Specifications
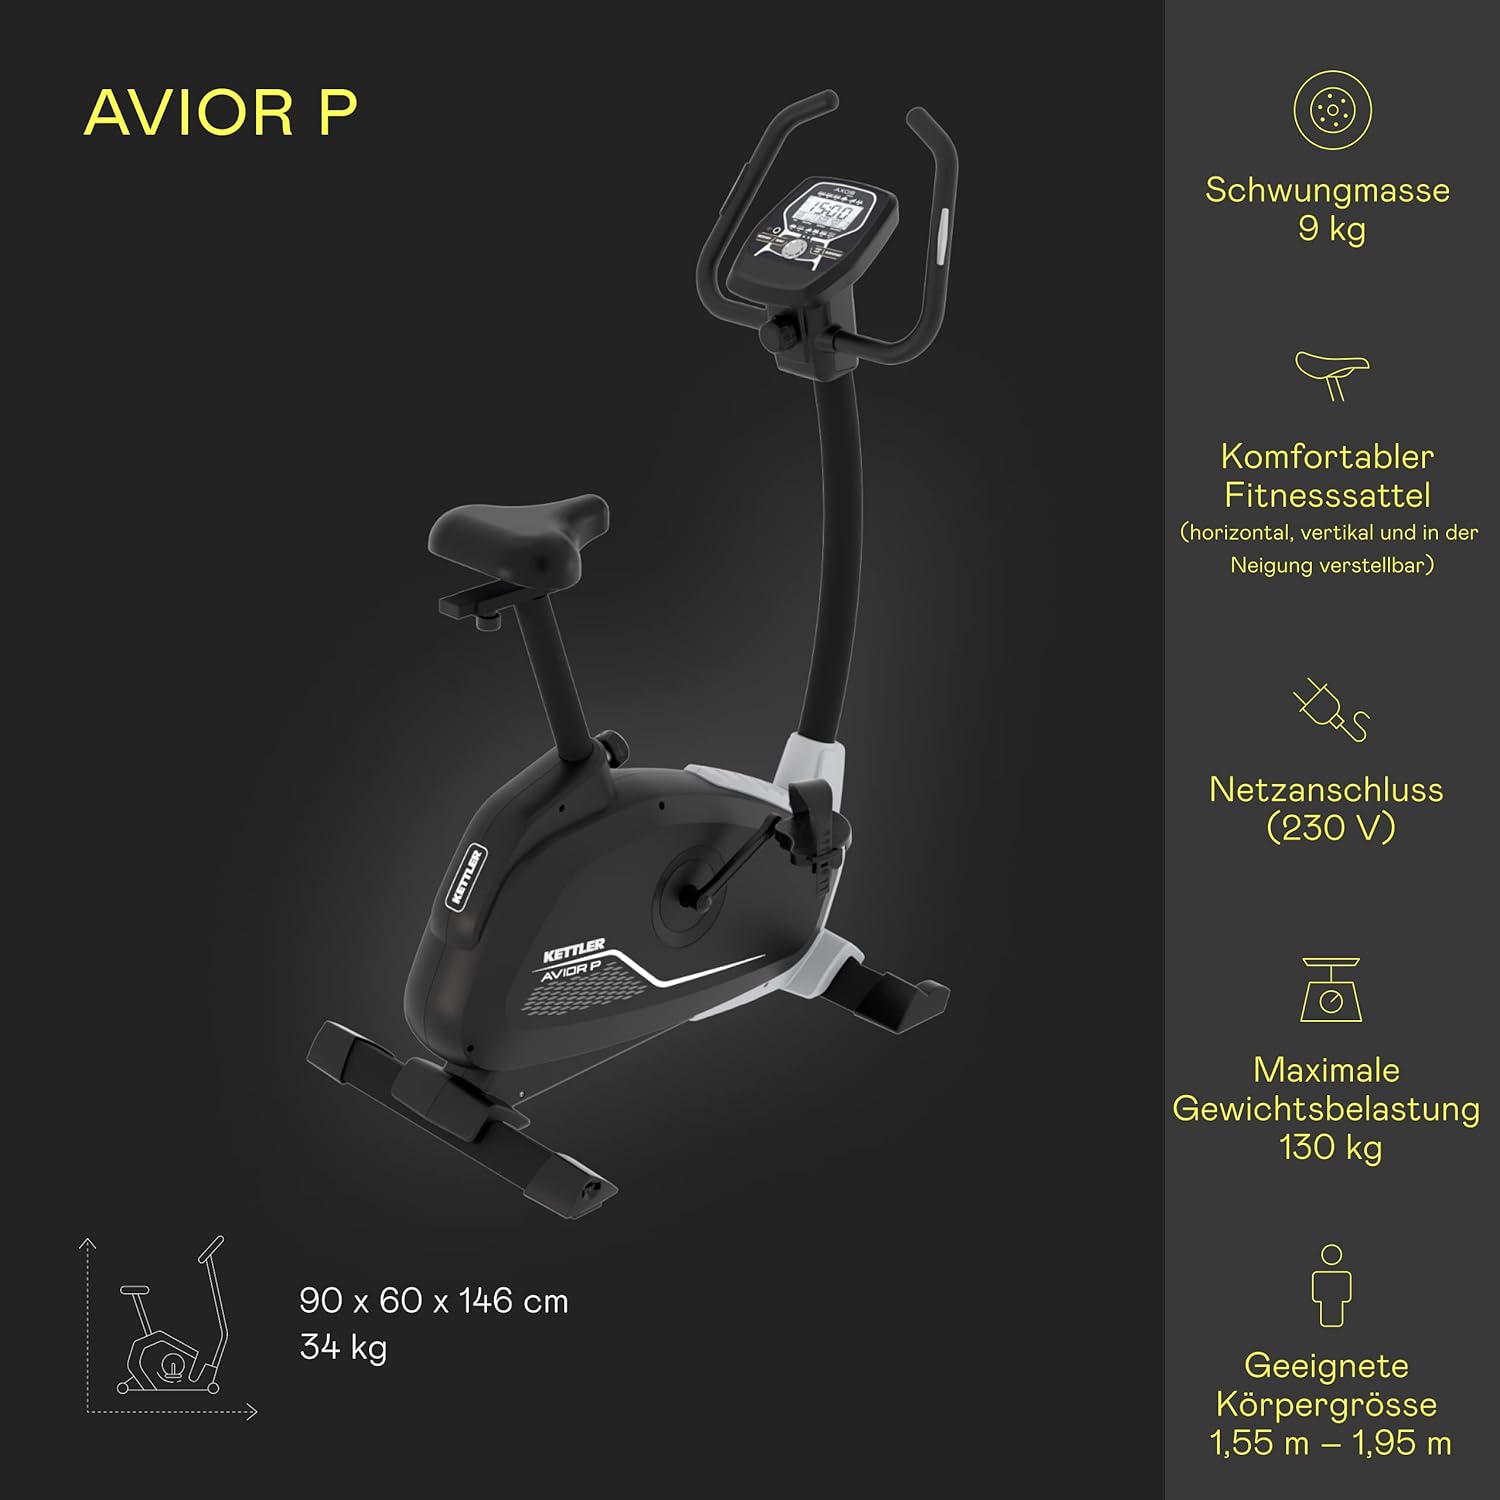
Figure 6: Kettler Avior P Features and Dimensions
| Feature | Specification |
|---|---|
| Model Number | 9705289 |
| Dimensions (L x W x H) | 90 x 60 x 146 cm (35.4 x 23.6 x 57.5 inches) |
| Product Weight | 34 kg (75 lbs) |
| Maximum User Weight | 130 kg (286 lbs) |
| Flywheel Mass | 9 kg (19.8 lbs) |
| Resistance Mechanism | Motorized Magnetic Brake System |
| Resistance Levels | 16 |
| Training Programs | 12 |
| User Profiles | 4 + 1 Guest Profile |
| Pulse Measurement | Hand Pulse Sensors, Optional 5 kHz Chest Strap |
| Power Supply | Mains Connection (230V) |
| Suitable Body Height | 1.55 m - 1.95 m (5 ft 1 in - 6 ft 5 in) |
8. Warranty and Support
Kettler products are manufactured to high-quality standards and come with a manufacturer's warranty. Please refer to the warranty card included with your product for specific terms and conditions.
For technical assistance, spare parts, or warranty claims, please contact Kettler customer support. Keep your purchase receipt and model number (Avior P, 9705289) ready when contacting support.
You can find more information and contact details on the official Kettler website or through your retailer.