
1. Introduction
This manual provides detailed instructions for the safe installation, operation, and maintenance of your Ashley Harbour Aries LED Linear Chandelier Light Fixture. Please read all instructions carefully before beginning installation and retain this manual for future reference.
Important Safety Information
- WARNING: Risk of electric shock. Disconnect power at the circuit breaker or fuse box before installation or servicing.
- All electrical connections must be in accordance with local codes, ordinances, or the National Electric Code (NEC). Consult a qualified electrician if you are unfamiliar with proper electrical wiring connections.
- This fixture is intended for indoor use only and is ETL listed for damp locations. Do not install in areas exposed to direct water spray.
- Ensure the mounting surface can support the weight of the fixture.
- Do not attempt to modify the fixture. Any modifications may void the warranty and create a safety hazard.
2. Included Components
Carefully unpack the fixture and check that all parts are present. If any parts are missing or damaged, do not attempt to assemble or install the fixture. Contact customer support for assistance.
- Aries LED Linear Chandelier Fixture
- Mounting Canopy
- Adjustable Hanging Cables
- Installation Guide
- Required Hardware (screws, wire nuts, etc.)
3. Setup and Installation
Professional installation is recommended for this fixture. Ensure power is disconnected at the circuit breaker before proceeding.
- Prepare for Installation: Turn off the main power supply at the circuit breaker. Clear the work area and gather necessary tools (screwdriver, wire strippers, ladder, etc.).
- Mount the Canopy: Secure the mounting bracket (part of the included hardware) to the junction box in the ceiling. Ensure it is firmly attached.
- Adjust Hanging Height: The chandelier features adjustable hanging cables. Determine your desired hanging height (from 7 to 11 feet ceilings) and adjust the cable length by pressing the pin on the cable gripper and sliding the cable to the desired position. Ensure both cables are adjusted to the same length for a level fixture.
-
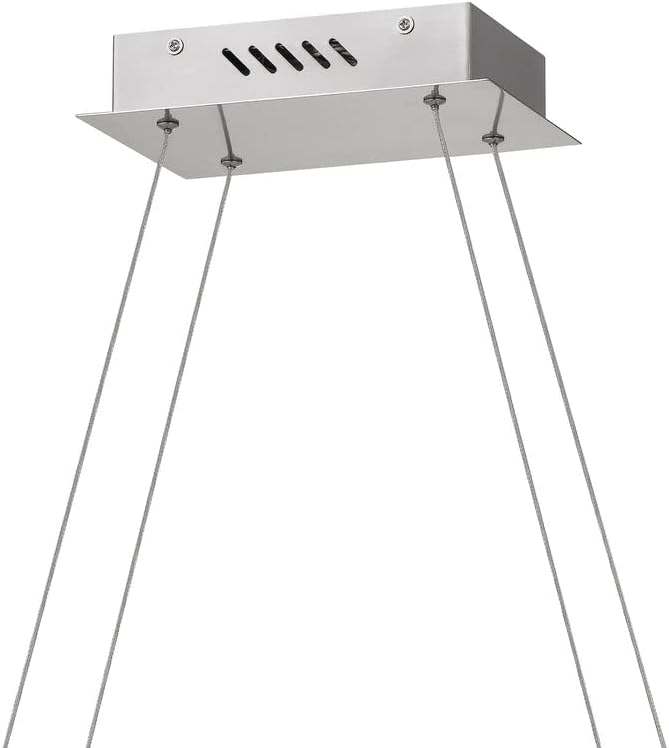
Image: Close-up view of the mounting canopy, showing the attachment points for the adjustable hanging cables. The cables extend downwards from the canopy, illustrating the suspension mechanism.
- Wire the Fixture: Connect the fixture's wires to the corresponding house wires using the provided wire nuts. Connect the black wire (live) from the fixture to the black wire from the ceiling, the white wire (neutral) from the fixture to the white wire from the ceiling, and the ground wire from the fixture to the ground wire from the ceiling. Ensure all connections are secure.
- Secure the Fixture: Carefully lift the chandelier and attach the canopy to the mounting bracket, securing it with the provided screws. Ensure no wires are pinched during this step.
-

Image: The Ashley Aries LED Linear Chandelier, showcasing its brushed nickel finish and curved linear design. The adjustable hanging cables are visible, suspending the fixture.
- Restore Power: Once installation is complete and all connections are secure, restore power at the circuit breaker.
4. Operating Instructions
The Ashley Aries LED Linear Chandelier is designed for simple operation.
- Turning On/Off: Operate the fixture using a standard wall switch connected to the circuit.
- Dimming Functionality: This fixture is fully dimmable. To utilize the dimming feature, ensure you have a compatible LED dimmer switch installed. Follow the dimmer switch manufacturer's instructions for proper operation.
- Light Output: The integrated LED light source provides 1800 lumens of brightness with a warm white color temperature of 3000 Kelvin.
5. Maintenance
Regular maintenance will help preserve the appearance and functionality of your chandelier.
- Cleaning: Always disconnect power before cleaning. Use a soft, dry, or slightly damp cloth to wipe the fixture. Do not use abrasive cleaners, solvents, or polishes as they may damage the finish.
- Bulb Replacement: This fixture uses integrated LED lighting and does not require bulb replacement. If the LED light source fails, contact customer support for assistance.
- Inspection: Periodically check all electrical connections and mounting hardware for tightness.
6. Troubleshooting
If you experience issues with your chandelier, refer to the following troubleshooting guide:
- Light Does Not Turn On:
- Check if the power supply is on at the circuit breaker.
- Ensure the wall switch is in the 'ON' position.
- Verify all wire connections are secure and correctly wired.
- Light Flickers or Dims Incorrectly:
- Ensure you are using an LED-compatible dimmer switch.
- Check the dimmer switch's minimum/maximum load settings.
- Verify all wire connections are secure.
- Fixture is Loose:
- Tighten the mounting screws securing the canopy to the junction box.
- Ensure the hanging cables are securely fastened.
If these steps do not resolve the issue, contact customer support.
7. Specifications
| Model Number | ASH4642B |
| Product Dimensions | 91.44 x 15.24 x 264.16 cm (L x W x H) |
| Item Weight | 1.96 kg |
| Material | Stainless Steel |
| Finish Type | Brushed Nickel |
| Power Source | AC |
| Light Source Type | Integrated LED |
| Wattage | 36 watts |
| Brightness | 1800 Lumens |
| Light Color | 3000K (Warm White) |
| Dimmable | Yes (with compatible LED dimmer) |
| Installation Type | Flush Mount (Canopy) / Hanging |
| Certifications | ETL Listed for Damp Locations |
8. Warranty and Support
Manufacturer's Warranty: This Ashley Harbour fixture is covered by a 1-year manufacturer's warranty from the date of purchase. This warranty covers defects in materials and workmanship under normal use.
Customer Support: For technical assistance, missing parts, or warranty claims, please contact Ashley Harbour customer support.