
Introduction
The Roberts Ortus Charge is a versatile alarm clock radio designed for bedside use, offering a range of features including DAB/DAB+ and FM radio, Bluetooth connectivity, dual alarms, and convenient charging options. This manual provides detailed instructions for setting up and operating your device, ensuring you can fully utilize all its functionalities.
Package Contents
- Roberts Ortus Charge Alarm Clock Radio
- Power Adapter
- User Manual (this document)
Controls and Connections
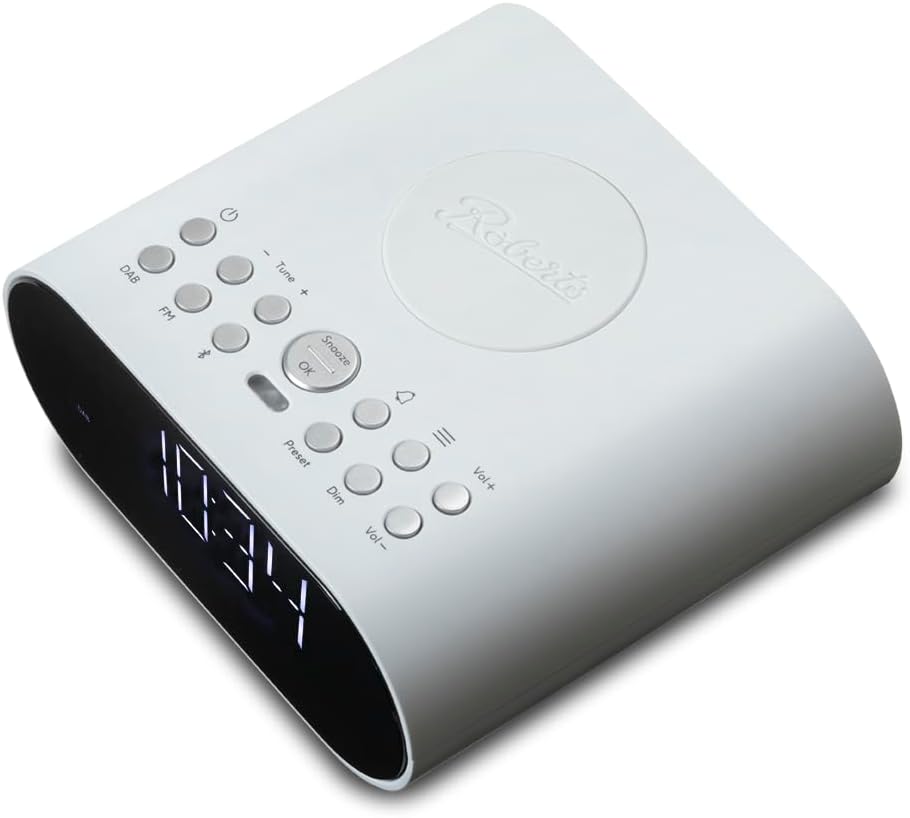
Figure 1: Top View - Control Panel
This image displays the top surface of the Roberts Ortus Charge, highlighting the various control buttons. These include Power, DAB, FM, Bluetooth, Tune +/- buttons, Volume +/- buttons, Preset, Dim, and the central Snooze/OK button.

Figure 2: Rear View - Connections
This image shows the back panel of the Roberts Ortus Charge, detailing the available connection ports. These include the power input, a 3.5mm headphone jack, and a 5V/1A USB charging port.
Front Panel
- Display: Large, easy-to-read digital clock and information display.
Top Panel
- Power Button: Turns the unit on or off.
- DAB/FM Buttons: Selects DAB/DAB+ or FM radio mode.
- Bluetooth Button: Activates Bluetooth pairing mode.
- Tune +/- Buttons: Adjusts radio frequency or navigates menus.
- Volume +/- Buttons: Controls audio output volume.
- Snooze/OK Button: Snoozes an active alarm or confirms selections.
- Preset Button: Accesses and saves radio presets.
- Dim Button: Adjusts display brightness.
- Wireless Charging Pad: For Qi-compatible devices.
Rear Panel
- Power Input: Connects to the supplied power adapter.
- Headphone Jack: For private listening.
- USB Charging Port (5V/1A): For charging external devices.
Setup
1. Power Connection
- Connect the supplied power adapter to the DC input jack on the rear of the Ortus Charge.
- Plug the power adapter into a wall outlet.
2. Initial Power On and Language Selection
- Press the Power button to turn on the unit.
- The display will prompt you to select a language. Use the Tune +/- buttons to scroll through the options (English, French, German, Dutch).
- Press the Snooze/OK button to confirm your selection.
3. Automatic Time and Date Setup (DAB)
Upon initial power-on, the Ortus Charge will automatically scan for DAB/DAB+ radio stations and set the time and date from the broadcast signal. This process may take a few minutes.
- Ensure the radio is placed in an area with good DAB signal reception.
- Once the scan is complete, the time and date will be displayed.
Operating the Radio
1. DAB/DAB+ Radio Mode
- Press the DAB button to enter DAB radio mode.
- If this is the first time using DAB, or if the station list is empty, the radio will perform a full scan.
- Use the Tune +/- buttons to scroll through the available stations.
- Press Snooze/OK to select a station.
2. FM Radio Mode
- Press the FM button to enter FM radio mode.
- Press and hold the Tune +/- buttons to automatically scan for the next available station.
- Alternatively, short press Tune +/- to manually adjust the frequency in small increments.
3. Saving and Recalling Presets
The Ortus Charge allows you to save your favorite DAB and FM stations as presets.
To Save a Preset:
- Tune to the desired DAB or FM station.
- Press and hold the Preset button until 'Preset Store' appears on the display.
- Use the Tune +/- buttons to select a preset number (1-10).
- Press Snooze/OK to confirm and save the station.
To Recall a Preset:
- Press the Preset button (short press). 'Preset Recall' will appear.
- Use the Tune +/- buttons to scroll through your saved presets.
- Press Snooze/OK to select and play the desired preset station.
Bluetooth Operation
1. Pairing a Device
- Press the Bluetooth button on the top panel. The display will show 'Bluetooth Pairing' and the Bluetooth indicator will flash.
- On your Bluetooth-enabled device (smartphone, tablet), go to its Bluetooth settings.
- Search for 'Roberts Ortus Charge' in the list of available devices.
- Select 'Roberts Ortus Charge' to pair. Once connected, the display will show 'Bluetooth Connected' and the indicator will stop flashing.
2. Playing Audio
- Once paired, you can play audio from your device through the Ortus Charge.
- Use the volume controls on both your device and the Ortus Charge to adjust the playback volume.
Alarm Clock Functions
The Ortus Charge features two independent alarms (Alarm 1 and Alarm 2).
1. Setting Alarms
- In standby mode, press and hold the Alarm 1 or Alarm 2 button (located near the volume controls) to enter alarm setup.
- Use the Tune +/- buttons to set the desired alarm time (hour and minute), pressing Snooze/OK after each setting.
- Select the alarm source: Buzzer or Radio (DAB or FM). If Radio is selected, choose the desired station.
- Select the alarm frequency: Daily, Weekdays, Weekends, or Once.
- Confirm all settings with Snooze/OK. The alarm icon will appear on the display, indicating the alarm is active.
2. Snooze Function

Figure 3: Snooze/OK Button
A detailed view of the central Snooze/OK button, used for snoozing alarms and confirming selections.
- When an alarm sounds, press the large Snooze/OK button to temporarily silence it for 9 minutes.
- The alarm will sound again after the snooze period.
3. Stopping and Disabling Alarms
- To stop a sounding alarm, press the Power button. The alarm will reset for the next scheduled activation.
- To completely disable an alarm, press the corresponding Alarm 1 or Alarm 2 button (short press) until the alarm icon disappears from the display.
Charging Functions
1. Wireless Qi Charging
- Place your Qi-compatible smartphone or device centrally on the wireless charging pad located on the top of the Ortus Charge.
- Ensure the device is correctly aligned for charging to begin. A charging indicator may appear on your device's screen.
- Remove any thick cases from your device if charging does not initiate.
2. USB Device Charging
- Connect your device's USB charging cable to the USB port (5V/1A) on the rear of the Ortus Charge.
- The Ortus Charge must be powered on or in standby mode for USB charging to function.
Display Settings
Dimmer Control
- Press the Dim button repeatedly to cycle through different display brightness levels.
- This allows you to adjust the display for comfortable viewing in various lighting conditions, especially at night.
Headphone Use
- To listen privately, plug a standard 3.5mm stereo headphone jack into the headphone port on the rear of the unit.
- The main speaker will be muted automatically when headphones are connected.
Maintenance
- To clean the unit, use a soft, dry cloth. Do not use abrasive cleaners or solvents.
- Avoid exposing the unit to extreme temperatures, direct sunlight, or high humidity.
- Ensure the wireless charging pad is kept clean and free of debris for optimal performance.
Troubleshooting
| Problem | Possible Cause / Solution |
|---|---|
| No power / Unit does not turn on. | Ensure the power adapter is securely connected to both the unit and the wall outlet. Check the power outlet. |
| Poor radio reception (DAB/FM). | Extend the telescopic antenna fully. Reposition the unit to an area with better signal. Perform a full scan for DAB stations. |
| Bluetooth device cannot pair. | Ensure the Ortus Charge is in Bluetooth pairing mode. Make sure your device's Bluetooth is enabled and within range. Forget 'Roberts Ortus Charge' on your device and try pairing again. |
| Wireless charging not working. | Ensure your device is Qi-compatible and placed centrally on the charging pad. Remove any thick phone cases. Check for foreign objects on the charging pad. |
| Alarm does not sound. | Verify that the alarm is enabled (alarm icon visible on display) and the alarm time is correctly set. Check the alarm volume. |
Specifications
- Brand: Roberts Radio
- Model: Ortus Charge
- Color: White
- Radio Tuner: DAB/DAB+, FM
- Connectivity: Bluetooth
- Special Features: Built-in Clock, Dual Alarms, Snooze, Display Dimmer
- Charging: Qi Wireless Charging, USB Charging Port (5V/1A)
- Power Source: Mains Powered (AC Adapter)
- Material: Plastic
- Display Type: Digital
- Headphone Output: 3.5mm Jack
Warranty and Support
This product comes with a manufacturer's warranty of 2 years. For detailed warranty terms and conditions, please refer to the documentation provided with your purchase or visit the official Roberts Radio website.
For technical support, troubleshooting assistance beyond this manual, or spare parts inquiries, please contact Roberts Radio customer service through their official website or the contact information provided in your product packaging.


