Introduction
This manual provides essential instructions for the safe operation, maintenance, and troubleshooting of your RYOBI 18V ONE+ 5-1/2" Circular Saw, Model P505B. Please read this manual thoroughly before using the tool to ensure proper function and to prevent injury. Keep this manual for future reference.

Figure 1: The RYOBI 18V ONE+ 5-1/2 inch Circular Saw, Model P505B, shown without a battery attached.
Setup
1. Unpacking and Inspection
Carefully remove the circular saw and all accessories from the packaging. Inspect the tool for any damage that may have occurred during shipping. Do not operate the tool if any damage is observed. Refer to the labeled diagram below to identify components.

Figure 2: Labeled diagram illustrating key components of the circular saw, including the spindle lock and lock-out switch.
2. Battery Installation
The RYOBI 18V ONE+ Circular Saw operates with any RYOBI ONE+ 18V battery (sold separately). To install the battery, align the battery pack with the port on the tool handle and slide it in until it clicks securely into place. To remove, press the release latches on the battery and pull it out.

Figure 3: The circular saw with an 18V ONE+ battery pack correctly installed.
3. Blade Installation and Removal
- Ensure the battery pack is removed from the saw before attempting any blade changes.
- Locate the spindle lock button and press it to lock the blade in place.
- Use the on-board wrench (stored on the tool) to loosen the blade bolt by turning it counter-clockwise.
- Remove the outer washer and the old blade.
- Install the new 5-1/2 inch blade, ensuring the teeth are pointing in the direction of rotation indicated by the arrow on the blade guard. The saw uses blades with a 3/8 inch arbor.
- Replace the outer washer and blade bolt, then tighten the bolt securely by turning it clockwise while holding the spindle lock.

Figure 4: Illustration of the blade changing process, highlighting the blade bolt and spindle lock.
4. Adjusting Depth of Cut
To adjust the cutting depth, loosen the depth adjustment lever. Raise or lower the saw base to the desired depth. For optimal cutting, the blade should extend approximately 1/8 inch below the material being cut. Tighten the depth adjustment lever firmly to secure the setting. The maximum depth of cut is 1-9/16 inches.
5. Adjusting Bevel Angle
For angled cuts, loosen the bevel adjustment lever. Tilt the saw base to the desired angle between 0 and 50 degrees. The maximum depth of cut at a 45-degree bevel is 1-1/8 inches. Tighten the bevel adjustment lever securely before operation.
Operating Instructions
1. Safety Precautions
- Always wear appropriate personal protective equipment, including safety glasses, hearing protection, and gloves.
- Ensure the workpiece is securely clamped or held to prevent movement during cutting.
- Keep hands clear of the blade path.
- Do not force the saw through material; allow the blade to cut at its own pace.
- Ensure the lower blade guard operates freely and closes instantly.
2. Making a Cut
- With the battery installed, depress the lock-out switch and then squeeze the trigger to start the saw. The blade will reach its full speed of 4600 RPM quickly.
- Allow the blade to reach full speed before contacting the workpiece.
- Guide the saw along the cutting line, maintaining a firm grip on both handles. Apply steady, even pressure.
- After completing the cut, release the trigger and allow the blade to stop completely before lifting the saw from the workpiece.

Figure 5: An individual demonstrating proper technique for cutting wood with the circular saw.
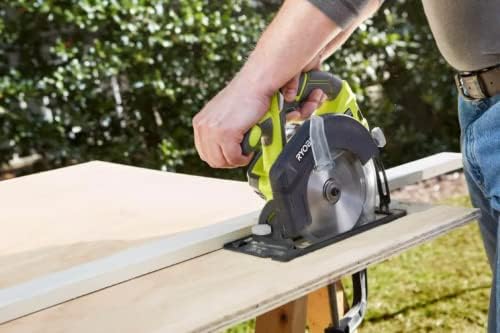
Figure 6: Detailed view of the saw in operation, cutting through a wooden board.

Figure 7: The circular saw being used to make a precise cut on a sheet of plywood.
Maintenance
1. Cleaning
Regularly clean the saw to ensure optimal performance. Remove sawdust and debris from the blade guard, motor vents, and base plate using a brush or compressed air. Do not use solvents or harsh chemicals, as they may damage plastic parts.
2. Blade Inspection and Replacement
Inspect the blade before each use for sharpness, cracks, or missing teeth. A dull or damaged blade can cause kickback and poor cut quality. Replace worn or damaged blades promptly following the blade installation instructions.
3. Storage
When not in use, store the circular saw in a clean, dry place, out of reach of children. Remove the battery pack before storing for extended periods.
Troubleshooting
- Saw does not start: Ensure the battery is fully charged and properly installed. Check that the lock-out switch is depressed before pulling the trigger.
- Poor cut quality or excessive splintering: The blade may be dull or incorrect for the material. Replace the blade or ensure it is clean. Verify the depth of cut is set correctly.
- Saw binds or kicks back: Ensure the workpiece is securely supported. Do not force the saw. Check for a dull or damaged blade. Ensure the blade guard is not obstructed.
- Overheating: Allow the tool to cool down. Avoid continuous heavy cutting. Ensure motor vents are clear of debris.
For issues not covered here, please contact RYOBI customer support.
Specifications
| Attribute | Specification |
|---|---|
| Brand | RYOBI |
| Model Number | P505B |
| Voltage | 18 Volts |
| Power Source | Battery Powered |
| Blade Diameter | 5-1/2 inches |
| Blade Type | 18 TPI Carbide Tipped |
| Arbor Size | 3/8 inch |
| No-Load Speed | 4600 RPM |
| Max Depth of Cut (90°) | 1-9/16 inches |
| Max Depth of Cut (45°) | 1-1/8 inches |
| Bevel Capacity | 0-50 Degrees |
| Item Weight | 5.6 Pounds |
| Special Features | Spindle Lock, On-board Wrench Storage |
Warranty Information
The RYOBI 18V ONE+ 5-1/2" Circular Saw (Model P505B) is backed by a 3-Year Manufacturer's Limited Warranty. For full details regarding warranty coverage, terms, and conditions, please refer to the official warranty documentation provided with your product or visit the RYOBI official website.
Support
For technical assistance, replacement parts, or further information regarding your RYOBI 18V ONE+ 5-1/2" Circular Saw, please contact RYOBI customer service. Contact details can typically be found on the RYOBI official website or on the product packaging.