MPOWER CRB7 Mk3
MPOWER CRB7 Combination Router Jig Mk3 Instruction Manual
Model: CRB7 Mk3 | Part Number: 10099
1. Introduction
This manual provides comprehensive instructions for the safe and effective use of the MPOWER CRB7 Combination Router Jig Mk3. The CRB7 is a versatile woodworking accessory designed to enhance the functionality of various routers, enabling precise operations such as circle cutting, mortising, and edge trimming. Please read this manual thoroughly before operating the jig to ensure proper setup and optimal performance.
The MPOWER CRB7 Mk3 system includes the following main components:
- CRB7 Universal Combination Router Base Jig Mk3
- CRB7 Mortise Hinge Lock & Flute Jig
- CRB7 Edging & Dowel Trim Kit

Figure 1: Overview of the MPOWER CRB7 Combination Router Jig Mk3 components, including the main jig, mortise jig, edging kit, and various rods and accessories.
2. Key Components and Features
2.1 CRB7 Universal Combination Router Base Jig Mk3
The core unit of the system, designed for universal compatibility with over 650 router models. It features an offset, cranked rod design for easy adjustment and a micro-adjuster for precise bit positioning.

Figure 2: Labeled diagram of the CRB7 Mk3 Router Jig, highlighting the off-set baseplate handle, rod adjustment mechanism, micro adjuster, tough nylon baseplate, and optional mounting points.
2.2 CRB7 Mortise Hinge Lock & Flute Jig
This accessory provides enhanced stability and precision for machining mortises, hinge rebates, lock rebates, and flutes. It consists of micro-adjustable precision-machined jaws that secure the workpiece.
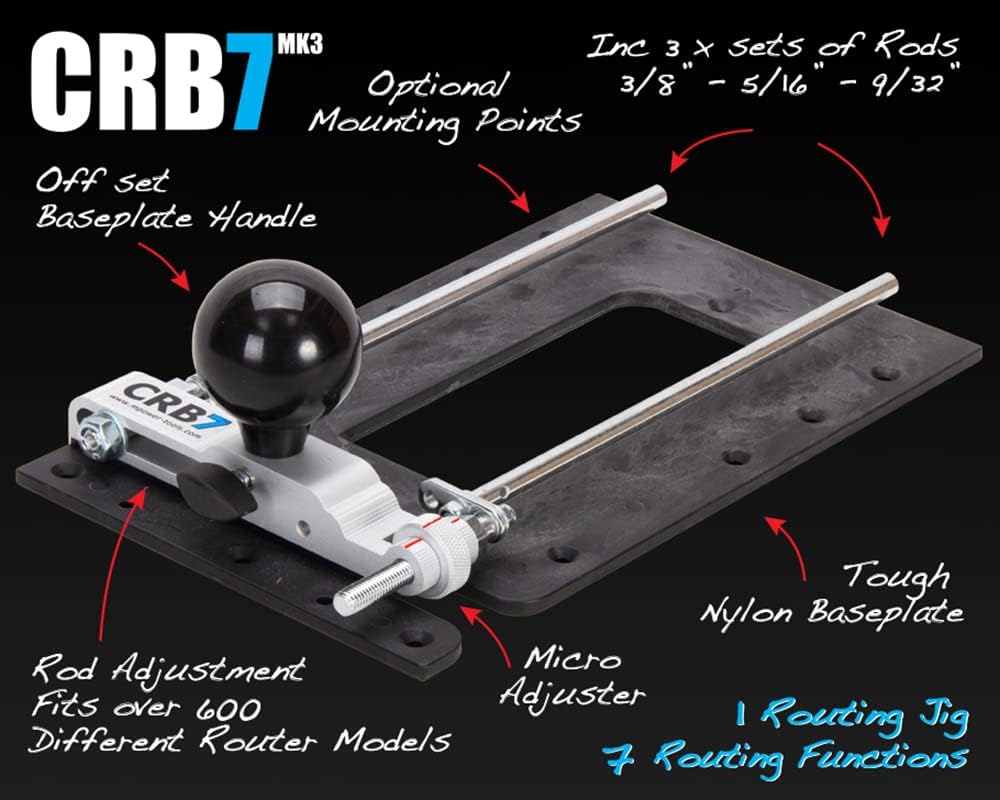
Figure 3: Labeled diagram of the Mortise Hinge Lock and Flute Jig, showing precision machined surfaces, brass mount fittings, twin locking bolts, and the micro adjuster.
2.3 CRB7 Edging & Dowel Trim Kit
Designed to simplify the flush trimming of hardwood edgings, iron-on lippings, and dowel heads, providing a smooth, fault-free finish.

Figure 4: The Tough Nylon Riser Pad with a bridge locking post and a heavy-duty tracer bearing, components used in various CRB7 functions, including the Edging & Dowel Trim Kit.
3. Initial Setup and Router Attachment
- Router Compatibility: The CRB7 is designed to fit a wide range of routers. Ensure your router's baseplate allows for secure attachment of the CRB7's rods.
- Attaching the CRB7 Base:
- Loosen the rod adjustment mechanism on the CRB7.
- Align the CRB7's rods with the mounting holes or slots on your router's baseplate.
- Slide the CRB7 onto the router, ensuring a snug fit. The offset design allows for flexibility.
- Tighten the rod adjustment mechanism to secure the CRB7 firmly to your router.
- Bit Installation: Install the appropriate router bit for your intended operation into your router's collet, following your router's manufacturer instructions.
- Micro Adjustment: Utilize the micro adjuster on the CRB7 to precisely position the router bit relative to the jig's guides or the workpiece. This allows for fine-tuning without disturbing the main setup.
4. Operating Instructions for Key Functions
The CRB7 system offers multiple functions. Always ensure the router is unplugged before making adjustments or changing bits.
4.1 Small Circle Cutting Jig
This function allows for routing precision circles and holes smaller than the router's base. The micro-adjuster facilitates precise diameter setting.
- Minimum Diameter: 1.5 inches (38mm)
- Maximum Diameter: 17.5 inches (445mm)
- Attach the small circle cutting accessory to the CRB7.
- Set the desired circle diameter using the micro-adjuster.
- Secure the workpiece and position the jig.
- Engage the router and carefully guide it to cut the circle.
4.2 Large Circle Cutting Jig
Enables cutting circles over 4 feet (1.2 meters) in diameter with high precision. The design allows for quick setup without removing the router from the CRB7.
- Attach the large circle cutting accessory.
- Establish the center point and radius for the large circle.
- Secure the pivot point and the workpiece.
- Guide the router smoothly around the pivot to achieve the cut.
4.3 Router Guide Side Fence
Functions as a parallel edge guide for routing dados or grooves parallel to an edge. It offers a greater range and easier setup compared to standard edge guides.
- Attach the side fence accessory to the CRB7.
- Adjust the fence distance from the router bit to match the desired dado or groove dimension.
- Secure the workpiece.
- Guide the CRB7 along the edge of the workpiece, keeping the fence flush.
4.4 Mortise Hinge Lock and Flute Jig
This accessory provides a stable platform for precise mortising, hinge rebates, lock rebates, and repetitive flute cutting.
- Attach the Mortise Hinge Lock and Flute Jig to the CRB7.
- Position the micro-adjustable jaws to securely hold the workpiece.
- Set the depth and position of the cut using the CRB7's micro-adjuster.
- Perform the mortise, rebate, or flute cut, utilizing the clear sight lines for accuracy.
4.5 Additional Functions
The CRB7 system also supports the following operations:
- Offset Router Base Plate: Provides an extended and stable platform for routing.
- Anti-Tilt Router Support: Helps maintain router stability during edge routing operations.
- Adjustable Mortising: Allows for precise and repeatable mortise cuts.
- False Panel Rebate Copier: For replicating rebates on panels.
- Adjustable Straight Edge Clamp Guide: Used with a straight edge for accurate linear routing.
- Edge and Dowel Trim Kit: For flush trimming hardwood edgings, lippings, and dowel heads. This kit utilizes a Tracer Racer Bearing for consistent cutter height and smooth passes.

Figure 5: Examples of the MPOWER CRB7 Router Jig in various woodworking applications, demonstrating its versatility for different routing tasks.
5. Maintenance
Regular maintenance ensures the longevity and performance of your MPOWER CRB7 Router Jig.
- Cleaning: After each use, clean the jig to remove sawdust and debris. Use a dry cloth or compressed air. Avoid solvents that may damage plastic components.
- Inspection: Periodically inspect all components for wear, damage, or loose fasteners. Pay close attention to the rods, micro-adjuster, and any moving parts.
- Lubrication: Lightly lubricate moving parts, such as the micro-adjuster threads and rod slides, with a dry lubricant or silicone spray to ensure smooth operation.
- Storage: Store the CRB7 and its accessories in a clean, dry environment, preferably in its original packaging or a dedicated storage case, to protect it from dust and impact.
6. Troubleshooting
This section addresses common issues you might encounter with the CRB7 Router Jig.
| Problem | Possible Cause | Solution |
|---|---|---|
| Jig does not attach securely to router. | Rods not properly aligned or tightened. Incompatible router base. | Ensure rods are correctly inserted and the adjustment mechanism is fully tightened. Verify router compatibility. |
| Inaccurate cuts or inconsistent results. | Loose components, incorrect micro-adjustment, or improper workpiece clamping. | Check all fasteners for tightness. Re-verify micro-adjuster settings. Ensure workpiece is securely clamped and does not shift during routing. |
| Difficulty in adjusting components. | Dust accumulation or lack of lubrication. | Clean components thoroughly and apply a light dry lubricant to moving parts. |
| Router bit not centered or aligned. | Improper initial setup or micro-adjustment. | Review the setup instructions. Use the micro-adjuster for fine-tuning bit position. |
7. Specifications
- Brand: MPOWER
- Model: CRB7 Mk3
- Part Number: 10099
- Construction Material: Durable Metal and Nylon
- Base Type Compatibility: Plunge (and fixed base routers with appropriate mounting)
- Small Circle Cutting Range: 1.5" (38mm) to 17.5" (445mm) diameter
- Large Circle Cutting Range: Up to 4 feet (1.2 meters) diameter and beyond
- Functions: 9+ (Small Circle Cutting, Large Circle Cutting, Router Guide Side Fence, Mortise Hinge Lock & Flute Jig, Offset Router Base Plate, Anti-Tilt Router Support, Adjustable Mortising, False Panel Rebate Copier, Adjustable Straight Edge Clamp Guide, Edge & Dowel Trim Kit)
8. Warranty and Support
For warranty information, technical support, or to purchase replacement parts, please contact MPOWER Tools directly. Refer to the official MPOWER website or your purchase documentation for the most current contact details and warranty terms.
MPOWER Tools: Visit the MPOWER Store on Amazon
Ask a question about this manual
Ask about setup, troubleshooting, compatibility, parts, safety, or missing instructions. Manuals+ will review the question and use this page’s manual context to help answer it.