Introduction
This manual provides detailed instructions for the installation, operation, and maintenance of your Owigift carburetor replacement. Please read this manual thoroughly before installation to ensure proper function and safety. Retain this manual for future reference.
Safety Information
Always observe basic safety precautions when working with fuel systems and internal combustion engines. Failure to follow these instructions may result in serious injury or property damage.
- Ensure the snowblower engine is off and cool before beginning any work.
- Disconnect the spark plug wire to prevent accidental starting.
- Work in a well-ventilated area. Fuel vapors are flammable.
- Wear appropriate personal protective equipment, including gloves and eye protection.
- Handle fuel with extreme care. Do not smoke or use open flames near fuel.
- Refer to your snowblower's original owner's manual for specific safety guidelines.
Package Contents
Verify that all items are present in the package:
- 1x Owigift Carburetor Assembly
- 1x Primer Bulb
- 1x Fuel Filter
- 2x Gaskets (various shapes)
- 1x Fuel Line (may be included)

Image 1: Contents of the Owigift carburetor replacement kit, including the main carburetor unit, two gaskets, a red primer bulb, and a red fuel filter.
Compatibility
This Owigift carburetor is designed as a replacement for the following Poulan Pro snowblower models:
- Poulan Pro PR627ES
- Poulan Pro 961920038
- Poulan Pro 961940010
- Poulan Pro 961940010-04
- Poulan Pro 961940010-05
- Poulan Pro 96194001004
- Poulan Pro 96194001005
Please verify your snowblower's model number before proceeding with installation.
Installation
The following steps outline the general procedure for replacing the carburetor. Specific steps may vary slightly depending on your snowblower model. Refer to your snowblower's service manual for detailed instructions.
Tools Required:
- Socket wrench set
- Screwdriver set
- Pliers
- Fuel line clamps
- Container for draining fuel
Procedure:
- Prepare the Snowblower:
Ensure the engine is off and cool. Disconnect the spark plug wire. Turn off the fuel supply valve, if present. Place a suitable container under the carburetor to catch any draining fuel.
- Remove Air Filter Assembly:
Locate and remove the air filter housing and air filter. This usually involves unscrewing a few bolts or clips.
- Disconnect Fuel Line:
Using pliers, carefully remove the fuel line clamp and disconnect the fuel line from the old carburetor. Allow any remaining fuel to drain into the container. Cap the fuel line to prevent further leakage.
- Disconnect Linkages and Wires:
Carefully note the position and connection of all throttle linkages, choke linkages, and any electrical wires (e.g., for a fuel solenoid) attached to the carburetor. Take photos if necessary for reassembly. Disconnect them.

Image 2: Side view of the carburetor, showing the throttle linkage mechanism. Note the position of these components before removal.
- Remove Old Carburetor:
Unscrew the mounting bolts that secure the carburetor to the engine manifold. Carefully remove the old carburetor and any old gaskets. Inspect the mounting surface for debris or damage.
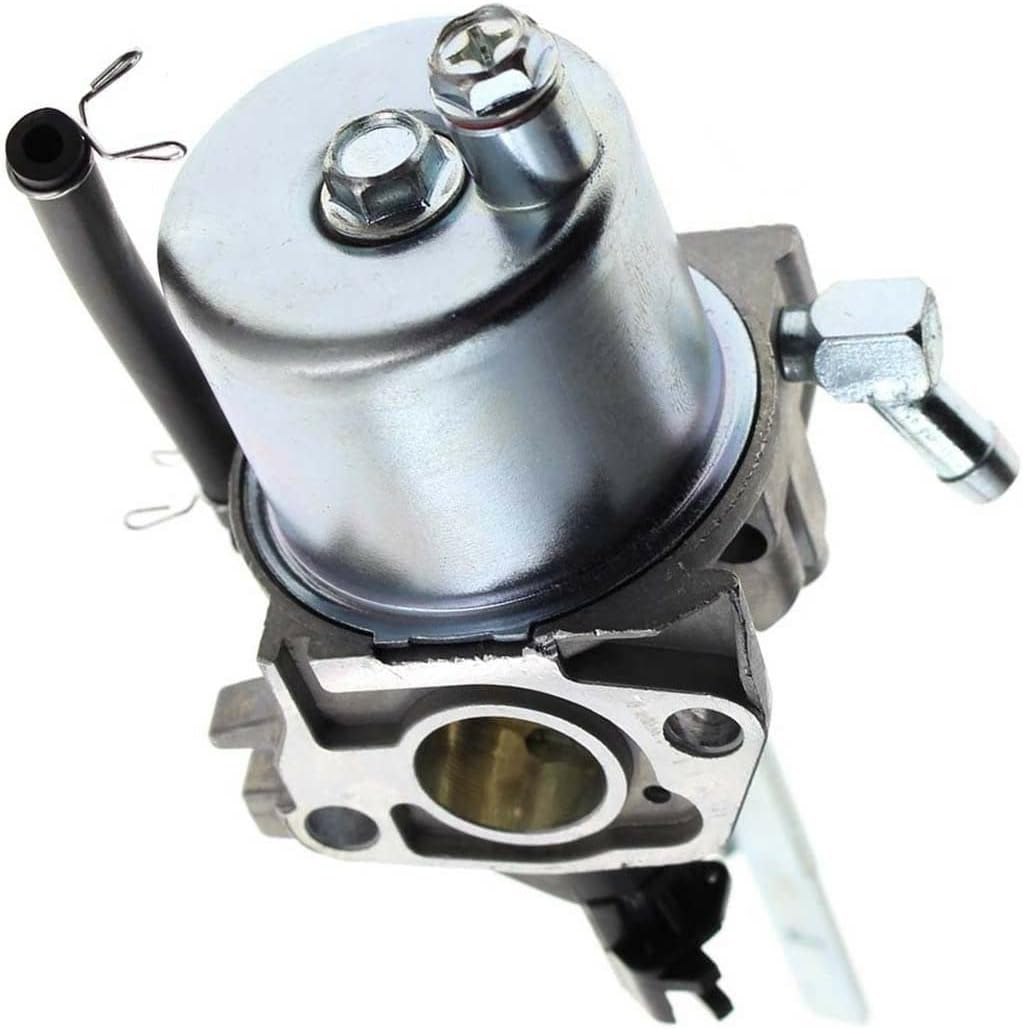
Image 3: Top-down view of the carburetor, highlighting the fuel bowl and various ports. Ensure all connections are noted.
- Install New Gaskets:
Place the new gaskets in their correct positions between the engine manifold, any spacer blocks, and the new carburetor. Ensure they are properly aligned to prevent air leaks.
- Mount New Carburetor:
Position the new Owigift carburetor onto the mounting studs. Secure it with the mounting bolts, tightening them evenly to the manufacturer's specifications (refer to snowblower manual).

Image 4: Bottom view of the carburetor, showing the mounting flange and fuel inlet. Ensure proper gasket placement during installation.
- Reconnect Linkages and Wires:
Reconnect all throttle and choke linkages, and any electrical wires, ensuring they move freely and are correctly seated. Refer to your earlier photos if needed.
- Reconnect Fuel Line and Install Fuel Filter/Primer Bulb:
Connect the fuel line to the new carburetor and secure it with a clamp. If replacing the fuel filter or primer bulb, install them now according to the snowblower's original configuration.
- Reinstall Air Filter Assembly:
Reattach the air filter and its housing.
- Final Checks:
Double-check all connections for tightness. Ensure no tools or debris are left in the engine compartment. Reconnect the spark plug wire. Turn on the fuel supply valve.
Operation
After installation, the carburetor is ready to deliver the correct fuel-air mixture to the engine. Follow your snowblower's manufacturer instructions for starting and operating the engine. The primer bulb, if equipped, should be pressed several times until firm to prime the fuel system before cold starts.
Observe engine performance. If the engine runs rough, stalls, or does not start, refer to the Troubleshooting section.
Maintenance
Proper maintenance extends the life of your carburetor and ensures optimal engine performance.
- Fuel Quality: Always use fresh, clean fuel. Stale or contaminated fuel is a primary cause of carburetor issues. Consider using a fuel stabilizer, especially during storage.
- Fuel Filter: Regularly inspect and replace the fuel filter (if applicable) according to your snowblower's maintenance schedule. A clogged fuel filter can restrict fuel flow to the carburetor.
- Air Filter: Ensure the air filter is clean and free of debris. A dirty air filter can cause a rich fuel mixture and poor engine performance.
- Storage: Before long-term storage, drain the fuel system or run the engine until it runs out of fuel to prevent fuel from gumming up the carburetor.
Troubleshooting
If you encounter issues after installing the new carburetor, review the following common problems and solutions:
| Problem | Possible Cause | Solution |
|---|---|---|
| Engine will not start | No fuel, clogged fuel filter, incorrect choke/throttle setting, spark plug issue, air leak. | Check fuel level and quality. Replace fuel filter. Ensure choke is set correctly for starting. Inspect spark plug. Verify gaskets are sealed. |
| Engine runs rough or stalls | Improper fuel-air mixture, dirty air filter, fuel contamination, loose connections. | Check air filter. Ensure fuel is fresh. Verify all linkages and fuel lines are secure. |
| Fuel leaks | Loose fuel line connection, damaged gasket, cracked fuel line. | Tighten fuel line clamps. Replace damaged gaskets. Inspect fuel lines for cracks. |
| Engine lacks power | Clogged fuel filter, dirty air filter, carburetor not properly adjusted (rare for replacement units). | Replace fuel filter. Clean/replace air filter. Ensure all linkages move freely. |
If problems persist after attempting these solutions, it is recommended to consult a qualified service technician or refer to your snowblower's official service manual.
Specifications
- Product Type: Carburetor Replacement
- Brand: Owigift
- Compatibility: Poulan Pro PR627ES, 961920038, 961940010, 961940010-04, 961940010-05, 96194001004, 96194001005 Snowblowers
- Included Components: Carburetor, Gaskets, Primer Bulb, Fuel Filter
Warranty and Support
For information regarding warranty coverage or technical support, please refer to the retailer or manufacturer's official website where the product was purchased. Keep your proof of purchase for warranty claims.