
1. Introduction
This manual provides detailed instructions for the setup, operation, and maintenance of your new KKG12A-C1 replacement remote control. Designed for compatibility with various CHANGHONG, REE, Pastamic, and CHEBLO air conditioner models, this remote offers a seamless replacement experience without the need for complex programming.
2. Product Overview
2.1. Components
- 1 x KKG12A-C1 Remote Control Unit
2.2. Key Features
- Applicable Model: Specifically designed for Changhong KKG12A-C1 air conditioner remote control, ensuring stable performance.
- Drive Free Operation: Ready to use directly after battery installation; no setup or programming required.
- User-Friendly Design: Ergonomic and intuitive layout for easy operation.
- Sensitive Buttons: Responsive buttons with a full range of functions to perfectly replace your original remote.
- Durable Construction: Made from high-quality ABS material for long-lasting use and resistance to wear.
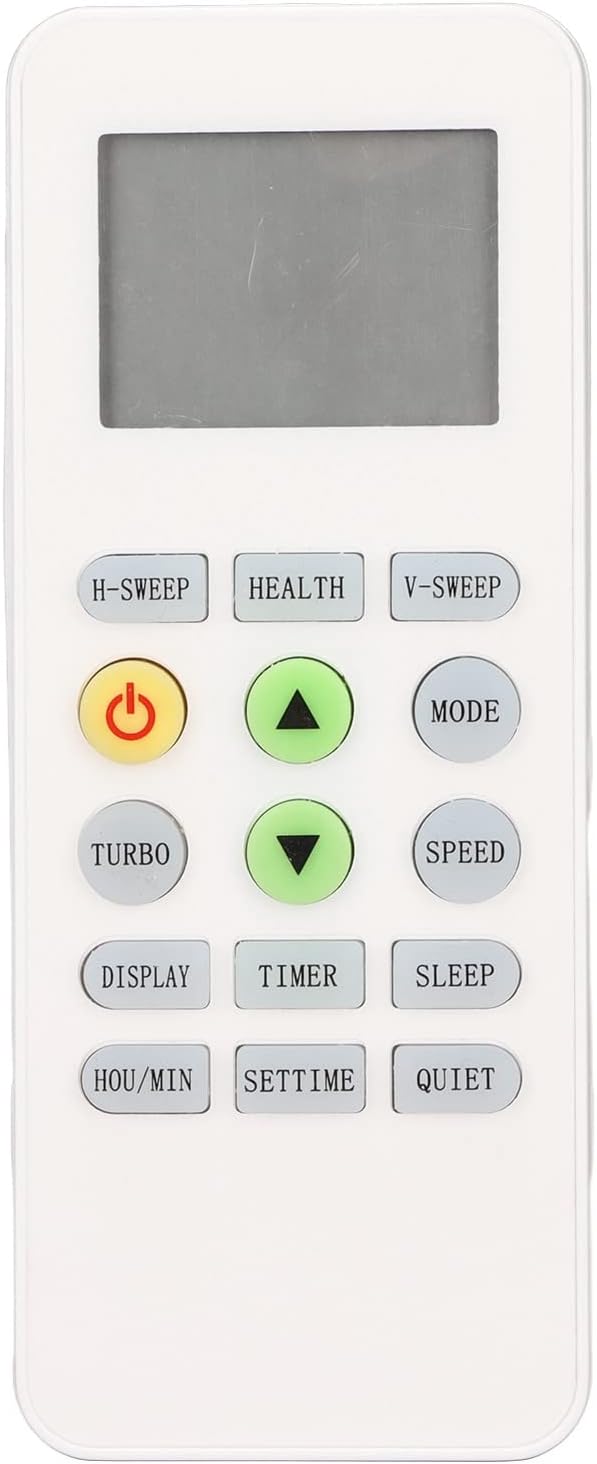
Figure 2.2.1: Front view of the KKG12A-C1 remote control, highlighting its display and button arrangement.
3. Setup
3.1. Battery Installation
The remote control requires two (2) AAA batteries (not included). Follow these steps to install them:
- Locate the battery compartment cover on the back of the remote control.
- Slide the cover downwards or press the latch (if present) to open the compartment.
- Insert two AAA batteries, ensuring the positive (+) and negative (-) terminals align correctly with the markings inside the compartment.
- Slide the battery compartment cover back into place until it clicks securely.
Important Note: Ensure batteries are inserted with correct polarity. Do not mix old and new batteries, or different types of batteries. Remove batteries if the remote control will not be used for an extended period.

Figure 3.1.1: Open battery compartment for AAA battery installation.
4. Operating Instructions
Once batteries are installed, the remote control is ready for immediate use. Point the remote control directly at the air conditioner's receiver when operating.

Figure 4.0.1: The remote control held comfortably in hand.
4.1. Basic Functions
- Power Button (⑂): Press to turn the air conditioner ON or OFF.
- MODE Button: Cycles through operating modes such as Auto, Cool, Dry, Fan, and Heat (if supported by your AC unit).
- Temperature Adjustment (▲ / ▼): Use the Up/Down arrows to increase or decrease the desired temperature.
- SPEED Button: Adjusts the fan speed (e.g., Low, Medium, High, Auto).
4.2. Advanced Functions
- H-SWEEP Button: Activates or deactivates horizontal swing of the air deflector.
- V-SWEEP Button: Activates or deactivates vertical swing of the air deflector.
- TURBO Button: Engages maximum cooling/heating power for rapid temperature change.
- DISPLAY Button: Toggles the display on the air conditioner unit (e.g., temperature display).
- TIMER Button: Used to set the ON/OFF timer for the air conditioner. Refer to your AC unit's manual for specific timer setting procedures.
- SLEEP Button: Activates the sleep mode, which adjusts temperature and fan speed for comfortable sleep.
- HEALTH Button: Activates specific health-related functions (if available on your AC unit), such as air purification or ionizer.
- QUIET Button: Reduces fan speed to minimize noise for quieter operation.
- HOU/MIN Button: Used in conjunction with the TIMER or SETTIME functions to adjust hours and minutes.
- SETTIME Button: Used to set the current time on the air conditioner's display (if applicable).

Figure 4.2.1: Remote control in active use with an air conditioner.
5. Maintenance
5.1. Cleaning
To maintain the remote control's appearance and functionality:
- Wipe the surface with a soft, dry cloth.
- For stubborn dirt, slightly dampen the cloth with water and a mild detergent, then wipe dry immediately.
- Do not use abrasive cleaners, alcohol, or corrosive liquids, as these can damage the remote's surface or internal components.
5.2. Storage
When not in use for extended periods, store the remote control in a cool, dry place away from direct sunlight and extreme temperatures. Remove batteries to prevent leakage and potential damage to the remote.
6. Troubleshooting
If you experience issues with your remote control, please refer to the following common problems and solutions:
| Problem | Possible Cause | Solution |
|---|---|---|
| Remote not responding | Dead or incorrectly installed batteries. Obstruction between remote and AC unit. Remote out of range. | Replace batteries with new AAA batteries, ensuring correct polarity. Remove any obstructions. Move closer to the AC unit. |
| Limited range or intermittent response | Weak batteries. Infrared sensor on AC unit is dirty or blocked. Strong light interference. | Replace batteries. Clean the infrared sensor on the AC unit. Avoid using in direct sunlight or near strong light sources. |
| Buttons not working | Physical damage to buttons. Internal circuit issue. | Ensure buttons are not stuck. If physical damage is evident or issue persists, consider replacement. |
7. Specifications
| Feature | Detail |
|---|---|
| Item Type | Remote Control |
| Material | ABS |
| Battery Type | 2 x AAA Batteries (Not Included) |
| Compatible Devices | Air Conditioner (CHANGHONG/REE/Pastamic/CHEBLO KKG12A-C1 models) |
| Connectivity Technology | Infrared |
| Package Dimensions | 5.43 x 2.28 x 0.79 inches |
| Item Weight | 2.11 ounces |
8. Warranty and Support
This product is covered by the manufacturer's standard warranty. For specific warranty details, returns, or technical support, please refer to the information provided at the point of purchase or contact Acogedor customer service directly. Please have your product model number (KKG12A-C1) and purchase details ready when contacting support.