1. Introduction
Thank you for choosing the BetterSub Tumbler Mug Heat Press Machine. This manual provides essential information for the safe and efficient operation, setup, and maintenance of your heat press. This machine is designed for sublimation heat transfer onto various cylindrical and conical drinkware, including skinny tumblers, ceramic mugs, glass cups, metal cups, and aluminum bottles.

The BetterSub Tumbler Mug Heat Press Machine in purple, shown alongside examples of sublimated mugs and tumblers, and an interchangeable 30oz heating attachment.
2. Safety Information
Please read all safety instructions carefully before operating the machine to prevent injury or damage.
- Always operate the machine on a stable, heat-resistant surface.
- Keep hands and other body parts away from the heating element during operation to avoid burns.
- Ensure proper ventilation in your workspace to dissipate any fumes from the sublimation process.
- Do not leave the machine unattended while it is powered on or heating.
- Never operate the heating element without a cup or tumbler inserted for extended periods, as this can deform the heating pad.
- Disconnect the power cord from the outlet when the machine is not in use or before cleaning and maintenance.
- Keep the machine away from water or other liquids to prevent electrical shock.
- This appliance is not intended for use by persons with reduced physical, sensory, or mental capabilities, or lack of experience and knowledge, unless they have been given supervision or instruction concerning use of the appliance by a person responsible for their safety.
3. Product Components and Specifications
Familiarize yourself with the various parts of your BetterSub Tumbler Mug Heat Press Machine.

A detailed diagram labeling the key components of the heat press machine, including the handle, pressure knob, thumb screw, mug heater, heat-resistant transmission line, air interface, power switch, fuse, and temp/time controller.
3.1. Technical Specifications
| Feature | Specification |
|---|---|
| Model Number | BYBS-Tumbler Press |
| Voltage | 110V |
| Wattage | 500W |
| Temperature Range | 0-482°F / 0-250°C |
| Time Range | 0-999 seconds |
| Product Dimensions (L x W x H) | 15.75" x 11.81" x 11.81" (40cm x 30cm x 30cm) |
| Item Weight | 1.87 lbs (850.49 g) |
| Material | Aluminum, Ceramic, Metal |
An illustration showing the physical dimensions of the BetterSub Tumbler Mug Heat Press Machine and its 30oz attachment, with measurements in centimeters and inches.
4. Setup
Follow these steps to set up your heat press machine for the first time:
- Unpack the Machine: Carefully remove all components from the packaging. Inspect for any shipping damage.
- Placement: Place the heat press on a sturdy, level, and heat-resistant surface in a well-ventilated area. Ensure there is enough space around the machine for safe operation.
- Connect Power: Plug the power cord into a grounded 110V electrical outlet. Ensure the power switch is in the OFF position before plugging in.
- Initial Check: Verify that the heating attachment is securely installed. The machine comes with a 30oz attachment pre-installed.
5. Operating Instructions
5.1. Power On and Initial Settings
- Power On: Flip the power switch to the ON position. The digital control panel will illuminate.
- Set Temperature and Time:
- Press the 'SET' button once to enter temperature setting mode. The 'SV' value will flash. Use the 'Up' and 'Down' arrows to adjust to your desired temperature (e.g., 365°F / 185°C for most sublimation). Press 'SET' again to confirm.
- Press the 'SET' button a second time to enter time setting mode. The 'S' value will flash. Use the 'Up' and 'Down' arrows to adjust to your desired time (e.g., 45-60 seconds). Press 'SET' again to confirm.
- The machine will begin heating to the set temperature. The 'PV' display shows the current temperature, and 'SV' shows the target temperature.

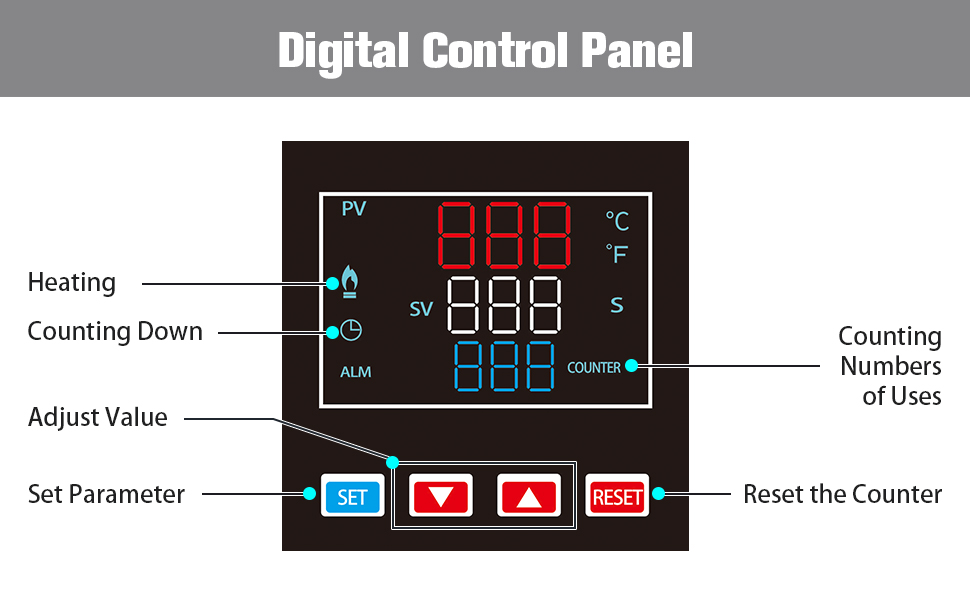
A close-up view of the digital control panel, indicating displays for PV (Process Value/Current Temperature), SV (Set Value/Target Temperature), time, and a counter, along with buttons for setting parameters and resetting the counter.
5.2. Adjusting Pressure
The machine features double stainless steel pressure knobs for precise adjustment.
- Test Fit: Before heating, place your blank tumbler or mug into the heating element.
- Adjust Knobs: Turn the black pressure knobs clockwise to increase pressure or counter-clockwise to decrease pressure. Aim for a firm, snug fit that allows the tumbler to be inserted and removed with moderate effort.
- Even Pressure: Ensure pressure is applied evenly across the surface of the tumbler for consistent sublimation results.
A close-up image of the double stainless steel pressure knobs, used for manually adjusting the pressure applied by the heating element.
5.3. Sublimation Process
Once the machine reaches the set temperature, you are ready to begin sublimation.
- Prepare Design: Print your sublimation design onto sublimation paper using sublimation ink. Trim the design as needed.
- Attach Design: Securely wrap the sublimation paper around your blank tumbler or mug, using heat-resistant tape to hold it in place. Ensure the design is flat and smooth against the surface.
- Insert Tumbler: Carefully insert the prepared tumbler into the heated attachment. Close the press handle. The timer will automatically start counting down.
- Rotate (Optional): For full-wrap designs on larger tumblers, you may need to rotate the tumbler halfway through the pressing time to ensure even heat distribution. Open the press, rotate the tumbler, and close the press to resume timing.
- Remove Tumbler: Once the timer alarms, open the press handle and carefully remove the hot tumbler using heat-resistant gloves.
- Cool Down: Place the hot tumbler on a heat-resistant surface to cool. Once cool enough to handle, carefully remove the sublimation paper to reveal your design.
The BetterSub heat press machine shown actively sublimating two 11oz mugs at the same time, demonstrating its dual capacity.

A collection of various types of drinkware, including wine tumblers, tumblers with handles, skinny tumblers, sports water bottles, shot glasses, and water bottles, all suitable for sublimation with the BetterSub heat press.
5.4. Changing Heating Attachments
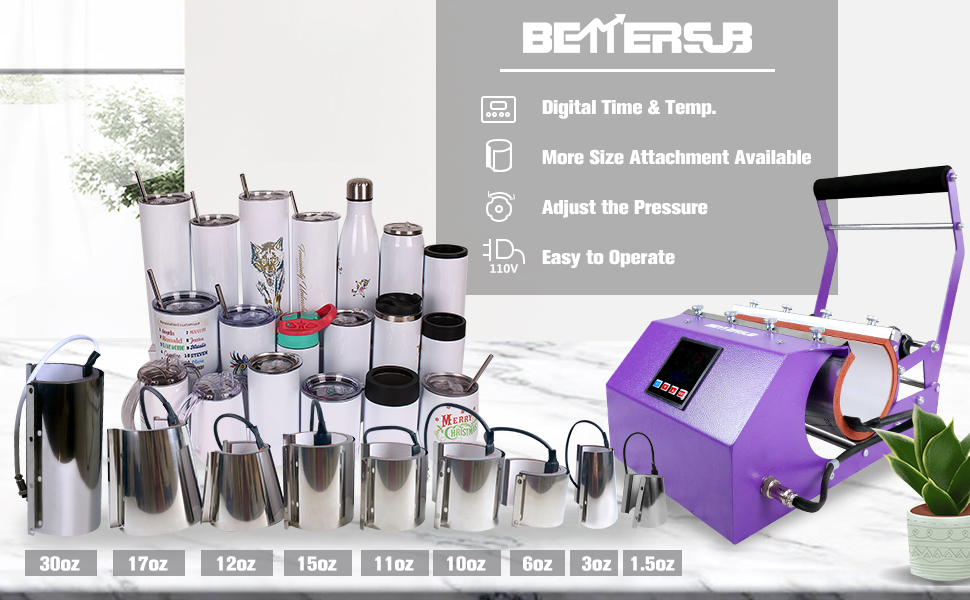
The BetterSub heat press is compatible with various heating attachments for different mug and tumbler sizes. The machine comes with a 30oz attachment. Other sizes can be purchased separately.
- Power Off and Cool Down: Ensure the machine is powered off and the current heating attachment has completely cooled down before attempting to change it.
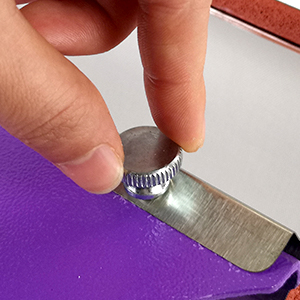
- Loosen Thumb Screws: Locate the thumb screws on the side of the heating attachment. Loosen these screws manually.
- Remove Attachment: Carefully slide the current heating attachment out of its position.
- Install New Attachment: Align the new heating attachment with the mounting points and slide it into place.
- Tighten Thumb Screws: Securely tighten the thumb screws to hold the new attachment firmly in place.
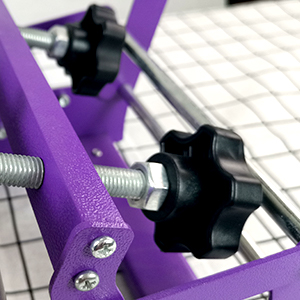
A close-up view of the updated thumb screw design, which facilitates easy replacement of the tumbler heater attachment.
An array of different sized cylindrical and conical heating attachments compatible with the BetterSub heat press machine, ranging from 1.5oz to 40oz.
6. Maintenance
Proper maintenance ensures the longevity and optimal performance of your heat press machine.
- Cleaning: Ensure the machine is unplugged and completely cool before cleaning. Wipe down the exterior with a soft, damp cloth. Do not use abrasive cleaners or solvents.
- Heating Element Care: The silicone pads and Teflon coating on the heating element are designed for durability. Avoid scratching or puncturing them. If the pads become dirty, gently wipe them with a soft cloth.
- Storage: When not in use, store the machine in a clean, dry environment, away from direct sunlight and extreme temperatures.
- Regular Inspection: Periodically check all connections, screws, and the power cord for any signs of wear or damage.
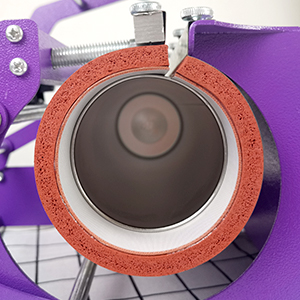
A detailed view of the heating element's silicone pads and Teflon coating, highlighting their heat-resistant and durable properties for optimal transfer performance.
7. Troubleshooting
Refer to the table below for common issues and their solutions.
| Problem | Possible Cause | Solution |
|---|---|---|
| Machine does not power on | Power cord not connected; Power switch off; Blown fuse | Check power connection; Ensure switch is ON; Replace fuse if necessary. |
| Temperature drops when tumbler is inserted | Normal operation | This is a normal phenomenon as the cold tumbler absorbs heat. The machine will quickly recover to the set temperature. |
| Uneven sublimation transfer | Uneven pressure; Incorrect temperature/time; Tumbler not centered | Adjust pressure knobs for even contact; Verify temperature and time settings; Ensure tumbler is centered and design is flat. |
| Heating pad deforms | Heating without a cup for too long | Avoid heating the attachment without a cup for extended periods. Replace heating pad if severely deformed. |
| Design is faded or incomplete | Insufficient temperature or time; Low pressure; Incorrect sublimation paper/ink | Increase temperature or time slightly; Adjust pressure; Ensure you are using quality sublimation supplies. |
8. Warranty and Support
For warranty information, please refer to the documentation included with your purchase or visit the official BetterSub website. If you encounter any issues not covered in this manual or require further assistance, please contact BetterSub customer support through their official channels.
You can often find support information and additional resources by visiting the BetterSub Store on Amazon.