Yamaha PSR-E473
Yamaha PSR-E473 Keyboard User Manual
Model: PSR-E473
Brand: Yamaha
Introduction
This manual provides detailed instructions for the safe and effective use of your Yamaha PSR-E473 Keyboard. The PSR-E473 is a portable electronic keyboard designed to combine excellent sound quality with a responsive playing feel. It features touch-sensitive keys, a powerful sound engine, extended effects, and a wide range of styles suitable for various musical genres. Please read this manual thoroughly before using the instrument to ensure optimal performance and longevity.
1. Setup
1.1 Unpacking and Inspection
Carefully remove the keyboard from its packaging. Inspect the instrument for any signs of damage that may have occurred during transit. Retain the original packaging for future transport or storage.
1.2 Power Connection
The PSR-E473 can be powered using either an AC adapter (sold separately) or batteries.
- AC Adapter: Connect the supplied AC power adapter to the DC IN jack on the rear panel of the keyboard and then plug it into a standard wall outlet.
- Batteries: The keyboard requires 4 AAA batteries. Open the battery compartment on the underside of the unit, insert the batteries according to the polarity indicators, and close the compartment securely.
1.3 Initial Placement
Place the keyboard on a stable, flat surface. Ensure there is adequate ventilation around the unit. Avoid placing it in direct sunlight, near heat sources, or in excessively humid or dusty environments.
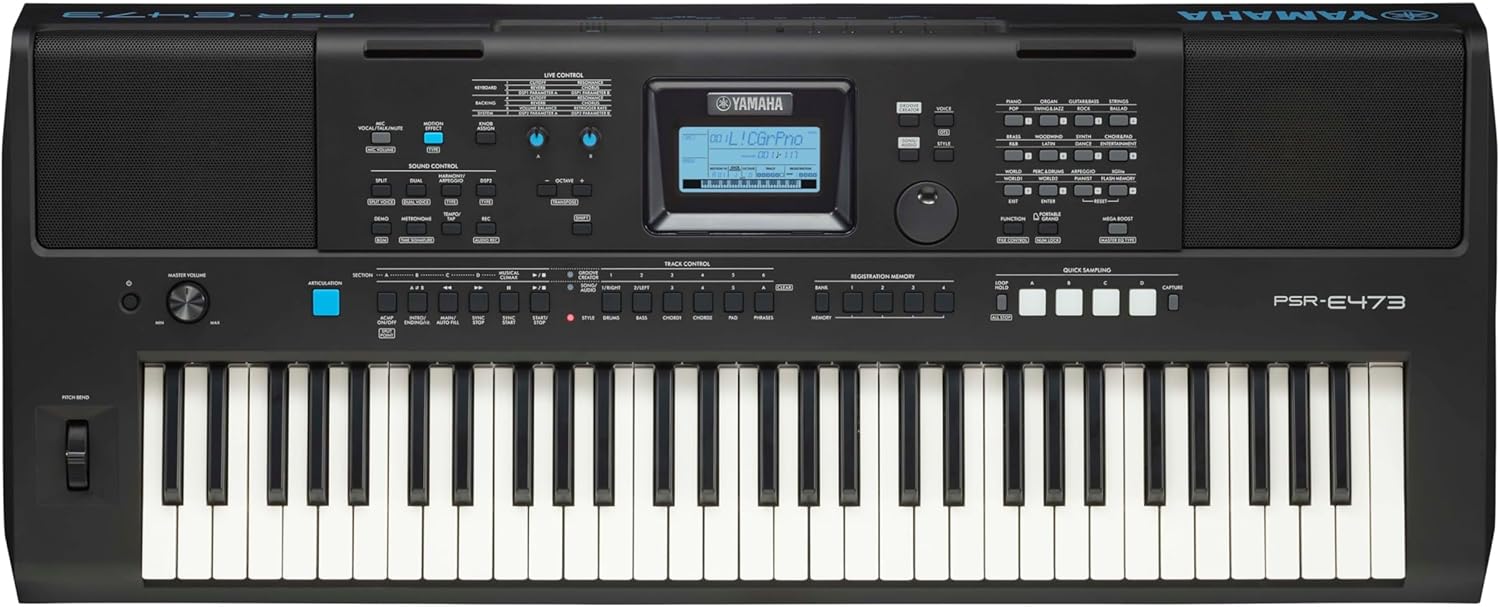
Figure 1: Top-down view of the Yamaha PSR-E473 Keyboard, showing the keys, control panel, and speakers.
1.4 Connecting Peripherals
The PSR-E473 offers various connectivity options:
- Headphones: Connect standard stereo headphones to the 3.5mm PHONES/OUTPUT jack for private practice.
- Audio Output: Use the PHONES/OUTPUT jack to connect to an external amplifier, mixer, or recording device.
- USB TO HOST: Connect the keyboard to a computer for MIDI data transfer.
- USB TO DEVICE: Connect a USB flash drive for data storage and playback.
- AUX IN: Connect an external audio player (e.g., smartphone, MP3 player) to play along with your favorite music.
- LIVE CONTROL: Connect a microphone for vocal effects.

Figure 2: Rear panel of the PSR-E473, illustrating the various input/output jacks including USB, AUX IN, and PHONES/OUTPUT.
2. Operating Instructions
2.1 Power On/Off
Press the [POWER] button located on the left side of the control panel to turn the instrument on. Press and hold the same button to turn it off.
2.2 Adjusting Volume
Rotate the MASTER VOLUME knob clockwise to increase the volume and counter-clockwise to decrease it. Adjust to a comfortable listening level.
2.3 Selecting Voices (Sounds)
The PSR-E473 offers a wide array of instrument voices. To select a voice:
- Press the [VOICE] button.
- Use the Category buttons or the Dial to browse through the available voices.
- Press the [ENTER] button or play a key to confirm your selection.
2.4 Using Styles (Accompaniment)
Styles provide automatic accompaniment patterns. To use a style:
- Press the [STYLE] button.
- Use the Category buttons or the Dial to select a desired style.
- Press the [START/STOP] button to begin the accompaniment.
- Play chords with your left hand to control the accompaniment.
- Press [START/STOP] again to stop the style.
2.5 Recording Your Performance
The PSR-E473 allows you to record your performances. Refer to the detailed instructions in the full owner's manual for multi-track recording and advanced features.
- Press the [REC] button to enter recording standby mode.
- Play the keyboard to start recording.
- Press the [START/STOP] button to stop recording.
- Your recorded performance can be played back by pressing the [PLAY/PAUSE] button.
3. Maintenance
3.1 Cleaning
Wipe the instrument with a soft, dry cloth. If the surface is very dirty, use a cloth dampened with a weak solution of water and a neutral detergent. Never use benzene, thinner, alcohol, or any type of solvent, as these may cause discoloration or damage to the finish.
3.2 Storage
When not in use for extended periods, disconnect the AC adapter and remove the batteries. Store the instrument in a cool, dry place away from direct sunlight and extreme temperatures.
4. Troubleshooting
| Problem | Possible Cause | Solution |
|---|---|---|
| No sound | Volume is too low; headphones connected; power issue. | Increase MASTER VOLUME; disconnect headphones; check power connection/batteries. |
| Keys not responding | Instrument is off; specific voice selected has no sound. | Turn on the power; select a different voice. |
| Distorted sound | Volume too high; external device connected improperly. | Lower MASTER VOLUME; check connections to external devices. |
| Display is blank | Power is off; low battery. | Turn on power; replace batteries or use AC adapter. |
If the problem persists after trying these solutions, please contact Yamaha customer support.
5. Specifications
| Feature | Detail |
|---|---|
| Model Name | PSR E473 |
| Number of Keys | 61 |
| Key Type | Touch-sensitive |
| Dimensions (W x D x H) | 99.2 cm x 40.4 cm x 13.6 cm (39.06 x 15.91 x 5.35 inches) |
| Weight | 7.77 kg (17.09 pounds) |
| Connectivity | USB TO HOST, USB TO DEVICE, AUX IN, PHONES/OUTPUT, LIVE CONTROL (Microphone) |
| Power Source | AC Adapter (not included), 4 AAA batteries |
| Headphones Jack | 3.5mm Jack |
| Skill Level | Beginner |
| Special Feature | Portable |

Figure 3: Detailed diagram illustrating the weight and dimensions of the PSR-E473 Keyboard.
6. Warranty and Support
6.1 Product Warranty
Yamaha products are manufactured to high standards and are backed by a limited warranty. Please refer to the warranty card included with your purchase or visit the official Yamaha website for detailed warranty terms and conditions specific to your region.
6.2 Customer Support
For technical assistance, service, or further inquiries, please contact Yamaha customer support. You can find contact information and additional resources on the official Yamaha website: www.yamaha.com.
Online courses and tutorials may also be available to help you get the most out of your instrument.
Ask a question about this manual
Ask about setup, troubleshooting, compatibility, parts, safety, or missing instructions. Manuals+ will review the question and use this page’s manual context to help answer it.