Introduction
Thank you for choosing the Alonefire PL400 Magnetic Clip-on Safety Light. This compact and versatile LED light is designed for hands-free illumination and enhanced visibility in various situations, including night activities, nursing, and general safety. Please read this manual carefully to ensure proper use, maintenance, and to maximize the lifespan of your device.
Package Contents
Upon opening your Alonefire PL400 package, please verify that all the following items are included:
- 1 x Alonefire PL400 Magnetic Clip-on Safety Light
- 1 x Mini Screwdriver
- 1 x User Manual (this document)
- 1 x Keychain Flashlight
- 2 x Spare Button Batteries (CR2032 type)

Image: Contents of the Alonefire PL400 package, showing the main clip-on light, a small screwdriver, the instruction manual, a bonus keychain light, and two spare button cell batteries.
Product Features
- Durable Construction: Made from high-quality ABS plastic, ensuring durability and wear resistance.
- Water-Resistant Design: Designed to withstand splashes and light rain, but not intended for submersion.
- Bright LED Illumination: Features a high-quality SMD LED light source, providing 15-20 lumens of brightness.
- Dual Lighting Modes: Offers a white flash mode for general visibility and a red flash mode for emergency signaling.
- Strong Magnetic Attachment: Equipped with a powerful magnet for secure, hands-free attachment to metal surfaces or thin fabrics (using a metal object on the other side).
- Long Battery Life: Powered by two built-in button batteries, offering up to 24 hours of illumination. Brightness may gradually decrease after 12 hours of continuous use.
- User-Replaceable Batteries: Comes with two spare batteries and a mini screwdriver for easy battery replacement.
- Versatile Application: Ideal for clipping onto shirts, pants, hats, backpacks, dog collars, belts, sleeves, work belts, and jackets.
Specifications
| Feature | Detail |
|---|---|
| Model Number | PL400 |
| Material | ABS Plastic |
| Light Source Type | SMD LED |
| Luminous Flux | 15-20 Lumens |
| Lighting Modes | White Flash, Red Flash |
| Power Source | 2 x CR2032 Button Batteries (Included) |
| Dimensions (L x W x T) | 73mm x 30mm x 20mm (approx. 11.9 x 2.3 x 2.3 cm) |
| Weight | 38 grams |
| Special Feature | Durable, Magnetic Attachment |

Image: A hand holding the Alonefire PL400 light, with callouts indicating its dimensions: 73mm length, 30mm width, and 20mm thickness.
Setup
Before first use, you must remove the insulating sheet to activate the battery.
- Locate the small insulating sheet positioned near the switch.
- Gently pull out and remove the insulating sheet. This will allow the battery to make contact and power the light.

Image: A diagram of the Alonefire PL400 light, highlighting the magnetic back, the power switch, and the insulating sheet that must be removed before initial operation.
Operating Instructions
Turning On/Off and Changing Modes
- Press the power switch once to turn on the light in white flash mode.
- Press the power switch a second time to switch to red flash mode.
- Press the power switch a third time to turn off the light.
Attaching the Light
The Alonefire PL400 features a strong magnetic design for versatile attachment:
- Direct Magnetic Attachment: Simply place the light onto any ferrous metal surface (e.g., a metal cabinet, car body).
- Clip-on Attachment: For clothing or thin fabrics (like shirts, hats, backpacks), place the light on one side of the fabric and a small metal object (e.g., a metal badge, a thin metal plate) on the other side. The strong magnet will secure the light in place.

Image: A person jogging in the dark, wearing the Alonefire PL400 light clipped to their jacket, demonstrating its use as a night running light for safety.

Image: A collage illustrating various applications of the Alonefire PL400, including multiple runners with lights, a light attached to a backpack, and a cyclist using the light for rear visibility at night.
Maintenance
Battery Replacement
The Alonefire PL400 uses two CR2032 button batteries. When the light dims significantly or stops working, it's time to replace the batteries. A mini screwdriver is included for this purpose.
- Using the provided mini screwdriver, loosen the four screws located on the bottom cover of the light.
- Carefully remove the bottom cover.
- Loosen the two smaller screws that secure the circuit board.
- Replace the old batteries with new CR2032 button batteries. Ensure correct polarity (+ and - sides) as indicated inside the battery compartment.
- Secure the circuit board with the two small screws.
- Reattach the bottom cover and tighten the four screws.
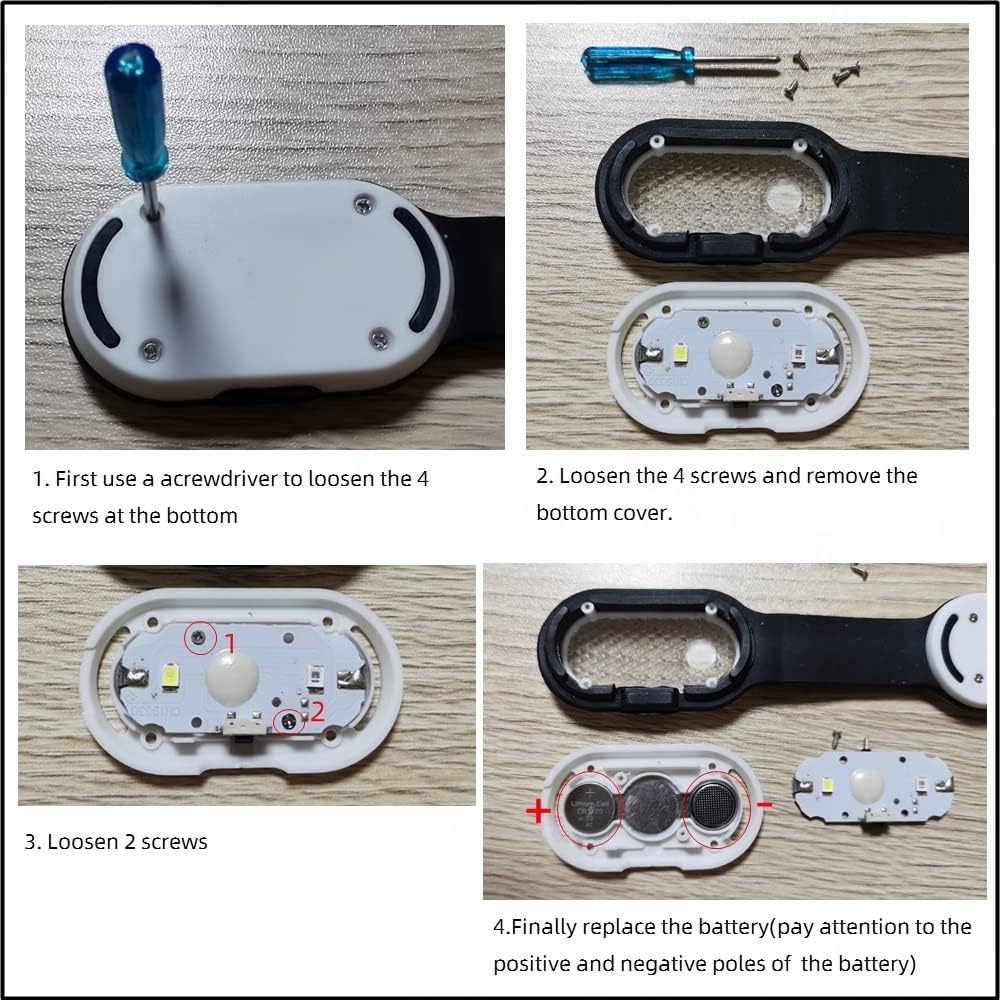
Image: A step-by-step visual guide for replacing the batteries in the Alonefire PL400. It shows loosening screws, removing the cover, accessing the battery compartment, and inserting new batteries with correct polarity.
Safety Warnings
- Do not clip the light onto excessively thick materials, as this may damage the clip or reduce magnetic adhesion.
- Avoid shining the light directly into eyes, as the brightness can cause temporary discomfort or vision impairment.
- The product is water-resistant, but it is not waterproof. Do not immerse it in water.
- Keep button batteries out of reach of children. If swallowed, seek immediate medical attention.
Troubleshooting
Light Does Not Turn On
- Ensure the insulating sheet has been completely removed from the battery compartment.
- Check if the batteries are inserted with the correct polarity (+ and -).
- Replace the batteries with new ones, as the existing batteries might be depleted.
Light is Dim
- The batteries may be running low. Replace them following the battery replacement instructions.
Warranty and Support
For any questions, concerns, or support regarding your Alonefire PL400 Magnetic Clip-on Safety Light, please refer to the contact information provided with your purchase or visit the official Alonefire website. Please retain your proof of purchase for warranty claims.


