1. Introduction
This manual provides essential information for the safe and effective use of your LABFENG Stainless Steel Vacuum Tube Kit, model 90-DD. Please read these instructions carefully before assembly, operation, or maintenance to ensure proper function and longevity of the equipment. This kit is designed for plant extraction processes, featuring a double-layer stainless steel tube and a robust tripod.
2. Product Overview and Components
The LABFENG 90-DD Vacuum Tube Kit is constructed from 304 food-grade stainless steel, ensuring durability and preventing contamination. Key components include a double-layer stainless steel tube, an upgraded food-grade stainless steel ball valve, a vacuum gauge, and a detachable tripod bracket.
2.1. Main Components

Figure 1: Product Structure Diagram
- Stainless Steel Tube Mezzanine: The main double-layer tube for material processing.
- Vacuum Gauge: For monitoring the vacuum level within the system.
- Stainless Steel Tee: Connects various parts of the system.
- Clip-on Tripod: Provides stable support for the vacuum tube kit.
- Upgraded Ball Valve: Food-grade stainless steel for robust and pressure-resistant control.
2.2. Included Accessories
The kit comes with essential accessories for immediate use and maintenance:

Figure 2: Included Accessories
- 2 x 150 micron filters
- 3 x Gaskets
- 1 x Sealing tape (PTFE thread tape)
- 1 x Silicone pad
- Detachable tripod bracket components
3. Safety Information
Always prioritize safety when operating vacuum equipment. Failure to follow safety guidelines can result in injury or equipment damage.
- Ensure all connections are secure and properly sealed before applying vacuum.
- Wear appropriate personal protective equipment (PPE), such as safety glasses and gloves, when handling materials and operating the kit.
- Do not exceed the maximum recommended vacuum pressure for the system.
- Handle the stainless steel components with care to avoid sharp edges or pinch points.
- Ensure the equipment is placed on a stable, level surface during operation.
- The outer chill tank can be filled with dry ice or wet ice; handle these substances with appropriate safety precautions.
4. Setup and Assembly
The LABFENG Vacuum Tube Kit comes disassembled and requires careful assembly. Refer to Figure 1 (Product Structure Diagram) for visual guidance.
- Unpack Components: Carefully remove all parts from the packaging and verify that all listed accessories are present.
- Assemble Tripod: Attach the tripod legs to the base of the main tube. Ensure they are securely fastened to provide a stable foundation. The upgraded detachable tripod bracket allows for flexible positioning.
- Connect Tube Sections: Assemble the double-layer stainless steel tube sections. Ensure gaskets are correctly seated between connections to create a tight seal.
- Install Valve and Gauge: Attach the upgraded food-grade stainless steel ball valve and the vacuum gauge to their respective ports. Use the provided sealing tape (PTFE thread tape) on all threaded fittings to prevent leaks. Wrap the tape clockwise around the threads before tightening.
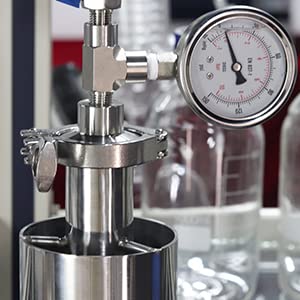
Figure 3: Vacuum Gauge and Connection Detail
- Secure Clamps: Use the provided clamps to secure all connections, ensuring a tight, leak-free system.
- Leak Test: After complete assembly, it is crucial to perform a leak test. Apply a vacuum to the system and monitor the vacuum gauge overnight to ensure no pressure loss occurs. This confirms all fittings are properly sealed.
5. Operating Instructions
This section outlines the general procedure for operating the LABFENG Vacuum Tube Kit for plant extraction.
- Prepare Material: Ensure your plant material is properly prepared for extraction and loaded into the double-layer stainless steel tube. The 90g capacity refers to the volume after compressing the material.
- Close System: Securely close all access points and ensure the upgraded ball valve is in the closed position.
- Connect Vacuum Source: Connect your external vacuum pump (not included) to the designated port on the kit.
- Apply Vacuum: Slowly open the ball valve to apply vacuum to the system. Monitor the vacuum gauge to achieve the desired vacuum level.

Figure 4: Kit in a Laboratory Setting
- Utilize Chill Tank (Optional): The outer layer of the double-layer tube can be used as a chill tank. Fill it with cold water, ice, or dry ice to maintain desired temperatures during the extraction process. Exercise caution when handling cryogenic materials.
- Monitor Process: Continuously monitor the vacuum gauge and the extraction process.
- Release Vacuum: Once the extraction is complete, slowly release the vacuum before opening the system.
- Collect Extract: Carefully collect the extracted product.
6. Maintenance
Regular maintenance ensures the optimal performance and longevity of your vacuum tube kit.
- Cleaning: The 304 food-grade stainless steel construction makes the kit easy to clean. After each use, disassemble the relevant parts and clean them thoroughly with appropriate solvents or detergents. Rinse with clean water and dry completely before reassembly.
- Gasket Inspection: Regularly inspect all gaskets for signs of wear, cracking, or damage. Replace worn gaskets immediately to maintain a proper vacuum seal. The kit includes additional gaskets for convenience.
- Filter Replacement: The 150 micron filters should be inspected and replaced periodically, depending on usage and material processed. The kit includes additional filters.
- Valve Check: Periodically check the ball valve for smooth operation and ensure it seals completely when closed.
- Storage: Store the kit in a clean, dry environment when not in use.
7. Troubleshooting
This section addresses common issues you might encounter with your vacuum tube kit.
- Loss of Vacuum / Leaks:
- Cause: Improperly sealed connections, worn gaskets, or insufficient sealing tape.
- Solution: Disassemble and reassemble all connections, ensuring gaskets are correctly seated and sufficient PTFE thread tape is applied to all threaded fittings. Tighten clamps securely. Perform a leak test.
- Difficulty Assembling Components:
- Cause: Misalignment or incorrect orientation of parts.
- Solution: Refer to Figure 1 (Product Structure Diagram) and ensure components are aligned correctly before attempting to tighten. Do not force parts together.
- Vacuum Gauge Not Registering:
- Cause: Gauge malfunction, or a severe leak preventing vacuum formation.
- Solution: First, check for leaks throughout the system as described above. If leaks are ruled out, the gauge may be faulty and require replacement.
8. Specifications
Detailed specifications for the LABFENG Stainless Steel Vacuum Tube Kit - 90-DD.

Figure 5: Product Dimensions
| Feature | Specification |
|---|---|
| Model Number | S-90G |
| Material | 304 Food Grade Stainless Steel |
| Capacity (Compressed Material) | 90g |
| Product Dimensions (L x W x H) | 22.86 x 15.24 x 53.34 cm (9 x 6 x 21 inches) |
| Item Weight | 90 g |
| Power Source Type | Manual |
| Voltage | 240 Volts (for associated equipment, not the kit itself) |
| Special Features | Upgrade Configuration, Additional Accessories |
| Included Components | 2*150 micron filter, 3* gasket, 1* sealing tape, 1* silicone pad |
| Filter Type | Cartridge |
9. Warranty and Support
LABFENG provides a warranty for this product and offers customer support for any inquiries or issues.
9.1. Warranty Information
This LABFENG Stainless Steel Vacuum Tube Kit comes with a 1-year warranty from the date of purchase. This warranty covers manufacturing defects and material flaws under normal use. Please note that consumable accessories such as gaskets, filters, and sealing tape are excluded from this warranty.
9.2. Customer Support
For technical assistance, warranty claims, or any questions regarding the operation or maintenance of your LABFENG product, please contact LABFENG customer service through the retailer where the product was purchased or refer to the official LABFENG website for contact information.


