1. Introduction
This manual provides detailed instructions for the setup, operation, maintenance, and troubleshooting of your NiPoGi AM02 Mini PC. Please read this manual thoroughly before using the device to ensure optimal performance and longevity.
The NiPoGi AM02 is a compact and powerful mini desktop computer designed for various applications, including home office, multimedia entertainment, light gaming, and business use. It features an AMD Athlon 300U processor, Radeon Vega 3 Graphics, and supports dual 4K display output.
2. Package Contents
Upon opening the package, please verify that all items listed below are present and in good condition:
- NiPoGi AM02 Mini PC
- Power Adapter
- HDMI Cable
- User Manual (this document)
- VESA Mount (optional, may be included)
If any items are missing or damaged, please contact customer support immediately.
3. Product Overview
The NiPoGi AM02 Mini PC is designed for efficiency and versatility. Below is an overview of its physical features and ports.

Image: Front and side view of the NiPoGi AM02 Mini PC, highlighting its various ports.
3.1 Front Panel
- Audio Jack: For connecting headphones or external speakers.
- Power Button: To turn the device on or off.
- Type-C Port: For data transfer or connecting compatible peripherals.
3.2 Rear Panel
- DC Input: Connect the provided power adapter here.
- HDMI Port: For connecting to a display (monitor, TV) with HDMI input. Supports 4K resolution.
- DisplayPort (DP): For connecting to a display with DisplayPort input. Supports 4K resolution.
- USB 3.0 Ports (x2): For high-speed data transfer with compatible USB devices.
- USB 2.0 Port (x1): For connecting standard USB peripherals.
- LAN Port (RJ-45): For wired network connection (Gigabit Ethernet).

Image: Detailed diagram illustrating the location and function of all ports on the NiPoGi AM02 Mini PC.
4. Setup Guide
Follow these steps to set up your NiPoGi AM02 Mini PC:
- Connect to Display: Connect your monitor or TV to the Mini PC using either the HDMI or DisplayPort. For dual display setup, use both ports.
- Connect Peripherals: Plug in your keyboard, mouse, and any other USB devices into the available USB ports.
- Network Connection: For a wired connection, connect an Ethernet cable to the LAN port. For wireless, ensure your Wi-Fi network is available after initial boot.
- Power On: Connect the power adapter to the DC input port on the Mini PC, then plug the adapter into a power outlet. Press the power button on the front panel.
- Initial Boot: The Mini PC will boot into Windows 10 Pro. Follow the on-screen instructions to complete the initial setup, including language, region, and network settings.

Image: The compact NiPoGi AM02 Mini PC placed on a desk next to a monitor, demonstrating its small footprint and ease of integration into a workspace.
4.1 VESA Mount Installation (Optional)
If your package includes a VESA mount, you can attach the Mini PC to the back of a compatible monitor or to a wall mount for a clutter-free setup. Refer to the VESA mount's specific instructions for installation.
5. Operating Instructions
5.1 Power On/Off
- To Power On: Press the power button on the front panel.
- To Shut Down: In Windows, go to Start > Power > Shut down. Alternatively, press and hold the power button for 5 seconds for a forced shutdown (not recommended for regular use).
5.2 Display Configuration
The NiPoGi AM02 supports dual 4K displays via its HDMI and DisplayPort outputs. To configure multiple displays in Windows:
- Right-click on the desktop and select "Display settings".
- Under "Multiple displays", you can choose to extend, duplicate, or show only on one display.
- Adjust resolution and orientation as needed for each display.
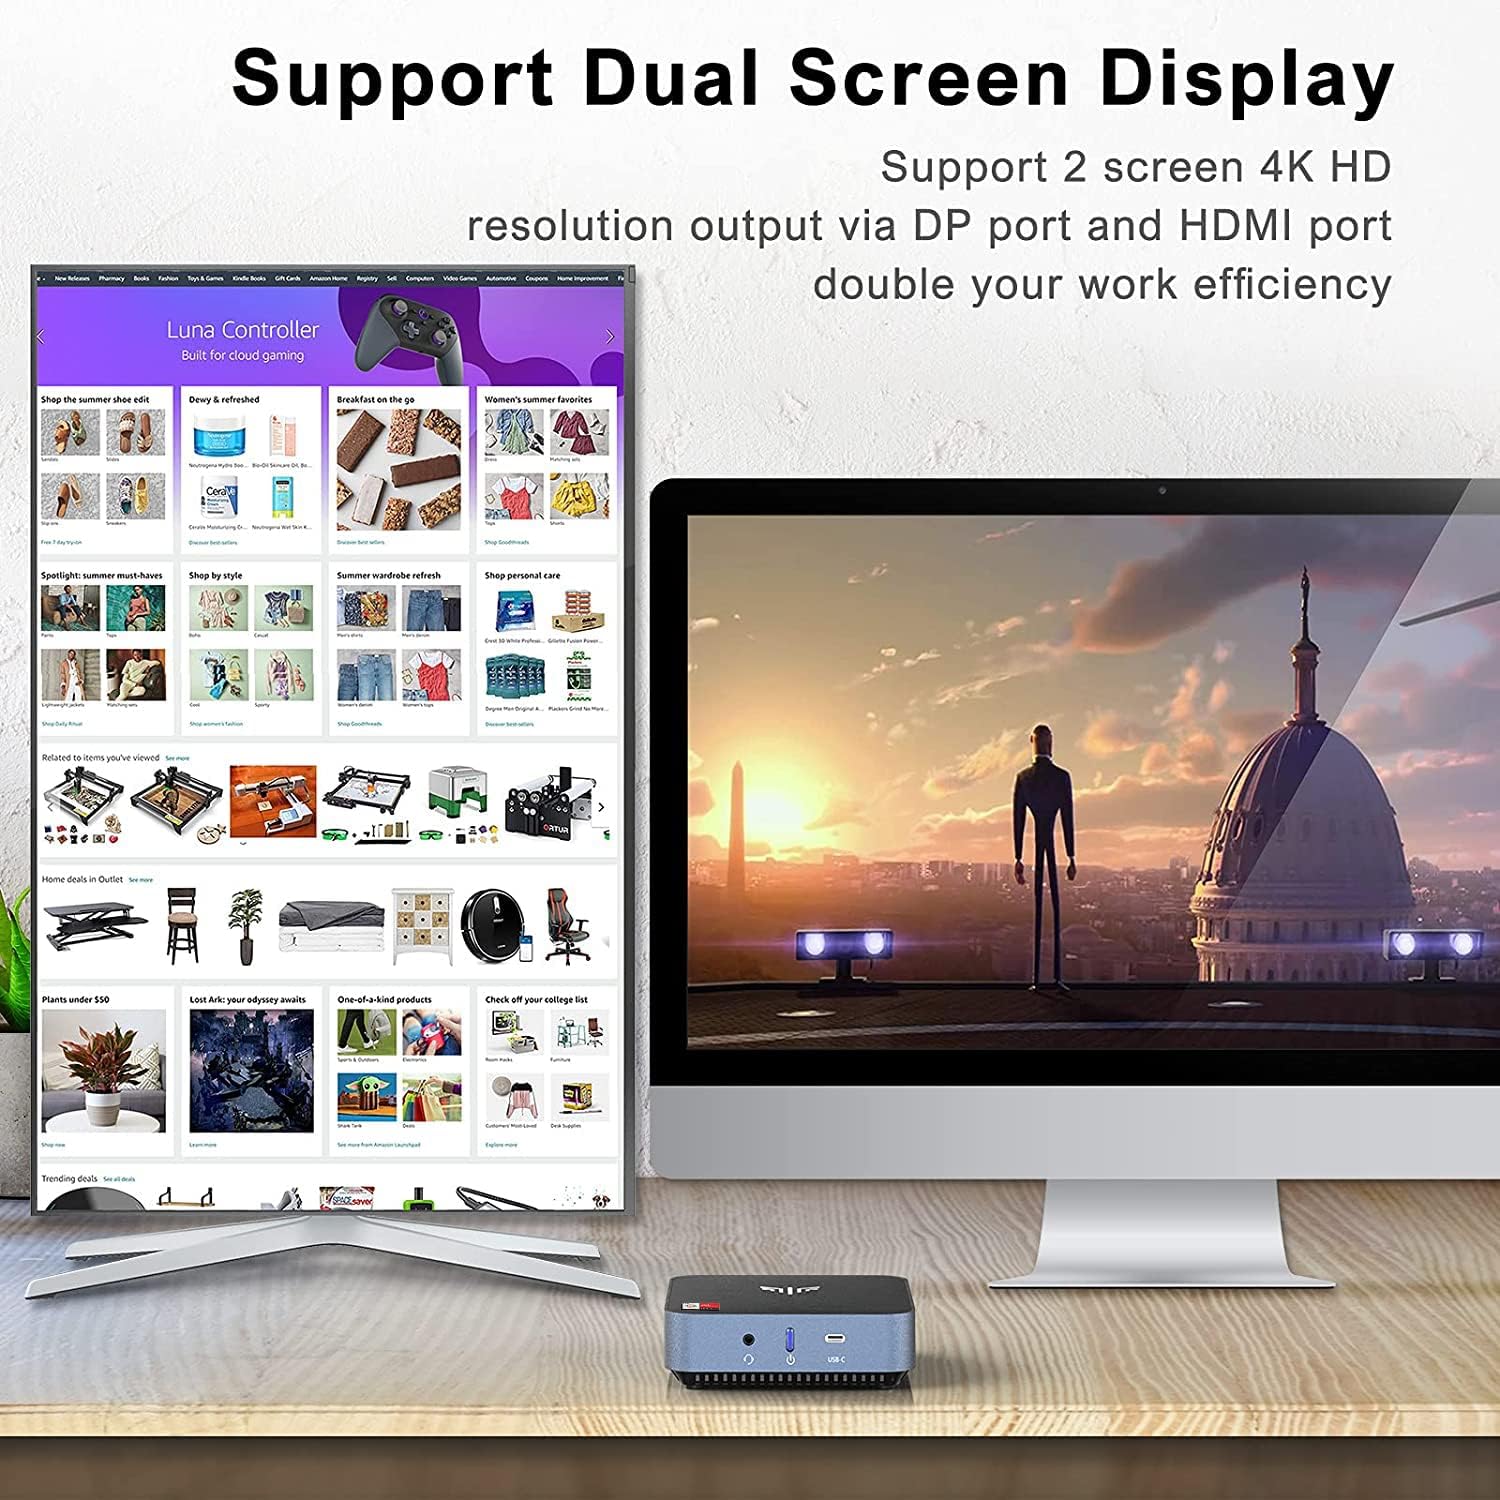
Image: The NiPoGi AM02 Mini PC connected to two monitors, demonstrating its dual display capability for enhanced productivity.
5.3 Network and Connectivity
- Wi-Fi: The device supports dual-band 802.11ac Wi-Fi. To connect, click the Wi-Fi icon in the taskbar, select your network, and enter the password.
- Bluetooth: Integrated Bluetooth 4.2 allows connection to wireless peripherals like keyboards, mice, and headphones. Enable Bluetooth in Windows settings to pair devices.
- Gigabit Ethernet: For a stable and fast wired connection, plug an Ethernet cable into the RJ-45 LAN port.
5.4 Advanced Features
The NiPoGi AM02 supports several advanced features for enhanced usability:
- Auto Power On: Configurable in BIOS, allows the PC to automatically power on when power is restored after an outage.
- Wake On LAN (WOL): Enables the PC to be woken up remotely over a network connection.
- PXE Boot: Allows the PC to boot from a network server.
- RTC Boot: Configurable in BIOS, allows the PC to power on at a scheduled time.

Image: Visual representation of advanced features such as Wake On LAN and Auto Power On, indicating the Mini PC's versatility.
6. Maintenance and Upgrades
6.1 Cleaning
To maintain optimal performance, regularly clean the exterior of the Mini PC with a soft, dry cloth. Ensure ventilation openings are free from dust and debris. Do not use liquid cleaners directly on the device.

Image: An internal diagram illustrating the efficient heat dissipation system within the NiPoGi AM02 Mini PC, emphasizing the importance of clear ventilation.
6.2 RAM Upgrade
The NiPoGi AM02 comes with 8GB DDR4 RAM and can be upgraded to a maximum of 64GB (2 x 32GB dual channel). To upgrade:
- Ensure the Mini PC is powered off and unplugged.
- Carefully open the casing (refer to specific model instructions or online guides for safe opening).
- Locate the DDR4 SO-DIMM slots.
- Gently press the clips on either side of the existing RAM module to release it.
- Insert the new DDR4 SO-DIMM modules, ensuring they are seated correctly and the clips lock into place.
- Close the casing and reconnect power.

Image: An exploded view of the NiPoGi AM02 Mini PC, illustrating the location of the dual-channel DDR4 RAM and M.2 SSD slots for easy upgrades.
6.3 SSD Storage Expansion
The Mini PC includes a 128GB M.2 2280 SSD and can be expanded up to 2TB (NVMe supported). It also supports an additional 2.5-inch SSD (not included). To expand storage:
- Follow steps 1 and 2 from the RAM upgrade section to open the casing.
- Locate the M.2 slot for NVMe SSD or the 2.5-inch drive bay.
- Install the new M.2 SSD or 2.5-inch SSD according to the drive's instructions and secure it.
- Close the casing and reconnect power. You may need to initialize and format the new drive in Windows Disk Management.
7. Troubleshooting
This section addresses common issues you might encounter with your NiPoGi AM02 Mini PC.
| Problem | Possible Cause | Solution |
|---|---|---|
| No power / PC does not turn on. | Power adapter not connected, faulty power outlet, power button issue. |
|
| No display on monitor. | Loose display cable, incorrect input source on monitor, faulty cable/monitor. |
|
| Wi-Fi connection issues. | Incorrect password, router issues, driver problems. |
|
| System is slow or unresponsive. | Too many applications running, low disk space, malware, outdated drivers. |
|
If the problem persists after trying these solutions, please contact NiPoGi customer support.
8. Specifications
Below are the technical specifications for the NiPoGi AM02 Mini PC:
| Feature | Detail |
|---|---|
| Processor | AMD Athlon 300U (2 Cores, 4 Threads, up to 3.3 GHz) |
| Graphics | AMD Radeon Vega 3 Graphics (1000 MHz) |
| RAM | 8GB DDR4 (Dual-Channel, expandable up to 64GB) |
| Storage | 128GB M.2 2280 SSD (NVMe/SATA, expandable up to 2TB) |
| Operating System | Windows 10 Pro (64-bit) |
| Video Output | 1x HDMI, 1x DisplayPort (Supports Dual 4K@60Hz) |
| USB Ports | 2x USB 3.0, 1x USB 2.0, 1x USB Type-C |
| Network | Gigabit Ethernet (RJ-45), Dual-band Wi-Fi 802.11ac (2.4/5 GHz) |
| Bluetooth | Bluetooth 4.2 |
| Audio | 1x 3.5mm Audio Jack |
| Dimensions | 12.5 x 12.5 x 4 cm (4.92 x 4.92 x 1.57 inches) |
| Weight | 1.06 kg (2.34 lbs) |
| Special Features | Auto Power On, PXE Boot, Wake On LAN (WOL), RTC Boot |

Image: A bar chart comparing the performance metrics of the AMD Athlon 300U processor with Intel i5-5257U and i5-6360U, showing its relative capabilities.
9. Warranty Information
The NiPoGi AM02 Mini PC comes with a 1-year manufacturer's warranty from the date of purchase. This warranty covers defects in materials and workmanship under normal use. It does not cover damage caused by misuse, accidents, unauthorized modifications, or natural disasters.
Please retain your proof of purchase for warranty claims. For detailed warranty terms and conditions, refer to the warranty card included in your package or contact NiPoGi customer support.
10. Customer Support
If you require assistance with your NiPoGi AM02 Mini PC, have questions, or need technical support, please contact our customer service team. We offer 24/7 support.
Contact Information:
- Email: [Insert Customer Support Email Here, if available]
- Website: [Insert Official Support Website Here, if available]
- Phone: [Insert Customer Support Phone Number Here, if available]
When contacting support, please have your product model (AM02) and purchase details ready to expedite the service process.


