1. Introduction
This manual provides detailed instructions for the proper use, setup, and maintenance of your OWLNV L3-LRF Digital Night Vision Rifle Scope. Please read this manual thoroughly before operating the device to ensure optimal performance and safety.

Figure 1: OWLNV L3-LRF Digital Night Vision Rifle Scope
2. Safety Information
- Do not look directly into the sun or any bright light source through the device, as this may cause permanent eye damage.
- Keep the device away from extreme temperatures, humidity, and direct sunlight.
- Ensure the device is securely mounted before use.
- Do not attempt to disassemble or modify the device, as this will void the warranty and may cause damage.
- Use only approved accessories and power sources.
3. Product Overview
3.1 Components
The OWLNV L3-LRF includes the following main components:
- Digital Night Vision Rifle Scope (L3-LRF)
- Picatinny Mount
3.2 Controls and Ports

Figure 2: Overview of L3-LRF controls and ports
- Power/Sleep Mode Button: Press to power on/off or enter/exit sleep mode.
- Menu Button: Long press to access the main menu. Short press for Red Dot activation.
- IR Illuminator/Down Button: Long press to switch between Black & White mode and Color mode at night. Short press to activate or adjust the IR Illuminator.
- Record/Range Finder/OK Button: Short press to activate the Range Finder. Long press to save settings or exit the menu.
- Play/Up Button: Short press to navigate up or play recorded media.
- Stretchable IR Illuminator: Adjustable infrared light source.
- Adjustable Red Dot: For quick target acquisition.
- Focus Adjustment Bar: For adjusting image clarity.
- Ports/Slots: Includes USB port and memory card slot.
Video 1: OWLNV L3-LRF Night Vision Rifle Scope Overview. This video demonstrates the physical features and controls of the L3-LRF device.
4. Setup
4.1 Mounting the Scope
Attach the OWLNV L3-LRF to your rifle using the provided Picatinny mount. Ensure the mount is securely fastened to prevent movement during use.

Figure 3: L3-LRF mounted on a rifle using the Picatinny mount.
4.2 Battery Installation
The device uses an efficient power system for extended operation. Ensure batteries are correctly inserted according to polarity markings. The device is designed for long-lasting outdoor use, minimizing the need for frequent recharging.
4.3 Power On/Off
To power on the device, long press the Power/Sleep Mode Button. To power off, long press the same button again. A short press will toggle sleep mode.
5. Operating Instructions
5.1 Day and Night Modes
The L3-LRF supports both full-color daytime viewing and sharp black-and-white images at night. The device automatically adjusts or can be manually switched between modes.

Figure 4: Comparison of Day Mode (color) and Night Mode (black and white) views.
5.2 IR Illuminator
The integrated 940nm IR Illuminator provides enhanced visibility in complete darkness. It features 3 adjustable brightness levels to adapt to different distances. Long press the IR Illuminator/Down Button to switch between Black & White mode and Color mode at night. Short press to cycle through the IR brightness levels.

Figure 5: Different levels of IR illumination for varying distances.
5.3 Zoom and Magnification
The L3-LRF offers 6.5x and 13x zoom capabilities. Use the appropriate controls to adjust magnification as needed. The Picture-in-Picture function allows for simultaneous viewing of both magnifications.

Figure 6: Picture-in-Picture display showing 6.5x and 13x magnification.
5.4 Integrated Rangefinder
The built-in rangefinder can measure targets up to 1000m away with one-click precision. Short press the Record/Range Finder/OK Button to activate the rangefinder and obtain distance measurements.

Figure 7: Display showing rangefinder measurements.
5.5 One-Shot Zeroing and Reticle Options
The L3-LRF features a smart one-shot zeroing function to save time and ammunition. Follow these steps:
- Fire the first shot at your target.
- Long press the Menu Button to enter the menu.
- Navigate to "Reticle Adjustment" using the IR Illuminator/Down Button and press Record/Range Finder/OK Button.
- Short press the Record/Range Finder/OK Button to move to the X-axis adjustment. Use the Play/Up and IR Illuminator/Down Buttons to move the reticle horizontally to align with the first impact point.
- Short press the Record/Range Finder/OK Button to move to the Y-axis adjustment. Use the Play/Up and IR Illuminator/Down Buttons to move the reticle vertically to align with the first impact point.
- Once aligned, long press the Record/Range Finder/OK Button to save and exit the menu.
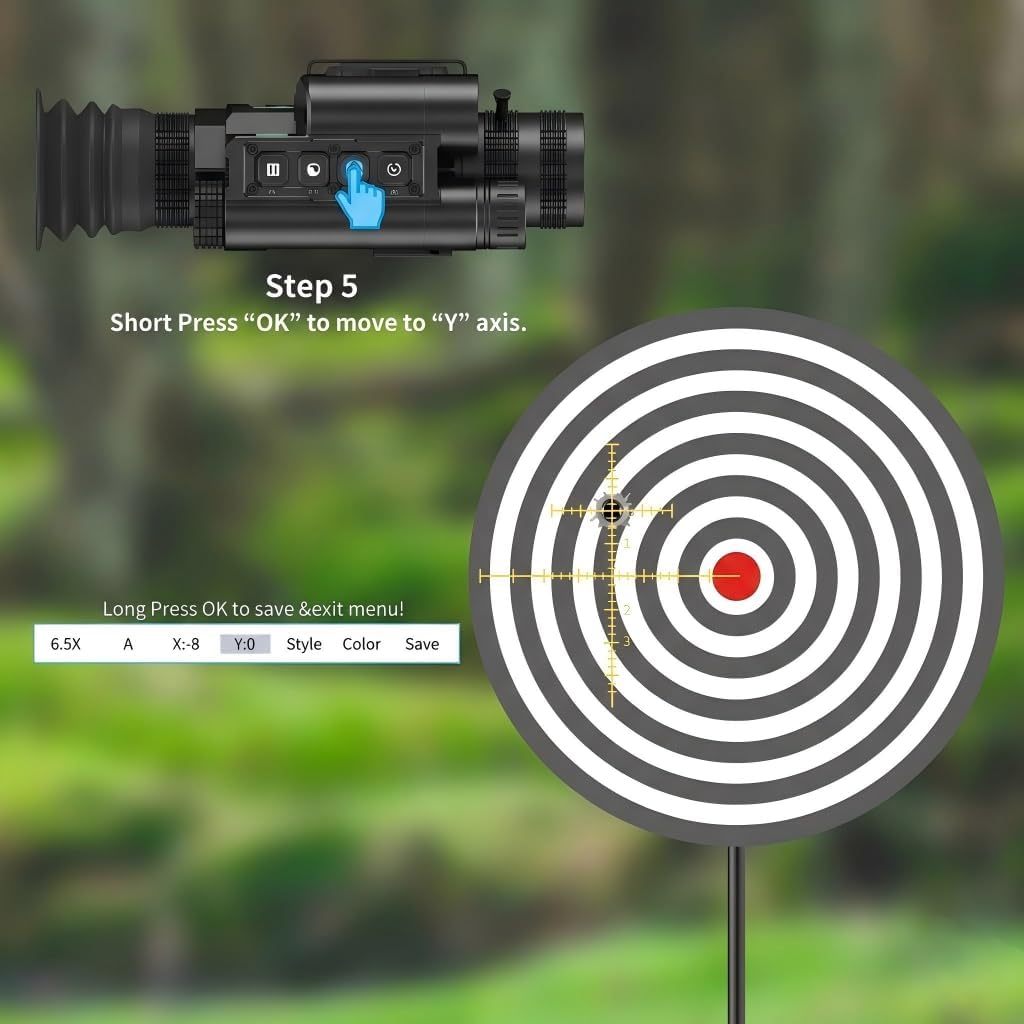
Figure 8: Adjusting the reticle during the one-shot zeroing process.

Figure 9: Successful second shot after one-shot zeroing.
You can choose from 5 reticle styles and 2 colors for personalized targeting within the menu settings.
Video 2: OWLNV Night Vision Scope L3 Series One-shot Zeroing. This video demonstrates the one-shot zeroing feature of the L3 series.
5.6 WiFi Streaming and Full HD Recording
Capture your observations and adventures in 1080P Full HD. The device supports wireless streaming to your smart device via a dedicated app (iOS & Android compatible). You can record videos and photos directly to a memory card (up to 128GB, not included).
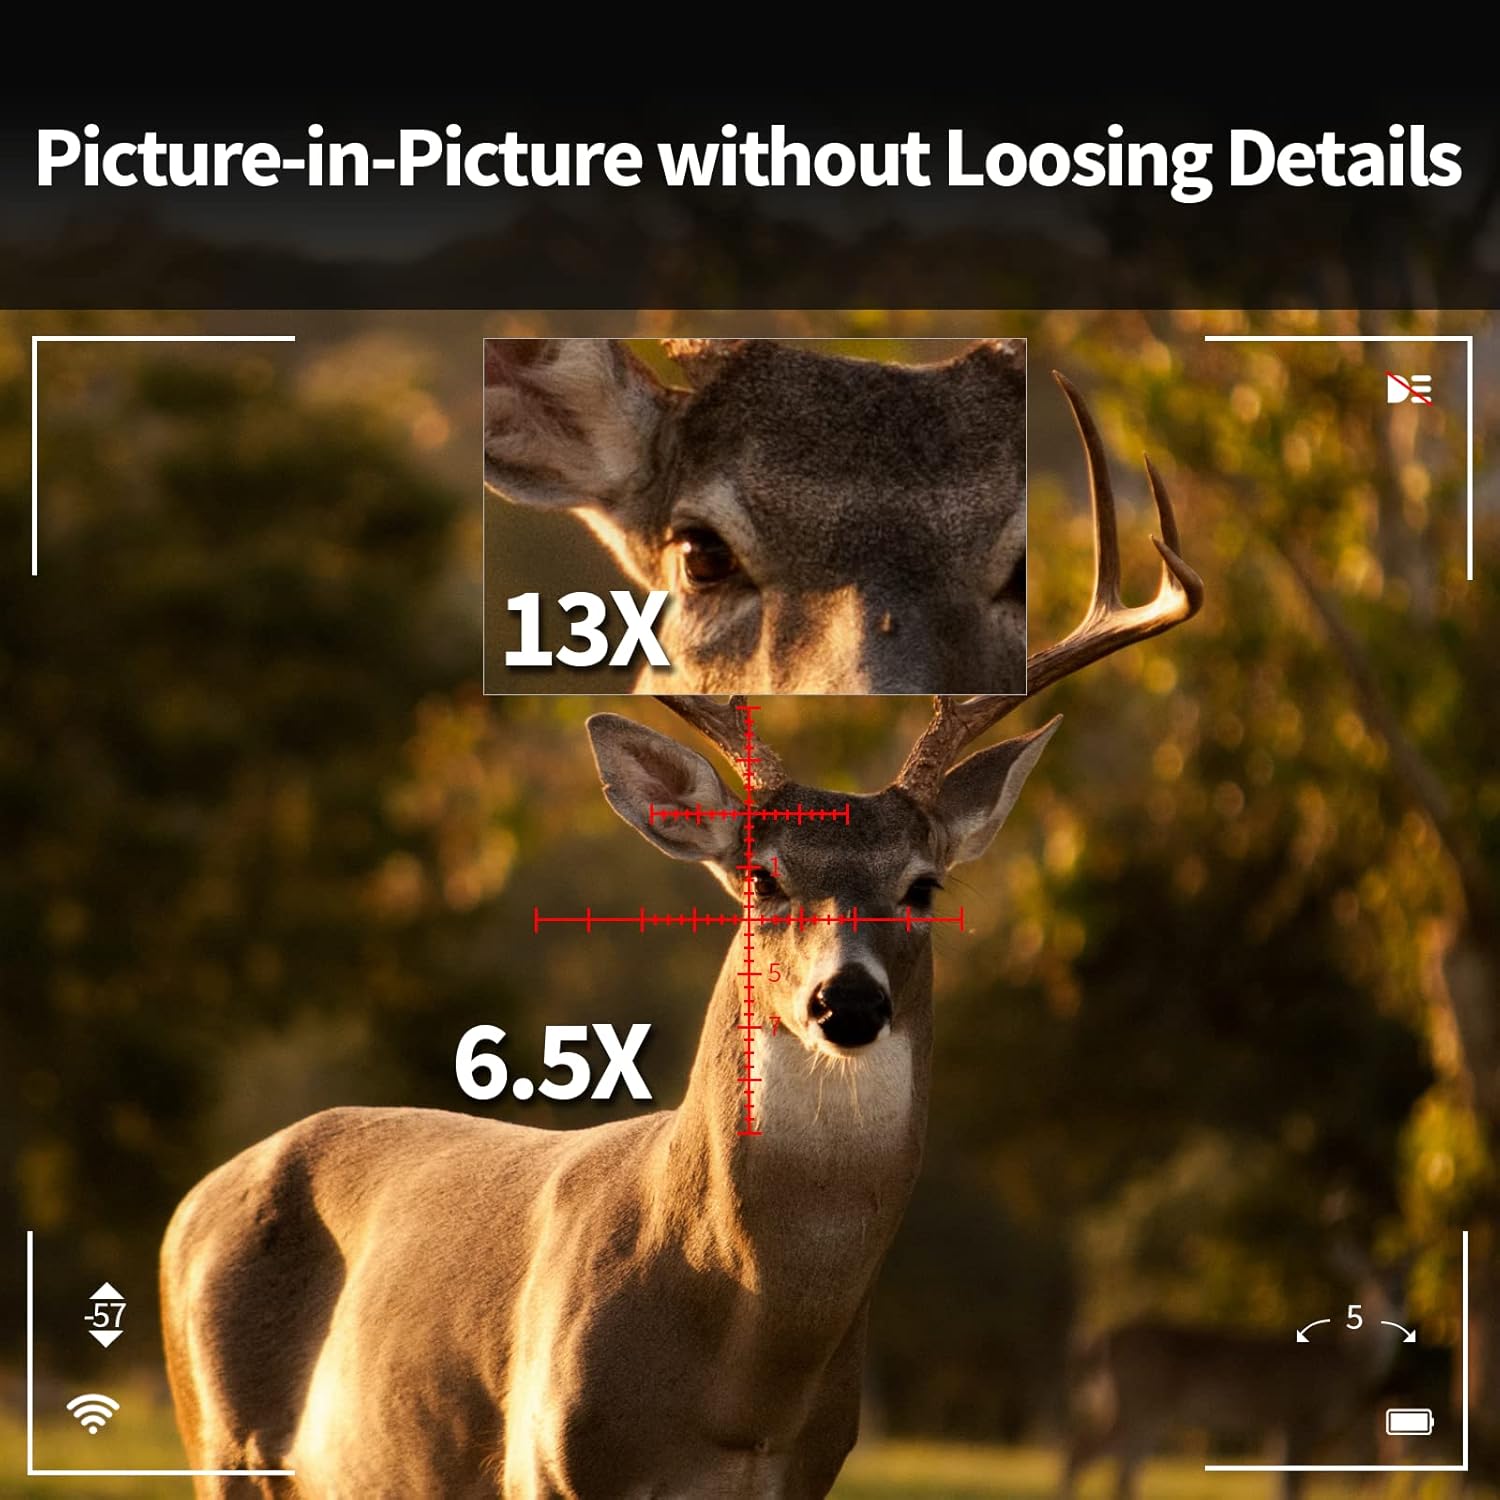
Figure 10: WiFi streaming from the L3-LRF to a smartphone.
Video 3: OWLNV Night Vision and Thermal Imaging Devices. This video showcases various features including WiFi streaming and night vision recording capabilities of OWLNV products, including the L3-LRF.
5.7 Gyroscope and E-Compass
The built-in 3D gyroscope and E-compass provide stable viewing and directional information, enhancing situational awareness in outdoor environments.
6. Maintenance
6.1 Cleaning
- Use a soft, lint-free cloth to clean the lenses. For stubborn dirt, use a lens cleaning solution designed for optics.
- Wipe the device body with a damp cloth. Do not use abrasive cleaners or solvents.
6.2 Storage
When not in use, store the device in a dry, cool place, away from direct sunlight and extreme temperatures. Remove batteries if storing for extended periods.
6.3 Waterproof Rating
The L3-LRF features an IP67 waterproof housing, protecting it from rain and dust. While it can withstand immersion up to 1 meter for 30 minutes, it is not designed for prolonged underwater use.

Figure 11: The L3-LRF is designed to be waterproof and dustproof (IP67).
7. Troubleshooting
If you encounter issues with your OWLNV L3-LRF, please refer to the following common troubleshooting tips:
- Device not powering on: Ensure batteries are fully charged and correctly inserted.
- Poor image quality: Check lens cleanliness and adjust focus. Ensure IR illuminator is active in low light conditions.
- WiFi connection issues: Ensure the device's WiFi is enabled and your smart device is within range. Restart both devices if necessary.
- Rangefinder not working: Ensure the target is within the effective range (up to 1000m) and there are no obstructions.
For further assistance, please contact OWLNV customer support.
8. Specifications
| Feature | Specification |
|---|---|
| Brand | OWLNV |
| Model Name | L3-LRF |
| Color | Black |
| Product Dimensions | 8.5"L x 2.4"W x 2.8"H |
| Item Weight | 565 Grams |
| Material | Aluminum |
| Magnification Maximum | 13 x |
| Magnification Minimum | 6.5 x |
| Compatible Devices | Rifle |
| Mounting Type | Picatinny Mount |
| Night Vision | Yes |
| Reticle Type | Cross |
| IR Illuminator | 940nm, 3 adjustable levels |
| Rangefinder | Up to 1000m |
| Video Recording | 1080P Full HD |
| Connectivity | WiFi (iOS & Android Apps) |
| Waterproof Rating | IP67 |
| Recoil Resistance | Up to 6000J |
9. Warranty and Support
9.1 Warranty Information
The OWLNV L3-LRF Digital Night Vision Rifle Scope comes with a 2-year warranty. Please retain your proof of purchase for warranty claims.
9.2 Customer Support
For technical support, warranty service, or any questions regarding your device, please refer to the contact information provided with your product packaging or visit the official OWLNV website.