
Interlight QUASAR
Interlight Quasar Wall Sconce - Instruction Manual
Model: Quasar | Color Temperature: 2700K | Voltage: Bivolt
Introduction
This manual provides essential information for the safe and correct installation, operation, and maintenance of your Interlight Quasar Wall Sconce. Please read these instructions thoroughly before installation and retain them for future reference.
Safety Instructions
- Electrical Safety: Always disconnect power at the circuit breaker or fuse box before beginning installation or performing any maintenance. Failure to do so may result in electric shock or serious injury.
- Professional Installation: Installation should be performed by a qualified electrician in accordance with all local and national electrical codes.
- Voltage Compatibility: This fixture is Bivolt (110-240V). Ensure your electrical supply matches this range.
- Handling: Handle the product with care to avoid damage. Do not install if the product appears damaged.
- Environment: This product is designed for specific environments. Ensure it is suitable for your intended indoor or outdoor application.
Package Contents
Verify that all components are present before proceeding with installation:
- Interlight Quasar Wall Sconce (1 unit)
- Mounting Bracket (1 unit)
- Mounting Screws and Wall Anchors (quantity may vary)
- Instruction Manual (this document)

Image: Front view of the Interlight Quasar Wall Sconce, showcasing its black finish and geometric design.
Specifications
| Brand | Interlight |
| Model | Quasar |
| Color Temperature | 2700K (Warm White) |
| Voltage | Bivolt (110-240V) |
| Product Dimensions (L x W x H) | 𠃠.1 x 0.95 x 0.1 cm; 370 g (Note: These dimensions appear unusually small for a wall sconce and may be a data entry error. Please refer to package dimensions for a more typical size indication.) |
| Package Dimensions | 10.8 x 10.7 x 10.4 cm |
| EAN/GTIN | 7894088042365 |
| ASIN | B09QCZSRFC |
| Batteries Required | No |
Setup and Installation
Important: Ensure power is disconnected at the main circuit breaker before starting installation.
- Prepare the Installation Area: Choose a suitable location on a wall. Ensure there is existing electrical wiring available.
- Mounting Bracket Installation:
- Carefully remove the mounting bracket from the back of the sconce.
- Position the mounting bracket against the wall at the desired installation point. Mark the drilling locations.
- Drill pilot holes at the marked locations. Insert wall anchors if necessary.
- Secure the mounting bracket to the wall using the provided screws. Ensure it is firmly attached.
- Electrical Connection:
- Connect the electrical wires from the wall to the corresponding wires on the sconce. Typically, this involves connecting live to live, neutral to neutral, and ground to ground. Refer to local electrical codes for proper wiring color conventions.
- Use appropriate wire connectors (not included) to secure all connections.
- Ensure all connections are tight and insulated.
- Attach the Sconce:
- Carefully align the sconce with the installed mounting bracket.
- Secure the sconce to the mounting bracket using the screws provided, ensuring it is flush against the wall and stable.
- Install Light Source: The product image suggests a G9 bulb.
- Insert the G9 bulb (not included, or pre-installed if specified by manufacturer) into the socket. Do not overtighten.

Image: Side view of the Interlight Quasar Wall Sconce, revealing the internal light source (G9 bulb type).
- Restore Power: Once installation is complete and all connections are secure, restore power at the circuit breaker.
Examples of installed sconces:
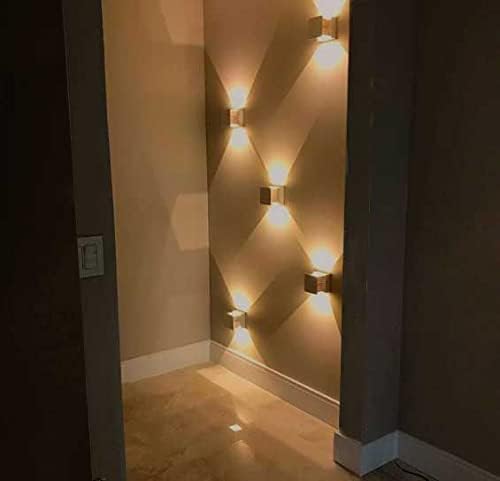
Image: Multiple Interlight Quasar sconces installed on an interior wall, demonstrating the upward and downward light projection.

Image: Interlight Quasar sconces mounted on an exterior building wall, providing ambient outdoor lighting.
Operating Instructions
The Interlight Quasar Wall Sconce operates via a standard wall switch connected to its electrical circuit. There are no additional controls on the fixture itself.
- To Turn On: Flip the connected wall switch to the "ON" position.
- To Turn Off: Flip the connected wall switch to the "OFF" position.
Maintenance
Regular maintenance ensures the longevity and optimal performance of your wall sconce.
- Cleaning:
- Before cleaning, ensure the power to the fixture is turned off at the circuit breaker.
- Wipe the exterior surface with a soft, dry, or slightly damp cloth.
- Do not use abrasive cleaners, solvents, or polishes as they may damage the finish.
- Bulb Replacement (if applicable):
- Ensure power is off and the bulb has cooled completely before attempting replacement.
- Carefully remove the old G9 bulb by pulling it straight out.
- Insert a new G9 bulb of the correct wattage and type (e.g., LED G9 2700K) by pushing it gently into the socket.
- Do not exceed the maximum wattage specified for the fixture (refer to fixture label if available).
Troubleshooting
If you encounter issues with your Interlight Quasar Wall Sconce, refer to the following common problems and solutions:
| Problem | Possible Cause | Solution |
|---|---|---|
| Light does not turn on. |
|
|
| Light flickers. |
|
|
| Fixture is hot to the touch. |
|
|
If problems persist, consult a qualified electrician or contact Interlight customer support.
Warranty and Support
Interlight products are manufactured to high-quality standards. For information regarding warranty coverage, please refer to the warranty card included with your purchase or visit the official Interlight website.
For technical support, replacement parts, or any other inquiries, please contact Interlight customer service through their official channels.
Website: www.interlight.com.br (Example link, actual link may vary)
Related Documents - QUASAR
 |
QUASAR HQ-2052UH Owner's Manual and Installation Guide Comprehensive owner's manual and installation guide for the QUASAR HQ-2052UH Room Air Conditioner by Quasar/Panasonic. Includes operation, setup, safety, and troubleshooting. |
 |
Interlight NEXT MULTI DOWNLIGHT RING Installation Manual Concise installation guide for the Interlight NEXT MULTI DOWNLIGHT RING, detailing how to fit the downlight into the metal ring using step-by-step instructions and textual descriptions of diagrams. |
 |
Interlight ColourDrop Trackspots Installation and Usage Guide Comprehensive guide for installing and using Interlight ColourDrop trackspots, covering compatibility with various track systems and safety instructions. |
 |
Interlight Camita ColourDrop 22W Tracklight: Installation and De-installation Guide Installation and de-installation guide for the Interlight Camita ColourDrop 22W LED tracklight. Learn how to safely mount and remove this versatile trackspot, compatible with various rail systems. |
 |
Interlight Camini Downlights Installation Guide - IP44 Rated Indoor LED Fixture Official installation guide for Interlight Camini Downlights. Learn how to safely install these IP44 rated indoor LED fixtures with step-by-step instructions and safety precautions. |
 |
Quasar Astrograph Watch: Specifications, Operation, and Warranty Guide Detailed guide for the Quasar Astrograph watch, covering its unique rotating planet dial, technical specifications, water resistance levels, operating instructions, and warranty information. Learn about the Miyota 8xxx movement and premium materials. |
Ask a question about this manual
Ask about setup, troubleshooting, compatibility, parts, safety, or missing instructions. Manuals+ will review the question and use this page’s manual context to help answer it.