1. Important Safety Instructions
Always observe basic safety precautions when using electrical tools to reduce the risk of fire, electric shock, and personal injury. Read all instructions carefully before operating this tool.
- Wear appropriate personal protective equipment, including eye protection, hearing protection, and a dust mask.
- Ensure the workpiece is securely clamped before routing.
- Keep hands clear of the rotating router bit.
- Disconnect the power plug from the power source before making any adjustments, changing accessories, or storing the tool.
- Do not operate the router in damp or wet conditions.
- Maintain a firm grip on the tool with both hands during operation.
- Use only router bits designed for the specified collet sizes (1/4", 6mm, 8mm).
2. Product Overview and Components
The DEWINNER 710W Compact Electric Router is a versatile tool designed for various woodworking tasks, offering precision and adaptability with its interchangeable base system.
The package includes the following main components:
- Main Motor Unit (710W, 220-240V)
- Fixed Base
- Plunge Base
- Angled Base (for trimming)
- Straight Guide Rail
- Curved Guide Rail
- Collets: 1/4 inch, 6mm, and 8mm
- 5 Carbide Router Bits
- Spare Carbon Brushes
- Wrench for bit installation
- Lever for adjustments
- Dust Extractor Port

3. Setup
3.1 Installing Router Bits
Proper installation of the router bit is crucial for safety and cutting accuracy.
- Ensure the router is unplugged from the power source.
- Press and hold the spindle lock button.
- Loosen the collet nut using the provided wrench by turning it counter-clockwise.
- Insert the router bit into the collet, ensuring at least 3/4 of the shank is seated.
- Tighten the collet nut firmly with the wrench by turning it clockwise, while still holding the spindle lock button. Do not overtighten.

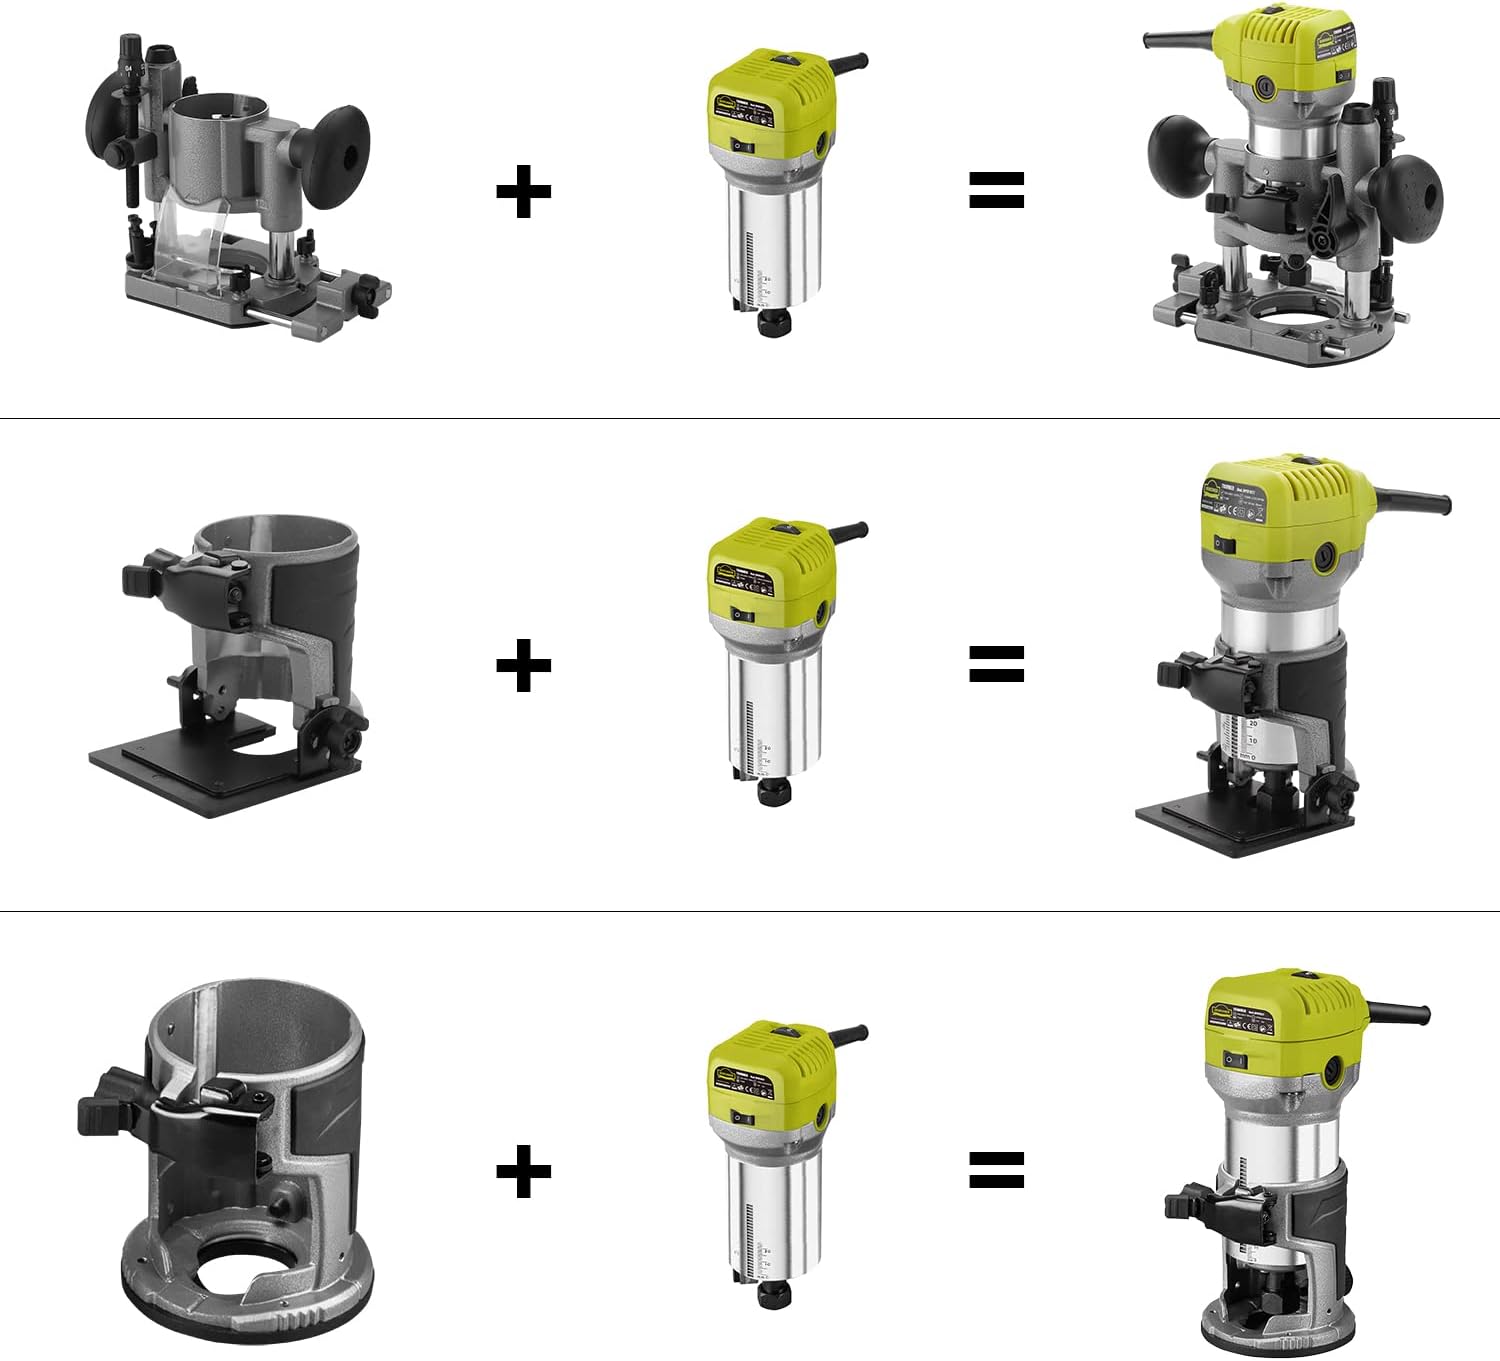
3.2 Attaching Router Bases
The DEWINNER router comes with three interchangeable bases for different applications: fixed, plunge, and angled.
- Ensure the router is unplugged.
- Align the motor unit with the desired base (fixed, plunge, or angled).
- Slide the motor unit into the base until it is fully seated.
- Secure the motor unit by tightening the base locking knob or lever.
3.3 Adjusting Cutting Depth
The cutting depth can be precisely adjusted using the rack and pinion system.
- With the desired base attached, loosen the quick-lock lever on the base.
- Use the depth adjustment knob or scale to set the desired cutting depth. The scale provides clear markings in both inches and millimeters.
- Once the depth is set, firmly tighten the quick-lock lever to secure the setting.
For plunge base operation, the depth can be pre-set, allowing the bit to be lowered into the workpiece after the base is flat on the surface.
4. Operating Instructions
4.1 Powering On and Speed Adjustment
The router features a power switch and a 6-speed adjustment dial.
- Plug the router into a 220-240V power outlet.
- Set the desired rotation speed using the 6-speed adjustment dial (13000 to 33000 RPM). Lower speeds are generally for larger bits or harder materials, while higher speeds are for smaller bits or softer materials.
- To start the router, press the power switch to the 'ON' position. The motor will quickly reach the set speed.
- To stop the router, press the power switch to the 'OFF' position.
4.2 Routing Techniques
Different bases allow for various routing applications:
- Fixed Base: Ideal for edge forming, dadoes, and rabbets where a consistent depth is maintained.
- Plunge Base: Used for stopped dadoes, mortises, and decorative inlays where the bit needs to be lowered into the workpiece.
- Angled Base: Suitable for trimming and chamfering edges at specific angles (adjustable slant range: -30° to +45°).
Always make multiple shallow passes instead of one deep pass, especially with harder materials, to reduce strain on the tool and improve cut quality.
5. Maintenance
5.1 Cleaning
Regular cleaning ensures optimal performance and extends the tool's lifespan.
- Always unplug the tool before cleaning.
- Use a soft brush or compressed air to remove dust and debris from the motor vents and around the collet area.
- Wipe down the exterior of the tool with a clean, damp cloth. Do not use harsh chemicals or solvents.
- Empty the dust extractor port regularly if used.
5.2 Carbon Brush Replacement
The carbon brushes are wear parts and should be replaced when they become worn to maintain motor efficiency.
- Ensure the router is unplugged.
- Locate the carbon brush caps on the sides of the motor housing.
- Unscrew the caps using a screwdriver or coin.
- Carefully remove the old carbon brushes.
- Insert the new carbon brushes (spare brushes are included).
- Replace and tighten the carbon brush caps.

6. Troubleshooting
If you encounter issues with your DEWINNER router, refer to the following common problems and solutions:
- Tool does not start: Check if the power cord is securely plugged in. Ensure the power switch is in the 'ON' position. Verify the power outlet is functional.
- Bit slips during operation: Ensure the collet nut is tightened sufficiently. Check if the router bit shank is clean and free of debris.
- Poor cut quality or excessive vibration: The router bit may be dull or damaged; replace it. Ensure the bit is correctly installed and tightened. Check for loose components on the base or motor unit. Reduce the depth of cut and make multiple passes.
- Overheating: Ensure the motor vents are clear of dust and debris. Avoid prolonged heavy use without breaks. Check if the carbon brushes are worn.
If the problem persists after checking these points, please contact DEWINNER customer support.
7. Specifications
| Feature | Specification |
|---|---|
| Manufacturer | DEWINNER |
| Dimensions (L x W x H) | 25.1 x 25 x 23.7 cm |
| Weight | 4.65 kg |
| Material | Metal |
| Power Type | Corded Electric |
| Voltage | 220 Volts |
| Power | 710W |
| Max Rotation Speed | 33000 RPM |
| Amperage | 3.23 A |
| Base Types Included | Fixed, Plunge, Angled |
| Collet Sizes | 1/4 inch, 6mm, 8mm |
| ASIN | B09QCVHRB4 |
8. Warranty and Support
For warranty information, technical support, or service inquiries, please contact DEWINNER customer service through your retailer or the official DEWINNER website. Keep your purchase receipt as proof of purchase.


