1. Product Overview
The JRHC Mini 2D Portable Wireless Barcode Scanner HC-202D is a versatile and compact device designed for efficient barcode scanning. It supports three connection methods: wired USB, 2.4G wireless, and Bluetooth, offering flexibility for various operating environments. This scanner is capable of reading both 1D and 2D barcodes, including those that are damaged, reflective, or distorted.

Image 1.1: The JRHC Mini 2D Portable Wireless Barcode Scanner, demonstrating its compact size and ergonomic design when held in hand.
2. Product Components
Familiarize yourself with the key components of your JRHC HC-202D barcode scanner:

Image 2.1: Detailed diagram illustrating the various parts of the JRHC HC-202D scanner, including the indicator light, scanning switch, power button, scan window, and hang strap attachment point.
- Indicator Light: Provides status feedback (e.g., power, connection, scanning success).
- Scanning Switch: Activates the scanning beam.
- ON&OFF Button: Powers the device on or off.
- Scan Window: The area through which barcodes are read.
- Hang Strap: For convenient carrying and to prevent drops.
3. Setup Instructions
3.1 Charging the Scanner
Before initial use, fully charge the scanner. Connect the scanner to a USB power source using the provided USB cable. The indicator light will show charging status and turn off when fully charged.
3.2 Connection Modes
The JRHC HC-202D offers three flexible connection options:

Image 3.1: Visual representation of the wired and wireless (2.4G and Bluetooth) connection options for the scanner, connecting to a laptop or mobile device.
3.2.1 Wired Mode
- Ensure the scanner is powered off.
- Connect the scanner to your computer using the USB cable.
- The scanner will automatically enter wired mode and function as a USB HID keyboard device.
3.2.2 2.4G Wireless Mode
- Plug the 2.4G USB dongle into an available USB port on your computer.
- Power on the scanner.
- The scanner will automatically pair with the dongle. A successful connection is indicated by a specific sound or light pattern (refer to the scanner's quick start guide for exact indications).
3.2.3 Bluetooth Mode
- Power on the scanner.
- Scan the 'Bluetooth Pairing' barcode (usually found in the quick start guide or on the scanner itself) to put the scanner into pairing mode.
- On your host device (e.g., smartphone, tablet, PC), enable Bluetooth and search for available devices.
- Select 'JRHC HC-202D' (or similar name) from the list of found devices to pair.
- A successful connection will be confirmed by an audible beep or indicator light change.
3.3 Compatible Systems
The scanner is compatible with a wide range of operating systems and devices:

Image 3.2: Visual display of the scanner's compatibility with various operating systems including Windows, Android, iOS, Linux, and Mac OS, for use with PCs, tablets, and smartphones.
- Windows XP / 7.0 / 8.0 / 10 PC
- Windows Mobile
- Android OS (Phones / Tablets)
- iOS (iPhone / iPad)
- Mac OS
- Linux
It supports software such as POS systems and OFFICE EXCEL/WORD/TXT for data input.
4. Operating Instructions
4.1 Scanning Modes
The scanner offers multiple scanning modes to suit different operational needs:

Image 4.1: An illustration detailing the three available scanning modes: manual button trigger, automatic single scan, and continuous automatic scanning.
- Trigger Mode: Press the scanning switch to activate the laser and scan a barcode.
- Continuous Scan Mode: The scanner continuously emits a scanning beam, reading barcodes as they pass in front of the scan window without needing to press the trigger for each scan.
- Automatic Detection Mode: The scanner automatically detects a barcode in its field of view and scans it without manual trigger activation.
Refer to the scanner's quick start guide for specific barcodes to configure these modes.
4.2 Upload Modes
Data can be uploaded in two ways:

Image 4.2: An illustration depicting the two data upload modes: Storage Mode for offline collection and Instant Upload Mode for real-time transmission.
- Instant Upload Mode: Scanned data is immediately transmitted to the connected device.
- Storage Mode: Scanned data is stored internally in the scanner's memory (up to 50,000 barcodes) and can be uploaded in batches later.
Refer to the scanner's quick start guide for specific barcodes to switch between these modes.
4.3 Scanning Barcodes
The HC-202D scanner is designed to read a wide variety of 1D and 2D barcodes, even under challenging conditions:
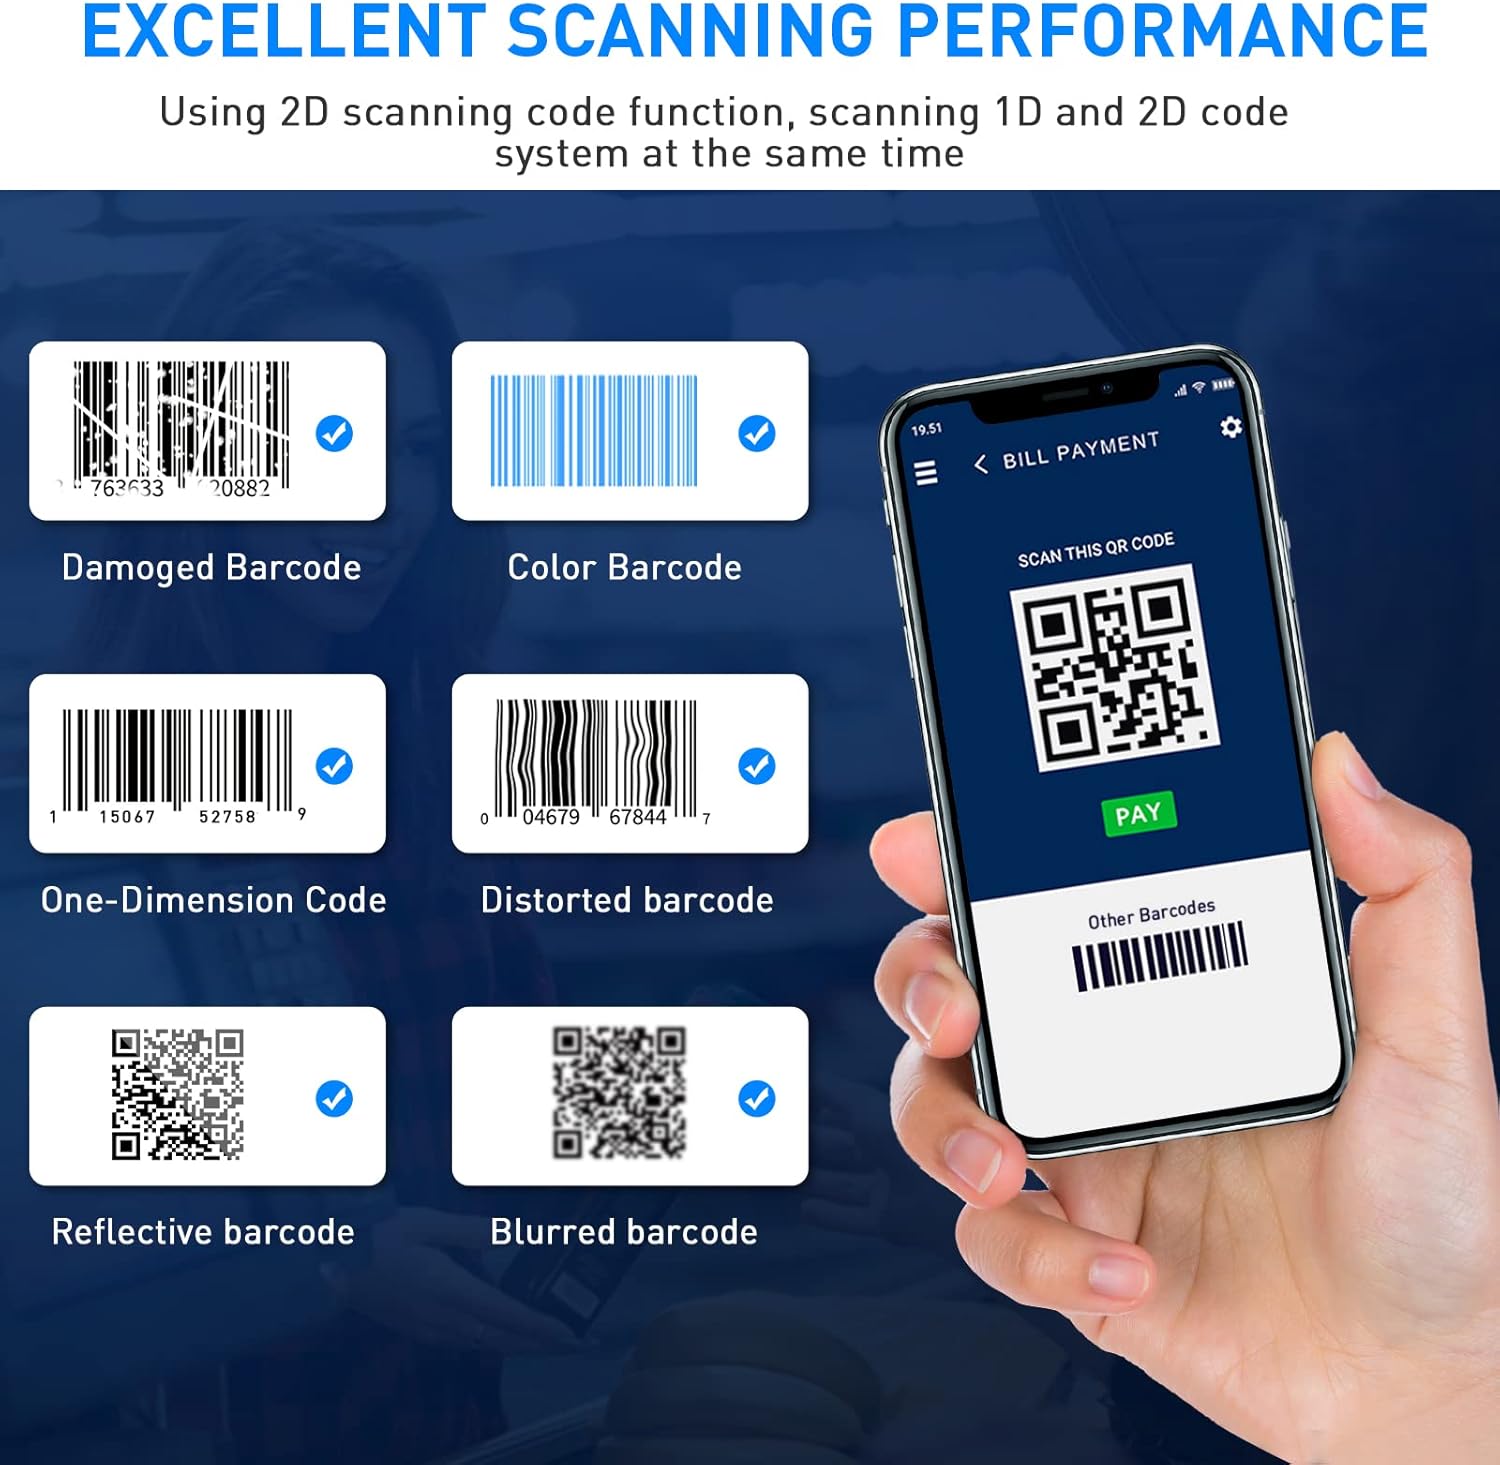
Image 4.3: Examples of various barcode types and conditions that the scanner can successfully read, including damaged, colored, 1D, distorted, reflective, and blurred barcodes.
To scan a barcode:
- Ensure the scanner is connected to your host device.
- Point the scan window at the barcode.
- Press the scanning switch (if in trigger mode) or allow the scanner to automatically detect (if in continuous or auto-detection mode).
- A successful scan is typically indicated by a beep and/or a flash of the indicator light.
4.4 Customization Options
The scanner offers several configurable settings:

Image 4.4: An illustration of the scanner's vibration alert feature, indicating options to enable or disable sound and vibration feedback.

Image 4.5: Examples of how barcode data can be customized with prefixes and suffixes, demonstrating flexible output formatting.
- Sound and Vibration: Enable or disable audible beeps and vibration alerts for scan confirmations.
- Prefix/Suffix: Add custom characters before or after scanned data.
- Delete Characters: Remove specific characters from scanned data.
- Add Keyboard Keys: Insert special keys like TAB, CR (Carriage Return), LF (Line Feed) after scanned data for automated input.
These options are typically configured by scanning specific setup barcodes provided in the full user manual or quick start guide.
5. Maintenance
5.1 Battery Care
The scanner is equipped with a 1200mAh Lithium Polymer battery. To ensure optimal battery life:
- Charge the battery fully before first use.
- Avoid completely draining the battery regularly.
- Store the scanner in a cool, dry place when not in use for extended periods.
- Charging time is approximately 2-3 hours for a full charge.
5.2 Cleaning
To maintain scanning performance:
- Gently wipe the scan window with a soft, lint-free cloth.
- Do not use abrasive cleaners or solvents.
- Keep the device free from dust and debris.
6. Troubleshooting
If you encounter issues with your JRHC HC-202D scanner, consider the following:
6.1 Connectivity Issues
- No Connection: Ensure the scanner is powered on and fully charged. For 2.4G, check if the USB dongle is properly inserted. For Bluetooth, ensure Bluetooth is enabled on your host device and the scanner is in pairing mode.
- Intermittent Connection: Check for obstacles or excessive distance between the scanner and the host device. Recharge the scanner if the battery is low.
6.2 Scanning Problems
- Scanner Not Reading: Ensure the barcode is clean, flat, and within the scanner's optimal reading range. Check if the correct scanning mode is selected.
- Incorrect Data Output: Verify that the scanner is configured for the correct barcode symbology. Check for any enabled prefix/suffix or character deletion settings that might be altering the output.
6.3 Device Unresponsive
- No Power: Ensure the battery is charged. If unresponsive, try a hard reset (refer to the full user manual for specific instructions, if available).
For persistent issues, refer to the comprehensive user manual or contact JRHC customer support.
7. Specifications
Detailed technical specifications for the JRHC Mini 2D Portable Wireless Barcode Scanner HC-202D:

Image 7.1: A visual comparison of the scanner's mini size and dimensions (78mm/3.07in length, 38mm/1.50in width, 12mm/0.47in thickness) against common smartphones, highlighting its portability.

Image 7.2: An illustration detailing the effective wireless range for both 2.4G (up to 100 meters/328 feet with light obstacles) and Bluetooth (up to 30 meters/98 feet) connectivity.

Image 7.3: Key battery specifications including 1200mAh capacity, 5 hours working time, 720 hours standby time, and 2 hours charging time.
| Feature | Specification |
|---|---|
| Model | HC-202D |
| Dimensions | 4.13 x 1.97 x 0.98 inches (approx. 105 x 50 x 25 mm) |
| Weight | 12 ounces (approx. 340 grams) |
| Connectivity | Wired (USB), 2.4G Wireless, Bluetooth |
| 2.4G Wireless Range | Up to 150M (492 feet) in open areas; 50M (164 feet) with obstacles |
| Bluetooth Range | Up to 30M (98 feet) |
| Battery | 1200mAh Lithium Polymer (included) |
| Working Time | Up to 10 hours continuous scanning (5 hours from image) |
| Standby Time | Up to 720 hours |
| Charging Time | 2-3 hours |
| Supported 1D Barcodes | UPC, EAN, Code128, Code39, Code11, Codabar, Industry25, Matrix25, Interleaved 2 of 5-Lottery, etc. |
| Supported 2D Barcodes | QR Code, Data Matrix, PDF417, Aztec code, Maxicode |
| Storage Capacity | Up to 50,000 barcodes (offline mode) |
| Compatible OS | Windows XP/7/8/10, Windows Mobile, Android, iOS, Mac OS, Linux |
8. Warranty and Support
For information regarding product warranty, returns, or technical support, please refer to the documentation included with your purchase or visit the official JRHC website. Contact details for customer service are typically available on the manufacturer's support page.


