1. Introduction
This manual provides detailed instructions for the safe and effective use of your JAY-PARK XHP90 LED Flashlight. This high-powered, rechargeable flashlight features an XHP90 LED, a COB side work light, and USB output functionality. Please read this manual thoroughly before operating the device.
2. What's in the Box
Verify that all components are present upon unpacking:
- Super Bright Rechargeable LED Flashlight
- Rechargeable Battery (Lithium-Ion)
- AAA Batteries (for alternative power)
- TYPE-C Charging Cable
- Cloth Cover
- Battery White Tube (for Lithium-Ion battery)
- AAA Battery Base (adapter for AAA batteries)
- Operation Manual (this document)
- Flashlight Case
3. Setup
3.1 Battery Installation
The JAY-PARK XHP90 LED Flashlight supports both a rechargeable Lithium-Ion battery and AAA batteries.
- Unscrew the rear cover of the flashlight.
- For Lithium-Ion Battery: Insert the provided rechargeable Lithium-Ion battery into the flashlight body, ensuring the positive (+) end faces towards the flashlight head. Use the battery white tube if necessary for a secure fit.
- For AAA Batteries: Insert three AAA batteries into the AAA battery base, observing correct polarity. Then, insert the loaded AAA battery base into the flashlight body, with the positive (+) end facing towards the flashlight head.
- Screw the rear cover back on securely.
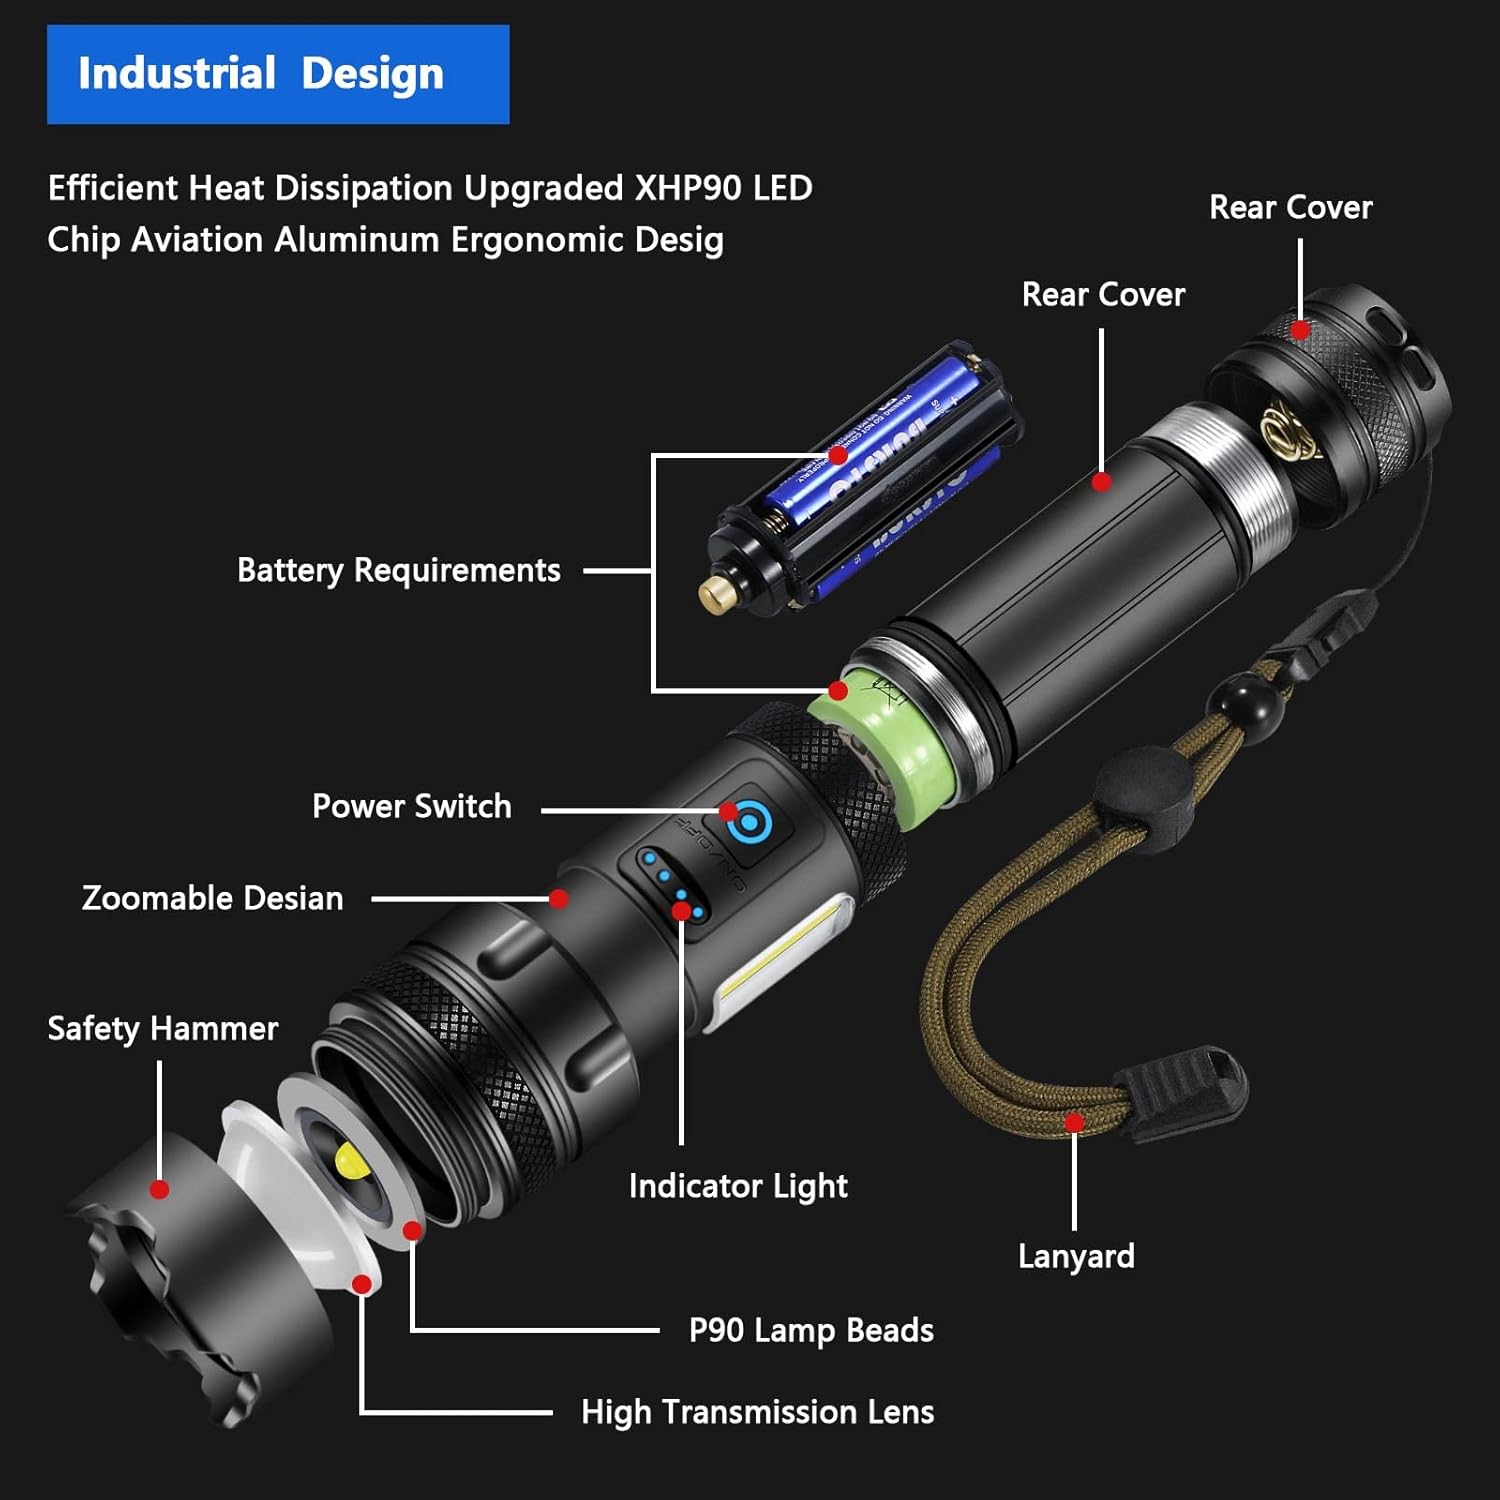
Figure 1: Exploded view illustrating battery installation and flashlight components.
3.2 Charging the Lithium-Ion Battery
Before first use, fully charge the Lithium-Ion battery. The flashlight features a built-in overcharging and over-discharging protection function to prolong battery life.
- Locate the USB-C charging port on the flashlight body.
- Connect the provided TYPE-C charging cable to the flashlight and to a compatible USB power source (e.g., wall adapter, computer USB port).
- The power indicator lights will illuminate to show the charging progress. Each light represents approximately 25% charge.
- Charging is complete when all four indicator lights are solid.

Figure 2: USB-C charging port and power indicator display.
4. Operating Instructions
4.1 Power On/Off and Main Light Modes
Press the power button to cycle through the main light modes:
- First Press: Strong Light (High brightness)
- Second Press: Medium Light (Moderate brightness)
- Third Press: Strobe (Flashing light)
- Fourth Press: Off
To turn off the flashlight from any main light mode without cycling through all modes, press and hold the power button for approximately 2 seconds.
4.2 COB Side Light Modes
The flashlight features a COB (Chip-on-Board) side light for broader area illumination. To activate the COB side light, double-press the power button quickly. Cycle through its modes with subsequent presses:
- First Double-Press: Strong Light (COB)
- Second Press: Medium Light (COB)
- Third Press: Red Light (COB)
- Fourth Press: Red Strobe (COB)
- Fifth Press: Off
To turn off the COB side light from any mode, press and hold the power button for approximately 2 seconds.

Figure 3: Illustration of main light and COB side light modes.
4.3 Telescopic Zoom Function
Adjust the beam focus by gently pulling or pushing the head of the flashlight. This allows you to switch between a focused spotlight for long-distance illumination and a wide floodlight for broader area coverage.

Figure 4: Flashlight demonstrating powerful beam and long-distance illumination.
4.4 Power Indicator
The four LED indicator lights near the power button display the remaining battery charge. Each light represents approximately 25% of the battery capacity.
4.5 USB Output (Power Bank Functionality)
The flashlight can also function as a power bank to charge small electronic devices. Connect your device to the USB output port using a compatible cable. Ensure the flashlight has sufficient charge before using this feature.

Figure 5: Battery capacity and approximate runtime.
4.6 Safety Hammer Function
The robust design of the flashlight includes a hardened end that can be used as a safety hammer in emergency situations, such as breaking glass.

Figure 6: Flashlight demonstrating its safety hammer feature.
5. Maintenance
5.1 Cleaning
Wipe the flashlight body with a soft, damp cloth. Do not use abrasive cleaners or solvents. Keep the lens clean for optimal light output.
5.2 Battery Care
To maximize battery lifespan, avoid fully discharging the Lithium-Ion battery frequently. Recharge the battery when the power indicator shows low charge. Store the flashlight with a partial charge if not used for extended periods.
5.3 Water Resistance
The flashlight has an IP56 protection rating, making it resistant to water splashes and dust. It is suitable for use in harsh environments such as thunderstorms or heavy snow. However, it is not designed for submersion in water.
6. Troubleshooting
| Problem | Possible Cause | Solution |
|---|---|---|
| Flashlight does not turn on. | Battery is depleted or incorrectly installed. | Charge the Lithium-Ion battery or replace AAA batteries. Ensure batteries are inserted with correct polarity. |
| Light output is dim. | Low battery charge. | Recharge or replace batteries. |
| Flashlight flickers. | Low battery charge or loose battery connection. | Recharge or replace batteries. Ensure battery is securely seated. |
| Flashlight gets warm during use. | Normal operation at high output. | This is normal for high-lumen flashlights. If it becomes excessively hot, reduce usage time or switch to a lower brightness mode. |
| Cannot switch between main light and COB light. | Incorrect button press sequence. | Single press for main light modes. Double press for COB side light modes. |
7. Specifications
| Model Number | JAY-PARK-01 |
| Light Source Type | XHP90 LED (Main), COB (Side) |
| White Brightness | Up to 10000 Lumens (Main Light) |
| Power Source | Rechargeable Lithium-Ion Battery or 3x AAA Batteries |
| Rechargeable Battery Capacity | 5000 mAh (Lithium-Ion) |
| Approximate Runtime | Up to 12 hours (depending on mode) |
| Battery Cell Composition | Lithium Ion |
| Charging Port | USB Type-C |
| Water Resistance Level | IP56 (Waterproof) |
| Dimensions (LxWxH) | 41 x 41 x 160 mm (1.6 x 1.6 x 6.3 inches) |
| Item Weight | 472 g |
| Additional Features | Telescopic Zoom, Power Indicator, USB Output (Power Bank Functionality), Safety Hammer |
8. Warranty
This JAY-PARK product typically comes with a 30-day warranty from the date of purchase, covering manufacturing defects. Please retain your proof of purchase for any warranty claims. For specific warranty details and terms, refer to the documentation included with your product or contact customer support.
9. Support
For technical assistance, troubleshooting not covered in this manual, or warranty inquiries, please contact JAY-PARK customer support through the retailer where the product was purchased or visit the official JAY-PARK website for contact information.


