1. Product Overview
The EagleStone 8-Hole Bubble Gun is an automatic bubble maker designed for outdoor play. It features an 8-hole outlet for high bubble output, integrated LED lights, and a leak-proof design. This manual provides essential information for the safe and effective use of your bubble gun.

Image: The EagleStone 8-Hole Bubble Gun, available in blue and red, designed for generating numerous bubbles.
2. Safety Information
- Adult Supervision: Always ensure adult supervision during use, especially for young children.
- Bubble Solution: Do not ingest bubble solution. In case of accidental ingestion, rinse mouth thoroughly and seek medical attention if necessary. Avoid contact with eyes; if contact occurs, flush with water immediately.
- Battery Safety: Use only the specified battery type (4 AA batteries, not included). Do not mix old and new batteries, or different types of batteries. Insert batteries with correct polarity. Remove batteries if the toy will not be used for an extended period.
- Choking Hazard: Keep small parts, such as battery covers and bubble solution bottles, away from young children to prevent choking.
- Outdoor Use: This product is primarily designed for outdoor use. If used indoors, be aware of potential slippery surfaces from bubble residue.
3. What's in the Box
Your EagleStone Bubble Gun package includes:
- Bubble Gun (quantity as per purchase, e.g., 2-pack)
- Bubble Solution Bottles (quantity as per purchase, e.g., 4 bottles)
- Bubble Refill Concentrates (e.g., 10 packets)
- Small Trays for solution
4. Setup and Installation
Follow these steps to set up your bubble gun:
- Install Batteries: Open the battery compartment cover, typically located on the handle. Insert 4 AA batteries, ensuring correct polarity. Close the cover securely.
- Prepare Bubble Solution: Unscrew the cap from a bubble solution bottle. Carefully peel back the foil seal. Pour the bubble solution into the provided small tray. If using concentrate, mix with water according to instructions on the packet before pouring into the tray.
- Attach Solution Bottle: Screw the bubble solution bottle onto the designated inlet pipe at the bottom of the bubble gun. Ensure it is securely fastened to prevent leaks.

Image: Visual guide for installing batteries, attaching the bubble solution, and operating the trigger.
Video: A demonstration of unboxing and setting up the bubble guns, including preparing the bubble solution.
5. Operating Instructions
Once assembled, operating the bubble gun is straightforward:
- Power On: Ensure the bubble solution bottle is securely attached and batteries are installed.
- Activate: Press and hold the trigger. The internal motor will activate, and LED lights will illuminate. Bubbles will begin to emerge from the 8-hole outlet.
- Continuous Bubbles: The automatic mechanism will continuously produce bubbles as long as the trigger is held down and there is sufficient bubble solution.
- Leak-Proof Design: The 360-degree leak-proof design allows for various angles of play without spillage.
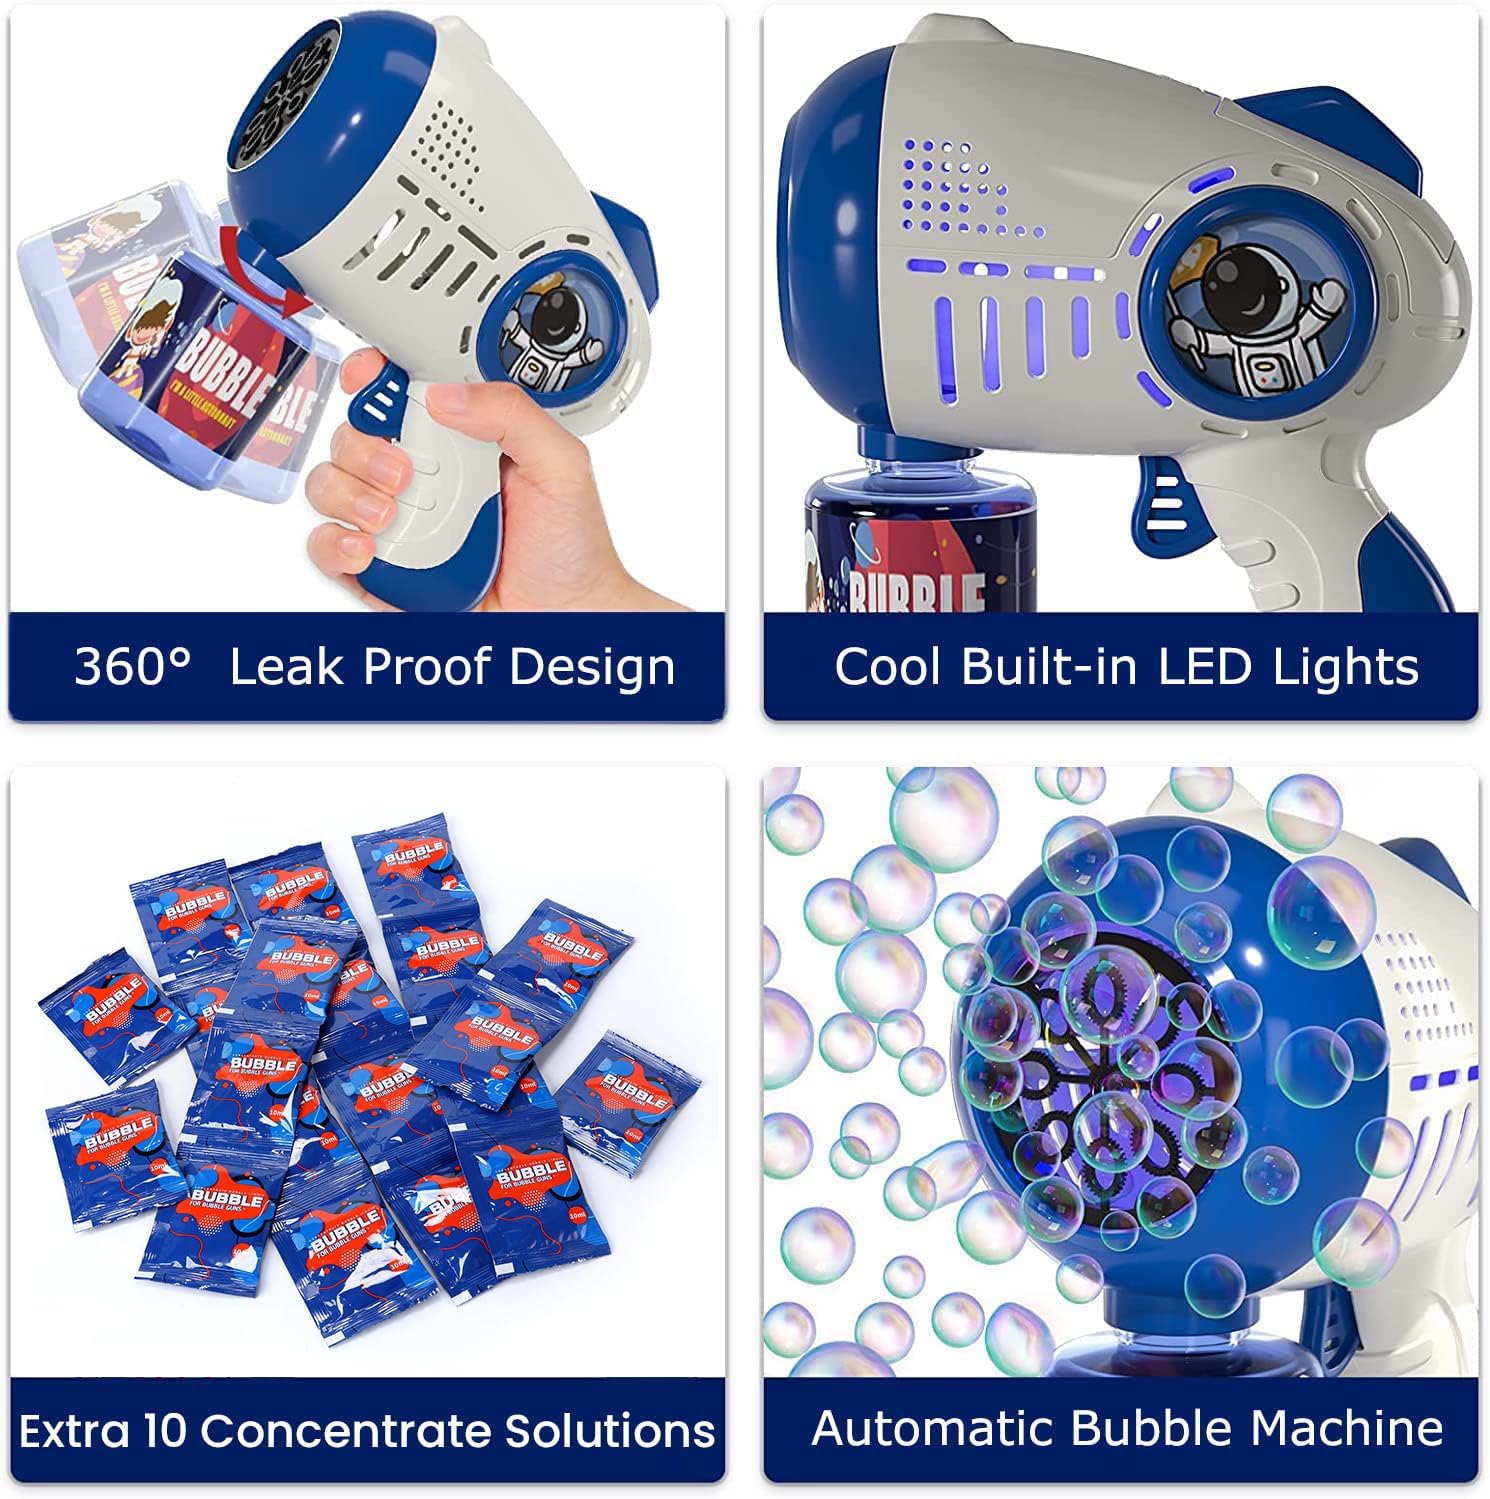
Image: Key features of the bubble gun, including its leak-proof design, LED lights, and automatic operation.
Video: A demonstration of the bubble guns in action, showing the continuous stream of bubbles produced.
6. Maintenance
To ensure the longevity and optimal performance of your bubble gun, follow these maintenance tips:
- Cleaning: After each use, wipe the exterior of the bubble gun with a dry cloth. Avoid submerging the electronic components in water.
- Solution Residue: If the bubble outlet becomes clogged with dried solution, gently wipe it with a damp cloth or cotton swab.
- Storage: Store the bubble gun in a cool, dry place away from direct sunlight. Remove batteries if storing for extended periods.
7. Troubleshooting
If you encounter issues with your bubble gun, refer to the following common problems and solutions:
| Problem | Possible Cause | Solution |
|---|---|---|
| No bubbles or weak bubbles | Low battery, insufficient solution, clogged outlet, incorrect solution consistency. | Replace batteries. Ensure solution bottle is full and securely attached. Clean the bubble outlet. Use recommended bubble solution or ensure concentrate is mixed correctly. |
| LED lights not working | Low battery, faulty connection. | Replace batteries. Check battery compartment for secure connection. |
| Leaking from the gun | Solution bottle not securely attached, damaged seal. | Ensure the solution bottle is tightly screwed onto the inlet pipe. Inspect the seal for damage. |
8. Specifications
- Brand: EagleStone
- Model Number: HL026
- Material Type: Plastic
- Color: Blue, Red (as per variant)
- Item Shape: Spaceship
- Age Range Description: Kid (Manufacturer Minimum Age: 36 months)
- Number of Items: 1 (per unit, typically sold in packs)
- Power Source: Battery Powered
- Battery Description: Alkaline (4 AA batteries, not included)
- Operation Mode: Automatic
- Additional Features: 8-hole outlet, Powerful motor, LED lights, 360-degree leak-proof design
- Item Dimensions L x W x H: 6.7"L x 2.5"W x 5.9"H
9. Warranty and Support
For warranty information or customer support, please refer to the product packaging or contact EagleStone customer service directly. Specific warranty terms may vary by region and retailer.