Flatware B09Q1D3SZB
Flatware Laminator Machine User Manual
Model: B09Q1D3SZB
1. Introduction
Thank you for choosing the Flatware Laminator Machine. This manual provides essential information for the safe and efficient operation of your new laminator. Please read it thoroughly before use and keep it for future reference.
2. Safety Instructions
- Always place the laminator on a stable, flat surface.
- Keep the laminator away from water or other liquids.
- Do not insert objects other than laminating pouches into the machine.
- Ensure proper ventilation around the machine during operation.
- Unplug the machine when not in use or before cleaning.
- Keep out of reach of children.
3. Package Contents
Verify that all items are present in the package:
- 1 x Flatware Laminator Machine
- 50 x A4 Plastic Laminating Films
- 12 x Trial Laminating Films (various sizes)
- 1 x User Manual (this document)

Image: The Flatware Laminator Machine shown alongside the included 50 A4 plastic films and 12 trial films.
4. Product Overview
The Flatware Laminator Machine features a two-roller system for efficient and smooth lamination, minimizing wrinkles, blistering, and curling. It supports both hot and cold lamination modes and includes an ABS button for jam release.

Image: The laminator in operation, demonstrating its quiet design with a laminated photo exiting the machine.

Image: Visual representation of the laminator's efficiency, highlighting a 3-minute preheat time, 280mm/min speed, and 30 minutes of continuous working.

Image: The laminator positioned with various documents (photos, cards, certificates, work permits, menus, paintings) to illustrate its compatibility with items up to 9.05 inches wide.
5. Setup
- Unpack the laminator and remove all packaging materials.
- Place the machine on a flat, stable, and heat-resistant surface.
- Ensure there is enough space around the machine for proper ventilation and for documents to exit freely.
- Plug the power cord into a suitable electrical outlet.
6. Operating Instructions
6.1 Selecting Lamination Mode

Image: Close-up of the laminator's mode switch, indicating options for Hot, Off, and Cold lamination.
- Hot Lamination: Best for standard documents and photos. Move the switch to the 'HOT' position. The machine will warm up within 3 minutes until the 'Ready' light turns green.
- Cold Lamination: Suitable for pressure-sensitive materials or documents that may be damaged by heat. Move the switch to the 'COLD' position. The 'Ready' light will turn green immediately.
6.2 Lamination Process
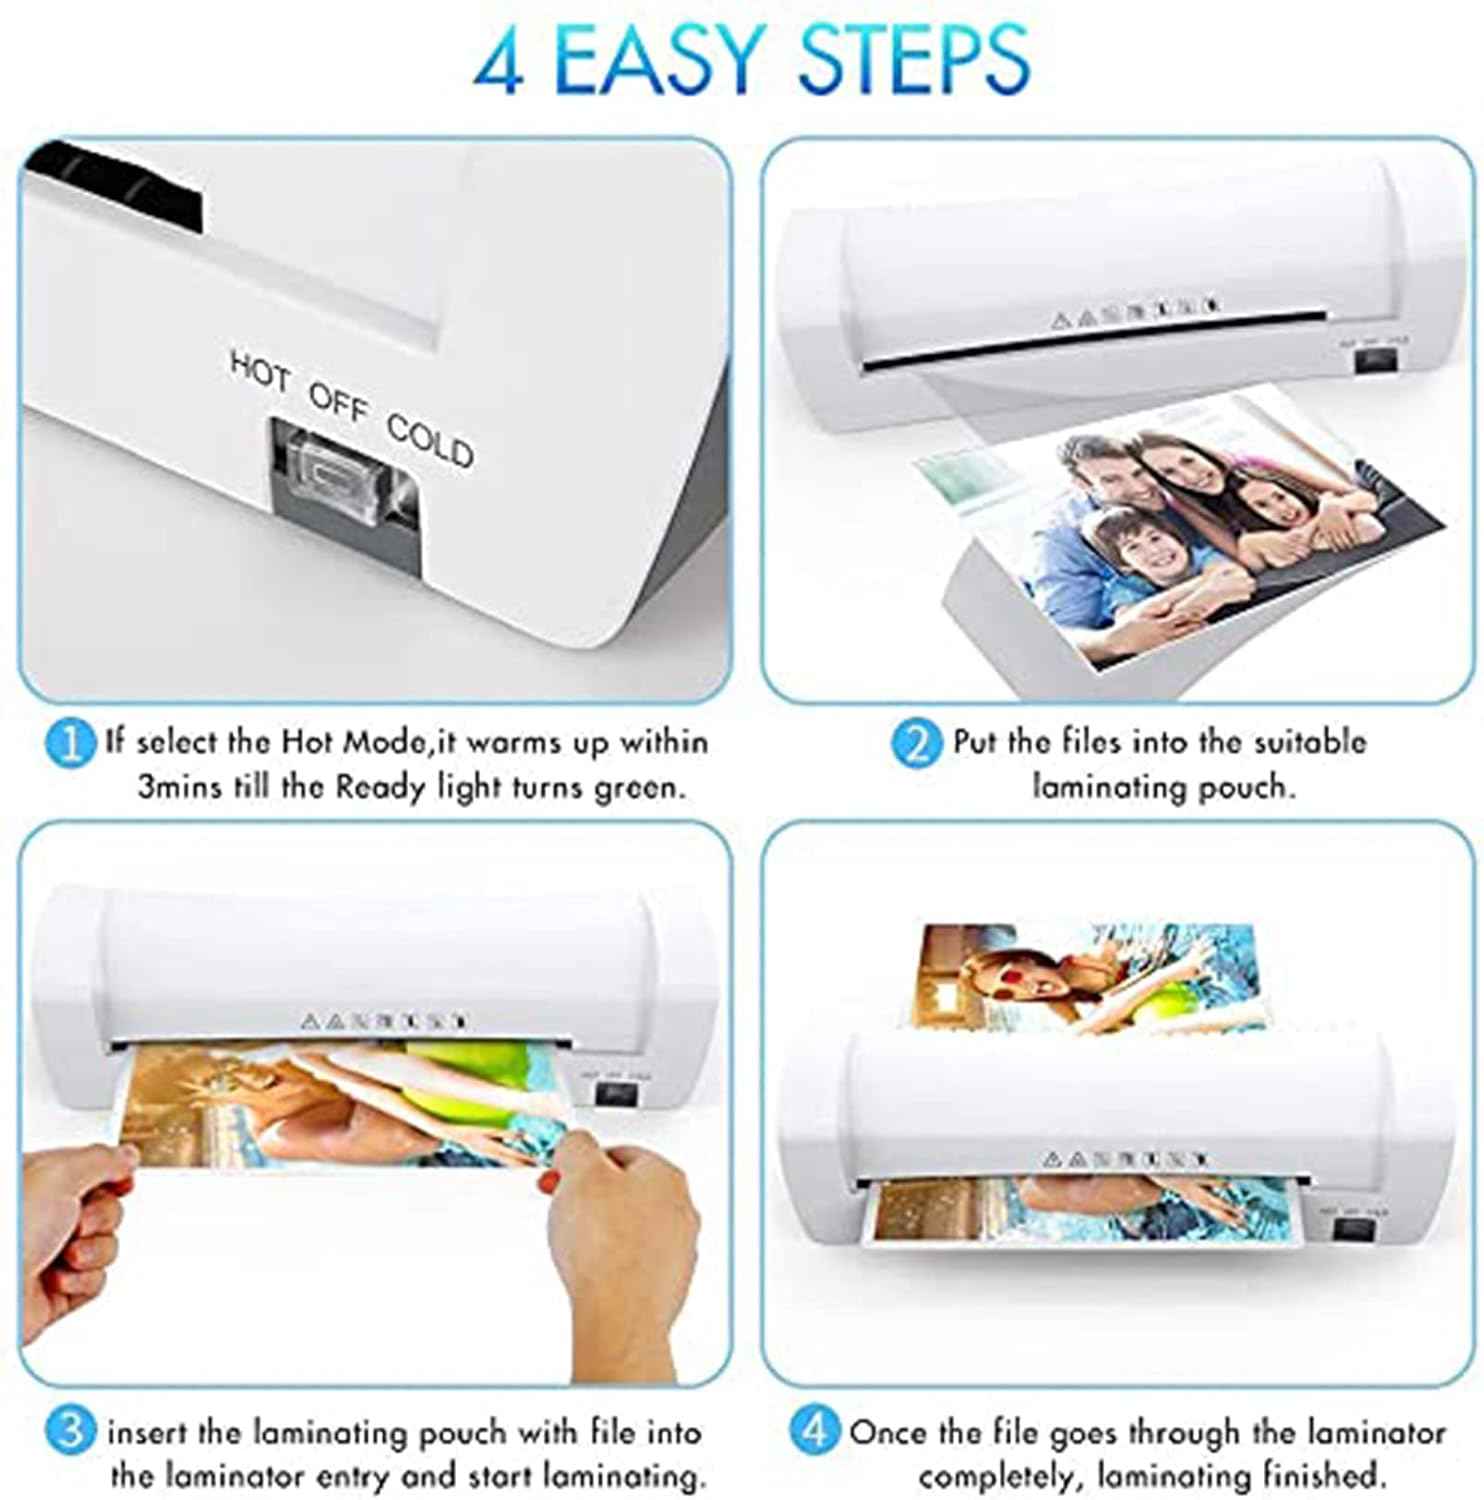
Image: A four-step visual guide demonstrating the lamination process: 1. Select Hot mode and wait for green light. 2. Place document into a laminating pouch. 3. Insert the pouch into the laminator entry. 4. Lamination is complete once the pouch fully exits.
- Select the desired lamination mode (Hot or Cold) and wait for the 'Ready' light to turn green.
- Prepare your document by placing it neatly inside a suitable laminating pouch. Ensure the document is centered and there is a small margin around it.
- Insert the sealed edge of the laminating pouch into the laminator entry slot. The machine will automatically feed the pouch through.
- Allow the pouch to pass completely through the machine. Do not pull or obstruct the pouch during the process.
- Once the laminated document exits the machine, place it on a flat surface to cool for a few seconds.
6.3 Jam Release (ABS Button)
In case of a paper jam, immediately press and hold the ABS button. This will release the rollers, allowing you to gently pull out the jammed pouch. Once the pouch is removed, release the ABS button.
7. Maintenance
- Always unplug the laminator before cleaning.
- Wipe the exterior of the machine with a soft, dry cloth. Do not use abrasive cleaners or solvents.
- To clean the rollers, run a folded piece of paper through the machine periodically to remove any adhesive residue.
- Store the laminator in a clean, dry place when not in use.
8. Troubleshooting
| Problem | Possible Cause | Solution |
|---|---|---|
| Machine does not turn on | No power supply | Check power cord connection and wall outlet. |
| Pouch gets jammed | Pouch inserted incorrectly or too thick | Press the ABS button to release the rollers and gently pull out the pouch. Ensure pouch thickness is within specifications. |
| Lamination has bubbles or wrinkles | Incorrect temperature setting, old pouches, or uneven insertion | Ensure the correct mode (Hot/Cold) is selected. Use fresh, good quality pouches. Insert the pouch straight and evenly. |
| Laminator is slow to warm up | Normal operation for Hot mode | The Hot mode typically takes 3 minutes to warm up. Wait for the 'Ready' light to turn green. |
Frequently Asked Questions
- Is this laminator suitable for hot foiling? Yes, this laminator is suitable for hot foiling applications.
9. Specifications
| Feature | Detail |
|---|---|
| Brand | Flatware |
| Model | B09Q1D3SZB |
| Lamination Modes | Hot and Cold |
| Warm-up Time (Hot Mode) | 3 minutes |
| Max. Pouch Thickness | 160mic (2x 80mic) to 250mic (2x125mic) |
| Max. Lamination Width | 230mm (A4 Size) / 9.05 inches |
| Supported Paper Sizes | A4, A5, A6, Card Type |
| Roller Design | Two-roller system |
| Jam Release | ABS Button |
| Country of Origin | China |
10. Warranty and Support
For warranty information or technical support, please refer to the documentation provided at the time of purchase or contact your retailer. Keep your purchase receipt as proof of purchase.
Ask a question about this manual
Ask about setup, troubleshooting, compatibility, parts, safety, or missing instructions. Manuals+ will review the question and use this page’s manual context to help answer it.