
1. Introduction
This manual provides detailed instructions for the safe and efficient use of your Koolouispoper 100W LED Floodlight. Please read this manual thoroughly before installation and operation, and retain it for future reference. This floodlight is designed for outdoor use, featuring IP66 waterproofing and a durable tempered glass construction.
2. Safety Information
Always follow basic safety precautions to reduce the risk of fire, electric shock, and personal injury.
- Electrical Safety: Ensure the power supply is disconnected before installation or maintenance. All wiring should be performed by a qualified electrician in accordance with local electrical codes.
- Voltage: This floodlight operates on AC220V. Verify your power supply matches this requirement.
- Grounding: The floodlight must be properly grounded to prevent electric shock.
- Mounting: Mount the floodlight securely on a stable surface. Ensure the mounting location can support the weight of the fixture.
- Temperature: Do not operate the floodlight in excessively high temperatures or in enclosed spaces without adequate ventilation.
- Damage: Do not use the floodlight if the power cord, housing, or tempered glass is damaged.
3. Product Specifications
| Specification | Value |
|---|---|
| Input Voltage | AC220V |
| Wattage | 100W |
| Lumens | 8000LM |
| Color Temperature | 3500K-6000K (White Light) |
| Waterproof Protection | IP66 |
| Material | Aluminum, Tempered Glass |
| Control Method | App (if applicable, refer to specific app instructions) |
| Dimensions (100W) | 200mm x 165mm (approx.) |
Note: Specifications are subject to change without notice.
4. Setup and Installation
Before beginning installation, ensure the power supply is turned off at the circuit breaker.
4.1 Component Overview


4.2 Mounting the Floodlight
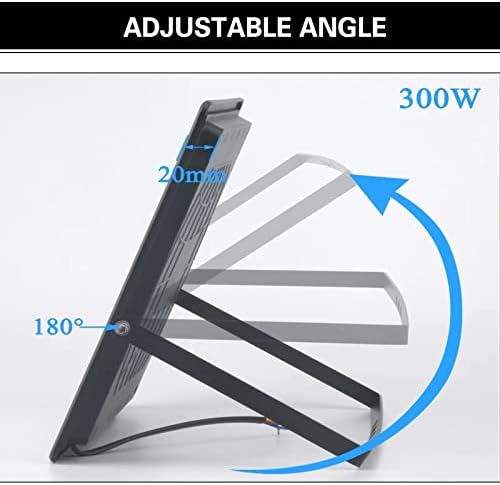
The floodlight features a 180-degree adjustable bracket for flexible positioning.
- Choose a suitable mounting location that is stable and can support the floodlight's weight.
- Use appropriate screws and anchors (not included) to securely fasten the mounting bracket to the desired surface.
- Adjust the angle of the floodlight by loosening the screws on the side of the bracket, tilting the lamp body to the desired position, and then tightening the screws to secure it.
4.3 Wire Connection
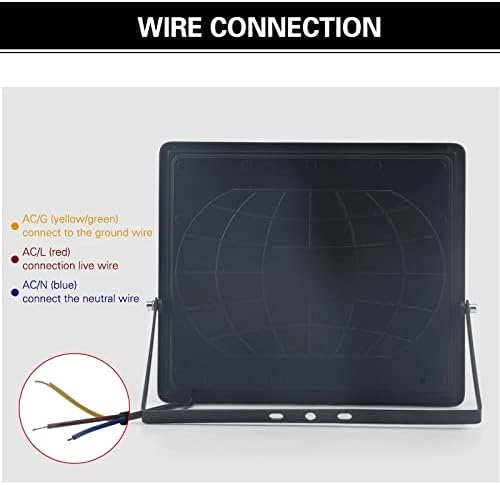
Connect the floodlight to your AC220V power supply as follows:
- AC/G (Yellow/Green wire): Connect to the ground wire.
- AC/L (Red wire): Connect to the live wire.
- AC/N (Blue wire): Connect to the neutral wire.
Ensure all connections are secure and properly insulated. Improper wiring can lead to electric shock or fire.
5. Operating Instructions
Once properly installed and wired, the floodlight can be operated by connecting it to a power source. If your model supports app control, refer to the specific app instructions provided separately for advanced features.
- Power On/Off: Turn on the power supply to illuminate the floodlight. Turn off the power supply to switch it off.
- Angle Adjustment: The floodlight's angle can be adjusted as described in Section 4.2 to direct light where needed.
6. Maintenance
Regular maintenance ensures optimal performance and longevity of your floodlight.
- Cleaning: Periodically clean the tempered glass surface with a soft, damp cloth to remove dirt and debris. Do not use abrasive cleaners or solvents.
- Inspection: Regularly inspect the power cord, wiring connections, and housing for any signs of damage or wear. Address any issues promptly.
- Heat Dissipation: Ensure the floodlight's aluminum body is free from obstructions to allow for efficient heat dissipation.

7. Troubleshooting
If you encounter issues with your floodlight, refer to the following common problems and solutions:
- Light Does Not Turn On:
- Check if the power supply is connected and turned on.
- Verify all wire connections (live, neutral, ground) are secure and correct.
- Inspect the power cord for any damage.
- Light is Dim or Flickering:
- Ensure the input voltage matches the floodlight's requirement (AC220V).
- Check for loose connections.
- Clean the tempered glass surface if it is dirty.
- Water Inside the Fixture:
- Although rated IP66, inspect the seals and housing for any damage that might compromise its waterproof integrity.
- If water ingress is confirmed, discontinue use and contact support.
If the problem persists after attempting these solutions, contact customer support.
8. Warranty and Support
For warranty information or technical support, please refer to the documentation provided at the time of purchase or contact Koolouispoper customer service. Keep your purchase receipt as proof of purchase.
Manufacturer: Koolouispoper
Date First Available: January 7, 2022