WNKRUN Restaurant Pager System (Model 400D+X1-15+200E-2) Instruction Manual
Brand: WNKRUN | Model: 400D+X1-15+200E-2
1. Introduction
This manual provides detailed instructions for the installation, operation, maintenance, and troubleshooting of your WNKRUN Restaurant Pager System, Model 400D+X1-15+200E-2. This wireless calling system is designed to enhance communication efficiency in various service environments such as restaurants, cafes, and hotels.
Figure 1: Overview of the WNKRUN Restaurant Pager System components.
2. Setup
2.1 Package Contents
Before proceeding with the setup, please ensure all components are present:
1 x Display Screen (Model CS-400D)
1 x Power Supply for Display Screen
1 x Remote Control
15 x Call Buttons (Model CS-X1)
2 x Waterproof Watch Pagers (Model CS-200E)
1 x Antenna for Display Screen
Figure 2: All included components of the pager system.
2.2 Display Screen Installation
Install the Antenna: Carefully screw the antenna into the designated port on the side of the display screen. Ensure it is securely attached.
Connect Power: Plug the power supply into the display screen's power input, then connect it to a power outlet.
Placement: Position the display screen in a central location where it is easily visible to staff.
Video 1: Demonstrates the correct procedure for installing the antenna and connecting the power to the display unit. It emphasizes installing the antenna first to prevent signal issues.Figure 3: The CS-400D display unit, highlighting its capacity and voice features.
2.3 Pairing Call Buttons with Watch Pagers
The factory default numbers are pre-matched. If you need to add new call buttons or re-pair existing ones, follow these steps:
Enter Setting Mode: On the watch pager, touch and hold the L & R keys simultaneously to enter the setting menu.
Select "Add Button": Navigate to "1: Add Button" using the L/R keys and confirm.
Press Call Button: While the watch is in "Add Button" mode, press the desired call button. The watch will display the new number and confirm successful pairing.
Exit Setting: Touch and hold the L & R keys again to exit the setting mode.
Video 2: Step-by-step guide on how to add call button numbers to the watch pager for pairing.Figure 4: Various system configurations and remote control functionality.
3. Operating Instructions
3.1 Basic Operation
When a customer requires service, they simply press the call button at their table. The display screen will immediately show the table number and broadcast it, while the watch pagers worn by staff will also receive the alert.
Video 3: Demonstrates the pager system in a restaurant setting, showing how a customer's call is received by both the display and a staff member's watch pager.Figure 5: Operational workflow of the WNKRUN pager system.
3.2 Display Modes and Standby Settings
The display screen supports three number display modes: single group, 4 groups, and 8 groups. You can also configure the standby display to show date and time, single time, last number, black screen, or a center line.
Adjust Standby Display (F14): Use the remote control or the buttons on the display unit to access F14 settings. Options include: 0=Date+Time (default), 1=Single time, 2=Last number, 3=Black screen, 4=Center line.
Adjust Display Mode (F06): Access F06 settings to select between 1=1 group, 4=4 groups, or 8=8 groups (default is 8 groups).
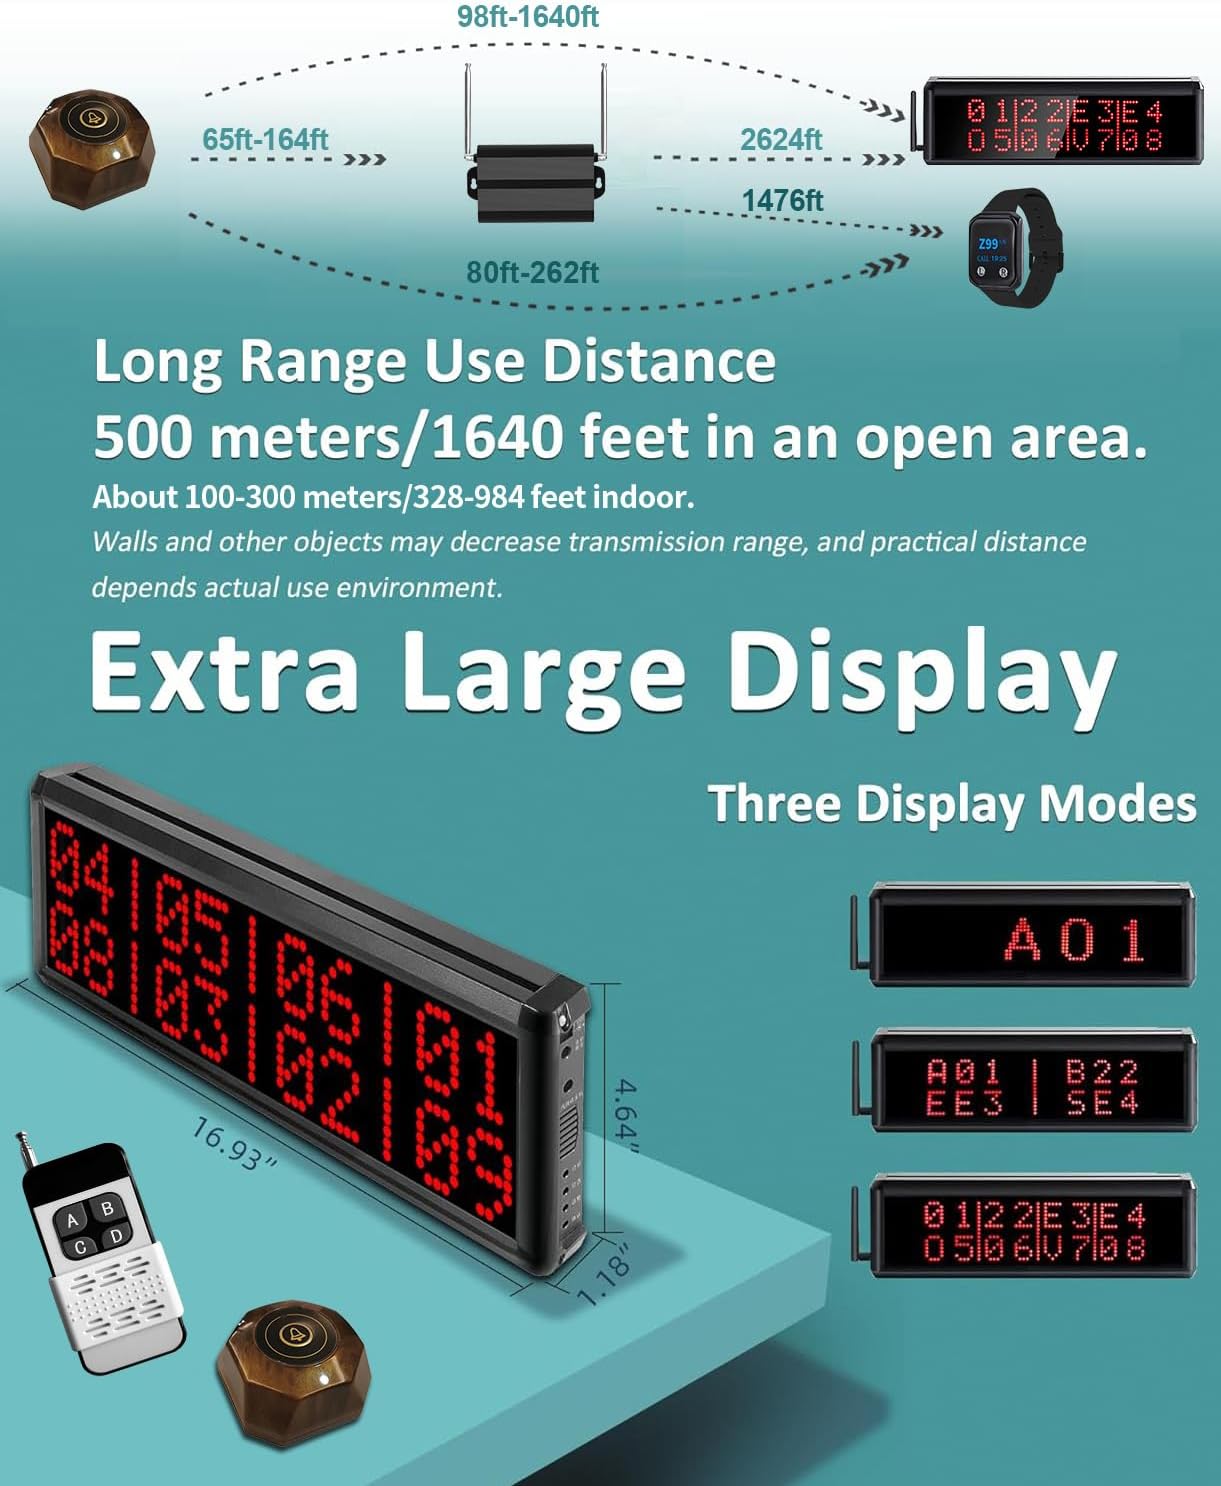
Video 4: Instructions on how to adjust the standby display settings on the main display unit.Video 5: Guide to adjusting the display mode (single, 4 groups, 8 groups) on the display unit.Figure 6: Details on the display modes and long-range capabilities.
3.3 Volume Adjustment
The display unit offers 10 levels of volume control (0-9), where 0 is mute. You can also connect an external active speaker to increase the volume further.
Video 6: Demonstrates how to adjust the volume settings on the display unit.Figure 7: Volume levels, beep options, and alphanumeric input capabilities.
3.4 Time Setting for Watch Pagers
To set the time on your watch pager (24-hour format by default):
Enter Time Setting (F7): Access the watch pager's menu and navigate to F7 for time setting.
Adjust Time: Use the L/R keys to adjust the hours and minutes.
Confirm: Confirm the settings to save the new time.
If you require a 12-hour format, first set F9=9861, then proceed with F7 time setting.
Video 7: Instructions for adjusting the time on the wrist watch pager.
3.5 Time Setting for Display Screen
To set the time on the display screen:
Access Time Setting (F16): Use the buttons on the display unit or the remote control to navigate to F16 for time setting.
Adjust Time: Use the appropriate buttons (Bit, Num) to adjust the date and time.
Confirm: Press the 'Ent' button to save the settings.
You can switch between 12-hour and 24-hour formats by setting F18=1011 (12-hour) or F18=1010 (24-hour, default) as needed, then proceed to set F16.
Video 8: Guide on how to adjust the display time on the main unit.
4. Maintenance
4.1 Call Button Battery Replacement
The CS-X1 call buttons use a 12V23A battery. When the light on the call button dims or it stops responding, it's time to replace the battery:
Open Cover: Push the back cover in the direction of the arrow to open it.
Replace Battery: Remove the old battery and insert a new 12V23A battery, ensuring correct polarity.
Close Cover: Securely close the back cover.
Figure 8: Call button specifications and battery replacement guide.Figure 9: The CS-X1 call button is IPX56 waterproof, allowing for easy cleaning.
4.2 Watch Pager Care
The CS-200E watch pagers are IPX67 fully waterproof, meaning they are protected against immersion in water up to 1 meter for 30 minutes. This allows for normal hand washing without concern.
Figure 10: Watch pager features, including IPX67 waterproofing and adjustable strap.Figure 11: Close-up of the watch pager's design and charging method.
5. Troubleshooting
5.1 Signal Range Issues
The system has an outdoor open area range of approximately 500m/1640ft. Indoor signal range is typically 100-300m/328-984ft, depending on environmental factors like walls and obstructions. If the signal distance is insufficient, WNKRUN signal amplifiers can be added to extend the range.
Figure 12: Signal range considerations and the use of signal amplifiers.
5.2 Factory Reset
To restore the display unit to factory settings, which removes all paired numbers:
Access Factory Reset (F18): Use the buttons on the display unit or the remote control to navigate to F18.
Enter Code: Input "0000" and confirm. The default value for F18 is 0009.
Re-pair Buttons: After a factory reset, all call buttons will need to be re-paired following the instructions in Section 2.3.
Video 9: Demonstrates how to perform a factory reset on the display unit.
5.3 Frequently Asked Questions (FAQs)
Can WNKRUN transmitters and receivers be used with other brands? No, WNKRUN branded transmitters and receivers are designed to be used exclusively with WNKRUN products and cannot be used alone or paired with other brands.
Is the signal distance sufficient? Signal distance is affected by the transmitter, receiver, power, and environment. If the distance is not enough, WNKRUN signal amplifiers can be added.
Can multiple display receivers be used with all call buttons simultaneously? Yes, the system supports various configurations including one receiver to one call button, one to many, many to one, and many to many.
For warranty information and technical support, please refer to the documentation included with your product or contact WNKRUN customer service directly. WNKRUN is committed to providing reliable products and professional after-sales service.
WNKRUN company was established in 2009, focusing on wireless pagers for 14 years. We are a modern company integrating R&D, design, production, and sales, serving various fields including catering, tourism, churches, schools, conferences, nurseries, hospitals, hotels, banks, and shops.
Ask a question about this manual
Ask about setup, troubleshooting, compatibility, parts, safety, or missing instructions. Manuals+ will review the question and use this page’s manual context to help answer it.