1. Introduction
Thank you for choosing the SPYCLOPS SPY-MNBLT2WIP5 5.0-Megapixel Outdoor Fixed Lens Mini Bullet IP PoE Camera. This camera is designed for reliable outdoor surveillance, offering high-resolution video, Power over Ethernet (PoE) for simplified installation, and robust weather resistance. This manual provides essential information for the proper installation, configuration, and maintenance of your camera to ensure optimal performance and longevity.
2. Package Contents
Please inspect the package contents carefully. If any items are missing or damaged, contact your dealer immediately.
- SPYCLOPS SPY-MNBLT2WIP5 IP PoE Camera
- Mounting Hardware (screws, wall anchors, hex key)
- Wi-Fi Antenna
- User Manual (this document)
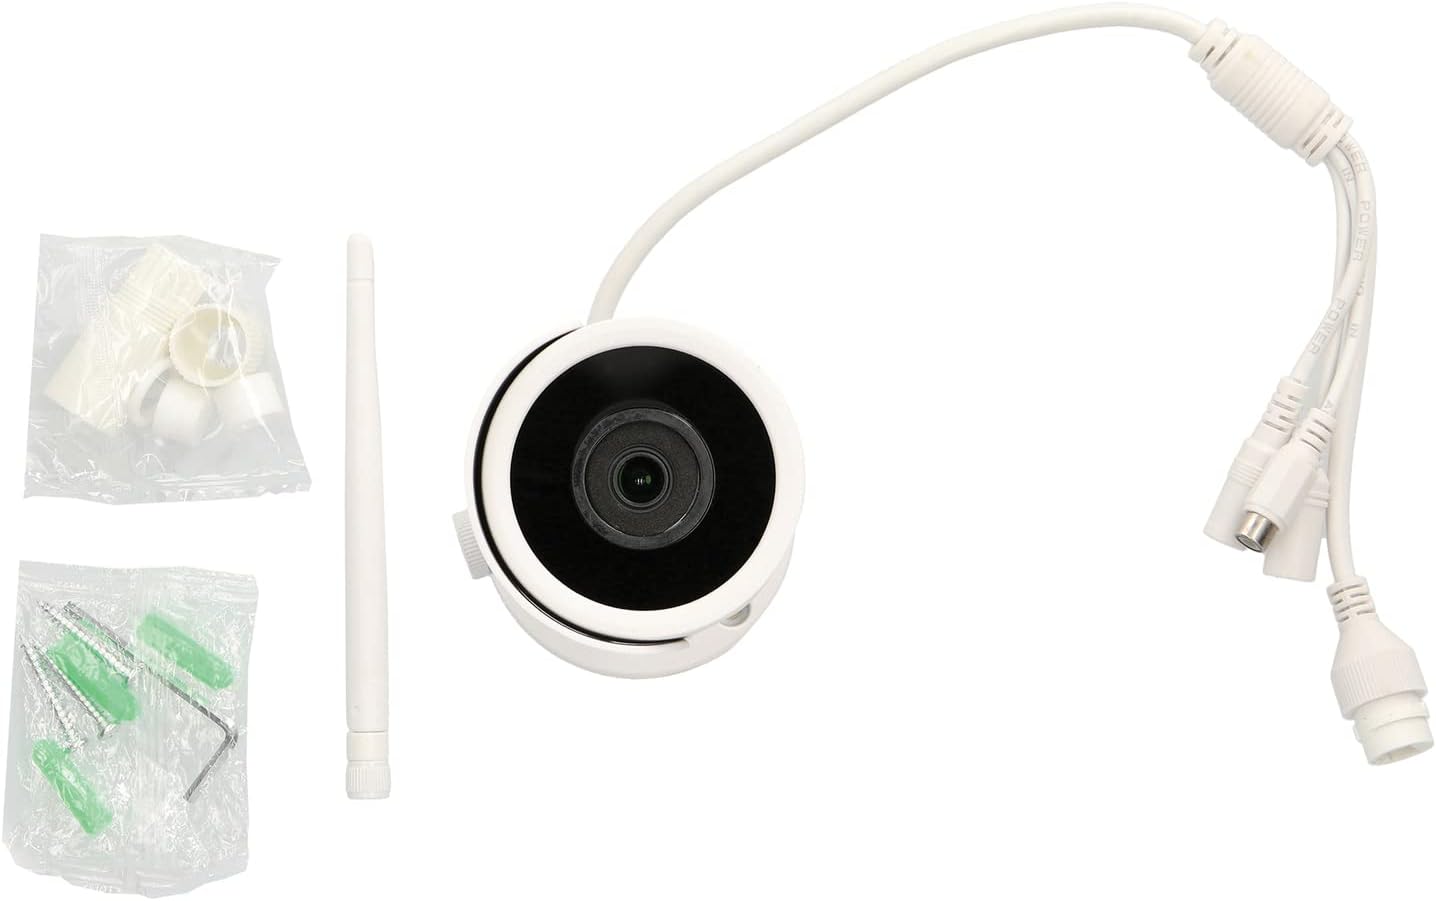
Image: SPY-MNBLT2WIP5 camera, Wi-Fi antenna, and mounting hardware.
3. Product Overview
Familiarize yourself with the components of your SPYCLOPS camera.

Image: Front and side view of the SPY-MNBLT2WIP5 camera, highlighting the lens, antenna, and adjustable mounting arm.
- Camera Lens: 2.8 mm fixed lens for wide-angle viewing.
- IR LEDs: Infrared illuminators for night vision up to 82 feet.
- Wi-Fi Antenna: For wireless network connectivity.
- Mounting Base: Secure attachment point for wall or ceiling installation.
- Cable Gland: Protects cable connections from environmental elements.

Image: Bottom view of the camera's mounting base, showing the cable routing channel and mounting holes.
The camera features a robust, weather-resistant (IP67) housing suitable for outdoor environments. The integrated cable gland ensures secure and protected connections.
4. Setup and Installation
4.1 Choosing a Location
Select a suitable outdoor location that provides the desired field of view, is within Wi-Fi range (if using wireless), and allows for secure mounting. Ensure the camera is positioned to avoid direct sunlight into the lens, which can cause glare.
4.2 Mounting the Camera
- Prepare the Surface: Use the mounting base as a template to mark the drill holes on the wall or ceiling.
- Drill Holes: Drill pilot holes at the marked locations. Insert wall anchors if mounting on drywall or masonry.
- Route Cables: Pass the necessary cables (Ethernet/PoE, optional power) through the cable gland opening in the mounting base.
- Secure the Base: Attach the mounting base securely to the surface using the provided screws.
- Adjust Camera Angle: Loosen the adjustment screw on the camera arm, position the camera for the desired view, and then tighten the screw to lock it in place.
4.3 Wiring and Power
The SPY-MNBLT2WIP5 camera supports Power over Ethernet (PoE), simplifying installation by delivering both power and data through a single Ethernet cable.
- PoE Connection: Connect an Ethernet cable from a PoE-enabled switch or NVR to the camera's Ethernet port. This will provide both power and network connectivity.
- Optional DC Power: If PoE is not available, connect a 12V DC power adapter (not included) to the camera's power input port.
- Wi-Fi Antenna: Screw the provided Wi-Fi antenna onto the camera's antenna port if you intend to use wireless connectivity.
4.4 Network Configuration
After physical installation and power-up, the camera will obtain an IP address via DHCP (if available on your network). You can use a network discovery tool provided by SPYCLOPS or your NVR/VMS software to find the camera's IP address and begin configuration.
5. Operating Instructions
5.1 Accessing the Camera
The camera can be accessed via a web browser or through a compatible Network Video Recorder (NVR) or Video Management Software (VMS).
- Web Browser: Open a web browser (e.g., Chrome, Firefox) and enter the camera's IP address in the address bar. You will be prompted to enter the default username and password (refer to your camera's specific documentation for default credentials).
- NVR/VMS: Follow the instructions provided with your NVR or VMS to add and configure the IP camera. The camera supports ONVIF for broad compatibility.
5.2 Basic Settings
Once logged in, you can configure various settings:
- Video Settings: Adjust resolution (up to 5MP), frame rate (20 FPS at 5MP, 25 FPS at 4MP, 30 FPS at 1080p), and compression format (H.264, H.264+, H.265, H.265+).
- Network Settings: Configure static IP address, DNS, and port forwarding if necessary.
- Motion Detection: Set up motion detection zones, sensitivity, and recording schedules.
- User Management: Change default passwords and create additional user accounts with different access levels.
5.3 Night Vision
The camera automatically switches to night vision mode in low-light conditions, utilizing its IR LEDs to provide clear black and white images up to 82 feet. Ensure no obstructions are blocking the IR LEDs for optimal performance.
6. Maintenance
6.1 Cleaning
Regularly clean the camera lens and housing to ensure clear image quality and proper operation. Use a soft, damp cloth. Avoid abrasive cleaners or solvents that could damage the lens or finish.
6.2 Firmware Updates
Check the SPYCLOPS website periodically for firmware updates. Firmware updates can improve performance, add new features, and address security vulnerabilities. Follow the instructions provided with the firmware update package carefully.
6.3 Cable Connections
Periodically inspect all cable connections for signs of wear, corrosion, or damage, especially in outdoor environments. Ensure the cable gland is tightly sealed to prevent water ingress.
7. Troubleshooting
This section addresses common issues you might encounter with your camera.
- No Power/No Image:
- Verify the Ethernet cable is securely connected to both the camera and the PoE switch/NVR.
- Ensure the PoE switch/NVR is powered on and providing PoE.
- If using a DC power adapter, ensure it is correctly connected and the power outlet is functional.
- Network Connectivity Issues:
- Check if the camera's IP address is correct and not conflicting with other devices on the network.
- Ensure the network cable is not damaged.
- If using Wi-Fi, verify the camera is within range of your wireless router and the Wi-Fi credentials are correct.
- Poor Image Quality:
- Clean the camera lens for dirt or smudges.
- Check video resolution settings in the camera's web interface.
- Ensure there is adequate lighting in the scene, or that night vision is functioning correctly in low light.
- Night Vision Not Working:
- Ensure there are no obstructions blocking the IR LEDs.
- Verify that the camera's IR settings are enabled in the web interface.
For further assistance, please contact SPYCLOPS technical support.
8. Specifications
| Feature | Specification |
|---|---|
| Model Name | SPY-MNBLT2WIP5 |
| Effective Still Resolution | 5.0 Megapixels |
| Photo Sensor Technology | CMOS |
| Lens | 2.8 mm Fixed Lens |
| Field of View | 109° |
| Video Capture Resolution | 5MP @ 20 FPS, 4MP @ 25 FPS, 1080p @ 30 FPS |
| Video Compression | H.264, H.264+, H.265, H.265+ |
| Night Vision Range | Up to 82 feet |
| Connectivity Protocol | Wi-Fi, IP (PoE) |
| Power Source | PoE (Power over Ethernet) or 12V DC (adapter not included) |
| International Protection Rating | IP67 (Water-resistant) |
| Mounting Type | Wall Mount |
| Indoor/Outdoor Usage | Outdoor |
| Dimensions (L x W x H) | 6.89 x 4.25 x 3.07 inches |
| Item Weight | 15.6 ounces |
9. Safety Information
- Read all instructions carefully before installation and use.
- Ensure all power connections are secure and meet the camera's specifications.
- Do not attempt to disassemble or modify the camera. This will void the warranty and could cause damage.
- Avoid pointing the camera directly at strong light sources for extended periods, as this may damage the image sensor.
- Use only approved accessories and power supplies.
- Keep the camera away from strong magnetic fields.
10. Warranty and Support
SPYCLOPS products are designed for reliability and performance. This product is covered by a manufacturer's warranty. For specific warranty terms and conditions, please refer to the warranty card included with your product or visit the official SPYCLOPS website.
For technical support, troubleshooting assistance, or service inquiries, please contact SPYCLOPS customer support through their official website or the contact information provided with your purchase documentation.