1. Introduction
This user manual provides detailed instructions for the installation, operation, and maintenance of your ESCAM WNK710 3MP Wireless WiFi IP Camera. This smart home indoor camera is designed for monitoring various indoor environments such as nurseries, pet areas, garages, or yards, offering features like 3MP high-definition video, two-way audio, motion detection, and night vision capabilities. Please read this manual thoroughly before using the product to ensure proper and safe operation.

Figure 1: ESCAM WNK710 3MP Wireless WiFi IP Camera, front view.
2. Safety Information
- Use only the power adapter provided with the camera. Using unauthorized power sources may damage the device and void the warranty.
- Do not expose the camera to extreme temperatures, humidity, or direct sunlight. This product is designed for indoor use.
- Avoid placing the camera near strong magnetic fields or sources of interference.
- Do not attempt to disassemble or modify the camera. Refer all servicing to qualified personnel.
- Keep the camera and its accessories out of reach of children and pets.
- Ensure the camera is securely mounted to prevent accidental falls.
3. What's in the Box
Verify that all components are present in the package before proceeding with installation.
- ESCAM WNK710 WiFi IP Camera (x1)
- 12V 2A Power Adapter (x1)
- Screw Pack (x1)
- Quick Start Guide (x1)
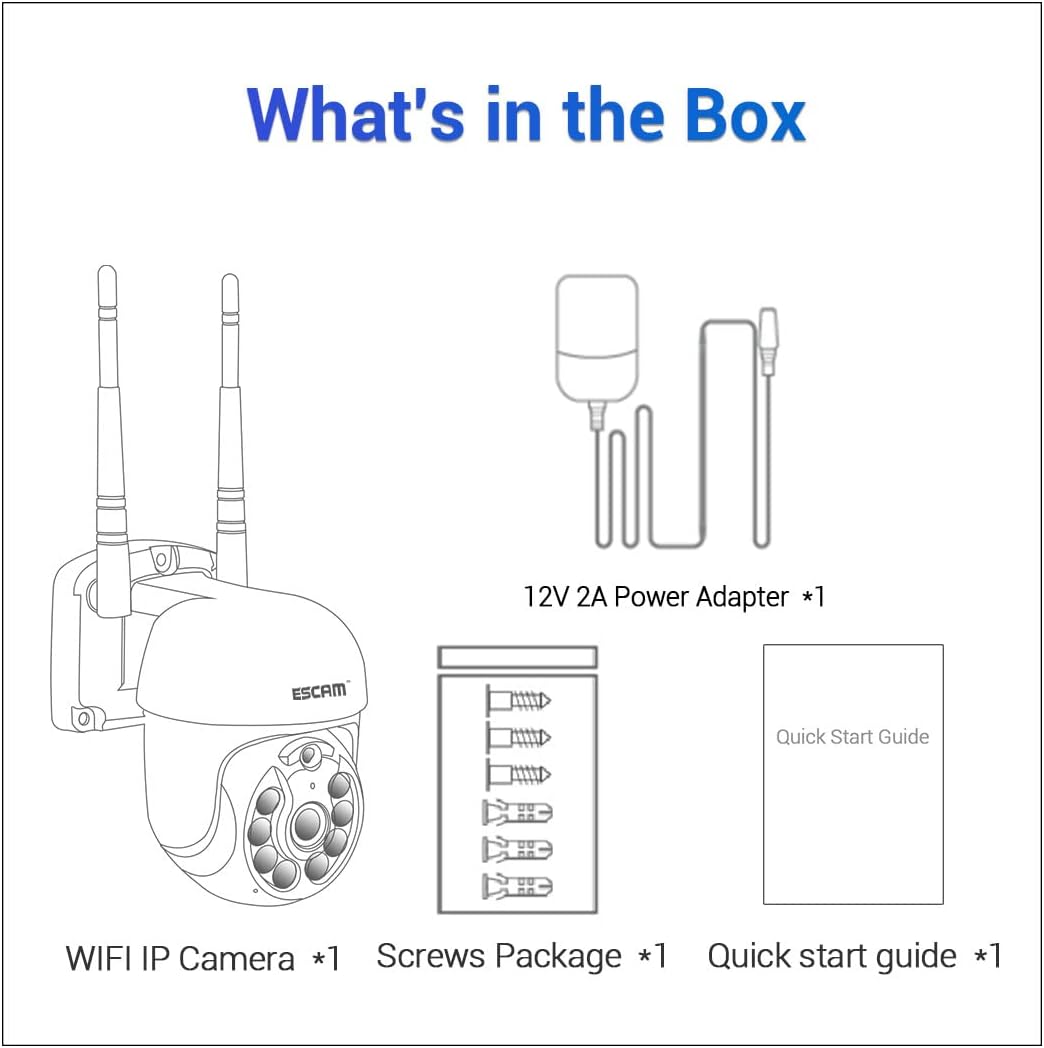
Figure 2: Package contents including the camera, power adapter, screws, and quick start guide.
4. Product Overview
Familiarize yourself with the various parts and interfaces of the ESCAM WNK710 camera.
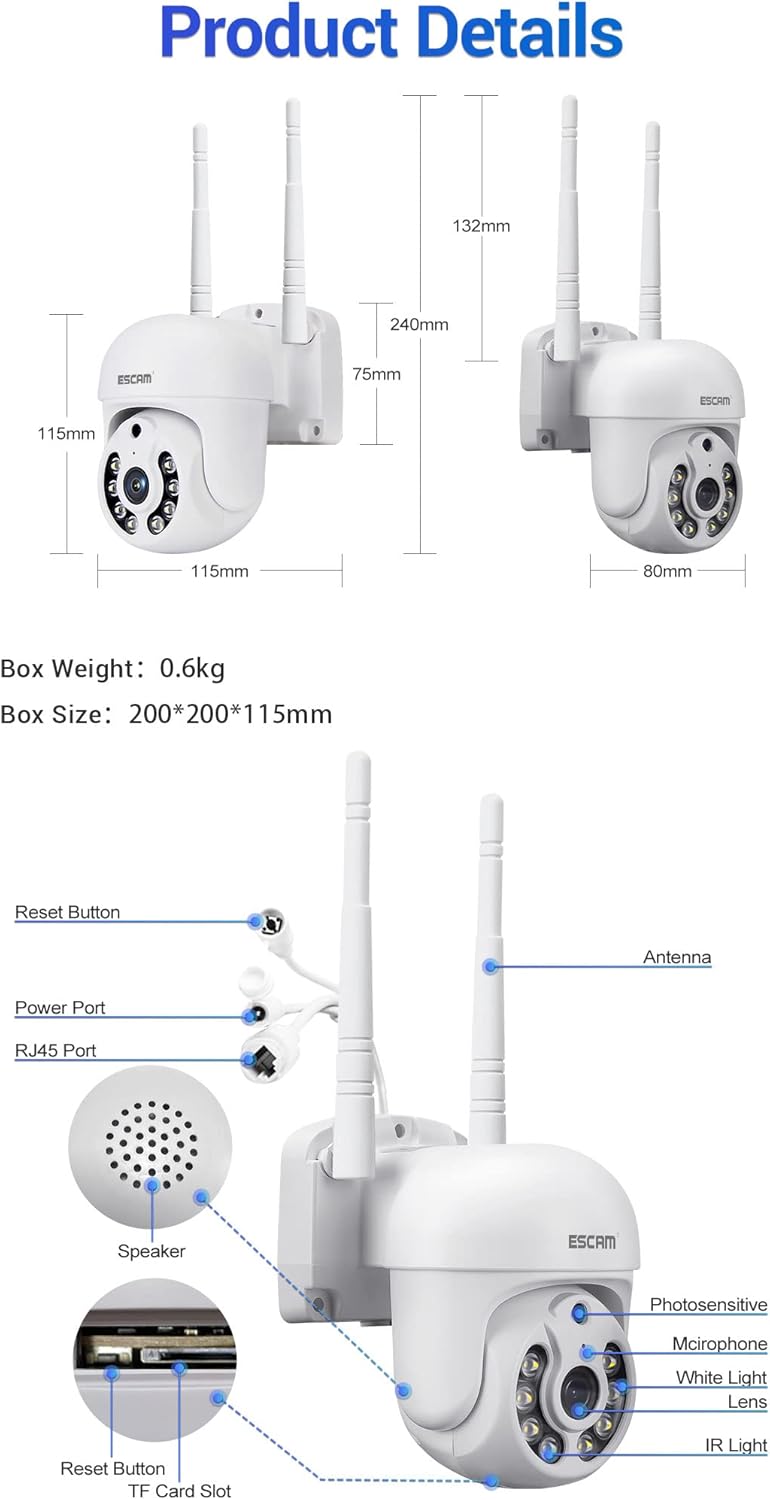
Figure 3: Detailed view of the camera showing dimensions, reset button, power port, RJ45 port, speaker, photosensitive sensor, microphone, white light LEDs, lens, IR light LEDs, and TF card slot.
- Lens: Captures video footage.
- IR Light LEDs: Provide infrared illumination for night vision.
- White Light LEDs: Provide white light illumination for full-color night vision and deterrence.
- Photosensitive Sensor: Detects ambient light levels to switch between day and night modes.
- Microphone: Captures audio for two-way communication and recording.
- Speaker: Outputs audio for two-way communication.
- Antenna: For wireless (WiFi) connectivity.
- Power Port: Connects to the 12V 2A power adapter.
- RJ45 Port: For wired Ethernet connection.
- Reset Button: Used to reset the camera to factory settings.
- TF Card Slot: Supports up to 128GB Micro SD card for local storage.
5. Setup
5.1 Physical Installation
The camera can be wall-mounted or placed on a flat surface. For wall mounting, use the provided screw pack.
- Choose a suitable location for the camera, ensuring it has a clear view of the area you wish to monitor and is within range of your WiFi network (if using wireless).
- Mark the drilling points on the wall using the camera's base as a template.
- Drill holes and insert wall anchors (if necessary).
- Secure the camera to the wall using the provided screws.
5.2 Power Connection
Connect the provided 12V 2A power adapter to the camera's power port and then plug it into a power outlet. The camera will power on and initiate its self-test sequence.
5.3 Network Connection
The ESCAM WNK710 supports both WiFi and wired Ethernet connections.

Figure 4: Connection methods for the camera, including direct AP connection to a phone and WiFi connection via a router.
5.3.1 WiFi Connection
- Download the EseeCloud app from your mobile device's app store (iOS App Store or Google Play Store).
- Register an account and log in.
- Tap the "+" icon in the app to add a new device.
- Select "WiFi Camera" and follow the on-screen instructions to connect the camera to your home WiFi network. This typically involves scanning a QR code on the camera or entering your WiFi credentials.
- Once connected, the camera's status indicator will change, and you will see the camera added to your device list in the app.
5.3.2 Wired Ethernet Connection
For a stable connection, you can use the RJ45 Ethernet port.
- Connect one end of an Ethernet cable to the camera's RJ45 port.
- Connect the other end of the Ethernet cable to an available LAN port on your router or network switch.
- The camera will automatically obtain an IP address via DHCP.
- Open the EseeCloud app, tap "+" to add a device, and select "Wired Camera" or "Search for devices on LAN" to discover and add the camera.
6. Operating Instructions
6.1 Live View
After successfully adding the camera to the EseeCloud app, tap on the camera's name in the device list to access the live video feed. You can view the real-time footage from your camera anytime, anywhere.
6.2 Pan/Tilt Control
The ESCAM WNK710 features pan and tilt functionality, allowing you to remotely adjust the camera's viewing angle.
- In the live view interface of the EseeCloud app, use the directional controls (usually an on-screen joystick or arrows) to pan the camera horizontally (350°) and tilt it vertically (90°).
6.3 Two-Way Audio
The camera is equipped with a built-in microphone and speaker for two-way audio communication.
- To speak through the camera, tap the microphone icon in the live view interface of the app. Hold the button to speak, and release to listen.
- Ensure your phone's microphone is enabled for the EseeCloud app.
6.4 Motion Detection and Alerts
The camera can detect motion and send alerts to your mobile device.
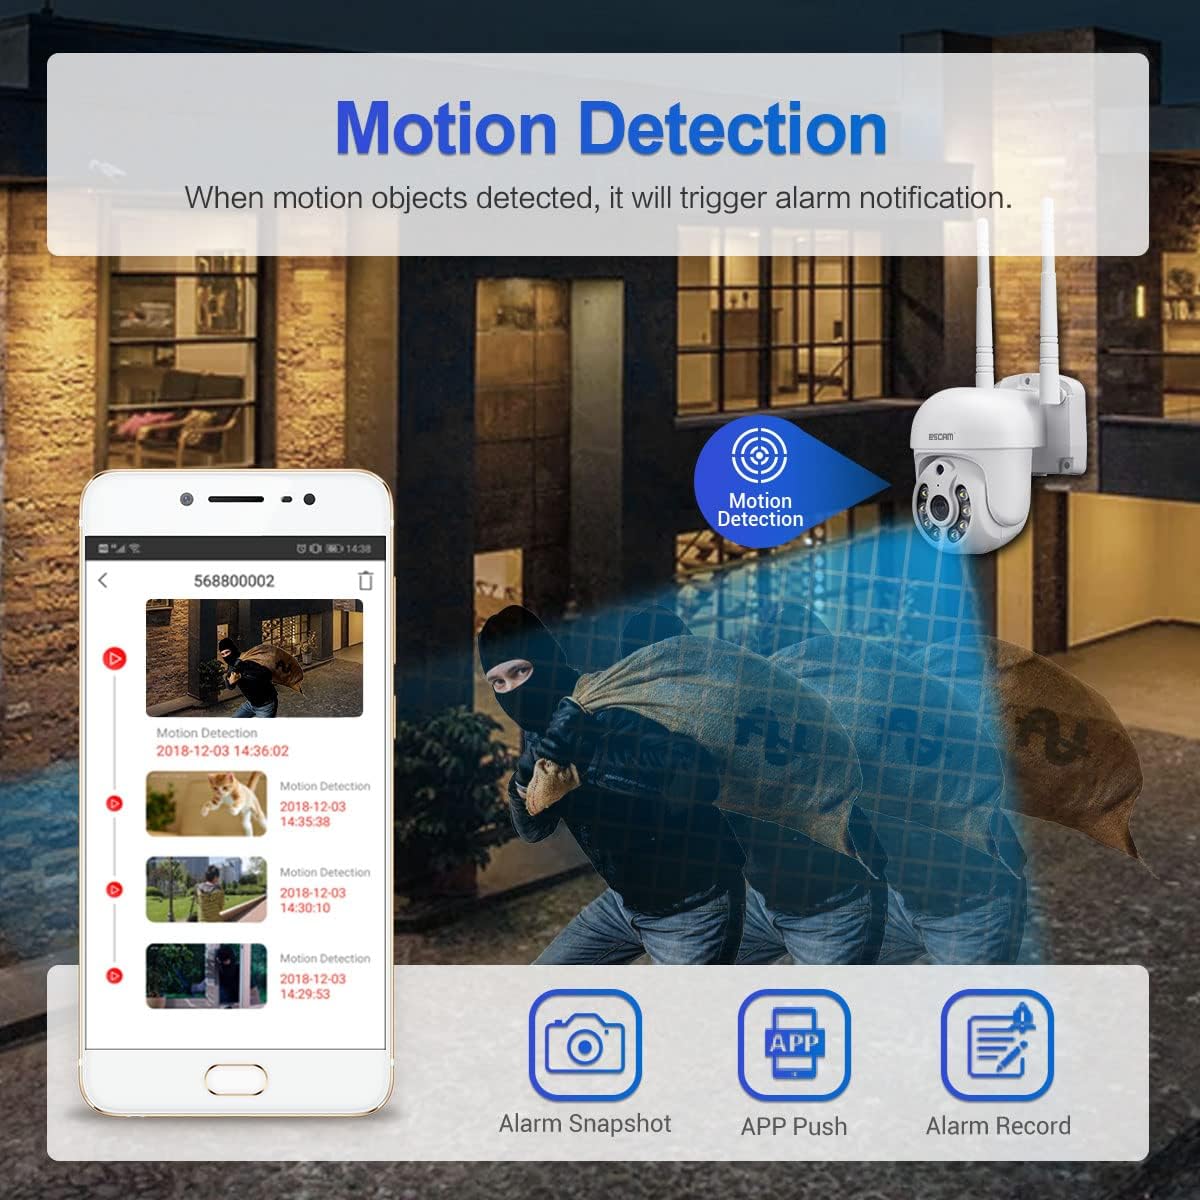
Figure 5: Illustration of motion detection triggering an alarm notification on a mobile phone, with options for alarm snapshot, app push, and alarm record.
- Navigate to the camera settings in the EseeCloud app.
- Enable "Motion Detection" and adjust sensitivity levels as needed.
- You can also set up specific detection zones and schedules.
- When motion is detected, the camera will trigger an alarm notification, send a push alert to your phone, and can record video clips.
- The camera features intelligent humanoid detection to reduce false positives.
6.5 Night Vision Modes
The ESCAM WNK710 offers three intelligent night vision modes for clear monitoring in low-light conditions.
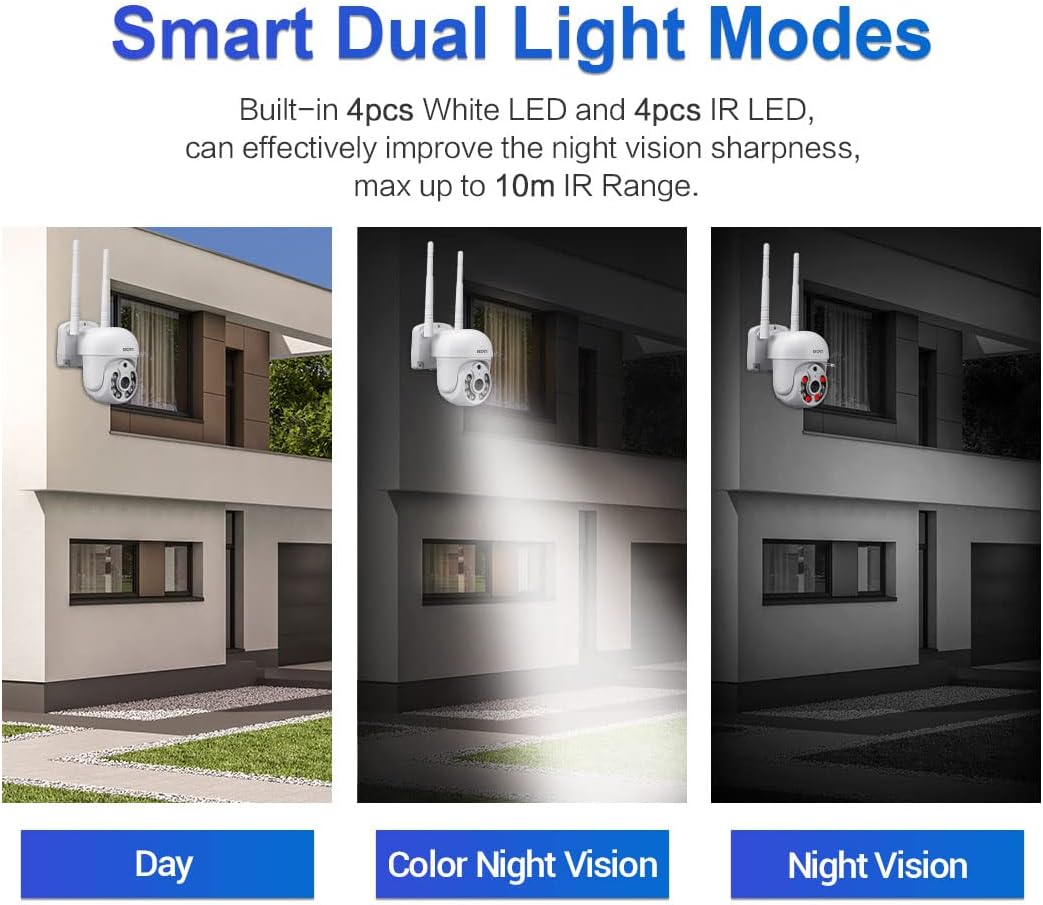
Figure 6: Comparison of Day mode, Color Night Vision mode (using white LEDs), and Night Vision mode (using IR LEDs).
- Infrared Mode (Black/White Night Vision): Uses IR LEDs for clear black and white images in complete darkness, up to 10m range.
- Full-Color Mode (Color Night Vision): Activates the built-in white light LEDs to provide full-color video even in low light. This mode can also act as a deterrent.
- Smart Mode: The camera automatically switches between IR and white light based on detected motion or specific settings, providing full-color video when activity is detected.
- You can select your preferred night vision mode in the EseeCloud app settings.
6.6 Recording and Playback
The camera supports continuous recording, motion-triggered recording, and scheduled recording to a Micro SD card (up to 128GB, not included) or cloud storage (subscription may be required).
- Micro SD Card Installation: Insert a Micro SD card into the TF card slot on the camera. Ensure the camera is powered off before inserting or removing the card.
- Playback: In the EseeCloud app, navigate to the playback section to view recorded footage. You can filter by date and time.
7. Maintenance
- Cleaning: Use a soft, dry cloth to clean the camera lens and body. Do not use liquid cleaners or abrasive materials.
- Firmware Updates: Regularly check for firmware updates through the EseeCloud app. Updates can improve performance, add new features, and enhance security. Follow the app's instructions carefully during updates.
- SD Card Management: If using an SD card, periodically check its status in the app. Format the card occasionally to maintain optimal recording performance.
8. Troubleshooting
| Problem | Possible Cause / Solution |
|---|---|
| Camera offline in app. |
|
| Cannot connect to WiFi. |
|
| No sound from camera or app. |
|
| Motion detection alerts not received. |
|
| SD card not recording. |
|
9. Specifications
| Feature | Detail |
|---|---|
| Model | WNK710 |
| Pixel | 3 Million Pixels (2304*1296) |
| Sensor | 1/2.7” CMOS Sensor |
| Video Processing | H.264/H.265 video encoding, support dual stream |
| Frame Rate | 15 fps |
| Day and Night Mode | IR-CUT infrared filter, supports infrared / full color / smart modes |
| Audio Processing | G.711 codec standard, support audio and video synchronization |
| Audio Port | 1 input (MIC/pickup), 1 output (speaker) |
| Wired Network | 1 RJ45 Ethernet interface, 10/100M adaptive |
| Wireless Network | 802.11b/g/n (2.4GHz WiFi) |
| Storage | Support 128G Micro SD card (not included) |
| Night Vision | 4 infrared LEDs + 4 white light LEDs |
| Pan/Tilt | 350° Pan / 90° Tilt |
| Power Supply | 12V 2A (Power adapter included) |
| Dimensions (L x W x H) | 7.87 x 7.87 x 4.72 inches (200 x 200 x 115 mm) |
| Item Weight | 1.76 pounds (0.8 kg) |
| Indoor/Outdoor Usage | Indoor |
10. Warranty and Support
For technical support, troubleshooting assistance, or warranty inquiries, please contact visiPower customer service. Refer to the contact information provided in the Quick Start Guide or on the official visiPower website.
Please note that protection plans are available for purchase separately to extend coverage beyond the standard manufacturer's warranty. These plans are offered by third-party providers and details can be found where the product was purchased.
