1. Introduction
This manual provides essential information for the safe operation, maintenance, and troubleshooting of your RYOBI ONE+ 18V Cordless 1/4 in. Impact Driver, model P235AB. Please read this manual thoroughly before using the tool to ensure proper and safe usage. Keep this manual for future reference.
2. General Safety Information
WARNING: Read all safety warnings, instructions, illustrations, and specifications provided with this power tool. Failure to follow all instructions listed below may result in electric shock, fire, and/or serious injury.
2.1 Work Area Safety
- Keep work area clean and well lit. Cluttered or dark areas invite accidents.
- Do not operate power tools in explosive atmospheres, such as in the presence of flammable liquids, gases, or dust. Power tools create sparks which may ignite the dust or fumes.
- Keep children and bystanders away while operating a power tool. Distractions can cause you to lose control.
2.2 Electrical Safety
- Do not expose power tools to rain or wet conditions. Water entering a power tool will increase the risk of electric shock.
2.3 Personal Safety
- Always wear eye protection. Use safety glasses with side shields or goggles.
- Dress properly. Do not wear loose clothing or jewelry. Keep your hair and clothing away from moving parts.
- Stay alert, watch what you are doing, and use common sense when operating a power tool.
2.4 Power Tool Use and Care
- Do not force the power tool. Use the correct power tool for your application.
- Disconnect the battery pack from the power tool before making any adjustments, changing accessories, or storing power tools.
- Store idle power tools out of the reach of children and do not allow persons unfamiliar with the power tool or these instructions to operate the power tool.
3. Product Overview
The RYOBI ONE+ 18V Cordless 1/4 in. Impact Driver P235AB is designed for driving screws and tightening bolts with high torque. It features a compact design and variable speed control for versatile applications.

Figure 1: Front view of the RYOBI ONE+ 18V Cordless 1/4 inch Impact Driver P235AB. This image shows the tool's compact design, the 1/4 inch hex chuck, and the RYOBI branding.
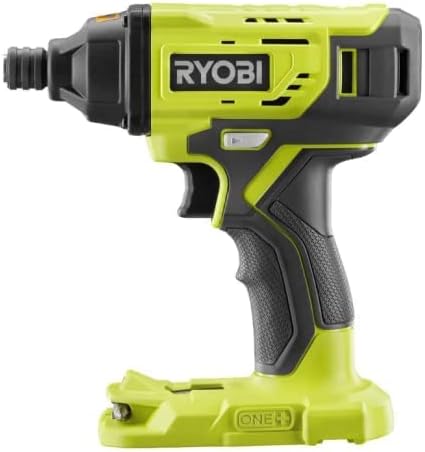
Figure 2: Side view of the RYOBI ONE+ 18V Cordless 1/4 inch Impact Driver P235AB. This view highlights the ergonomic grip, the trigger, and the forward/reverse selector switch.
3.1 Key Components
- 1/4 in. Hex Chuck: For quick and easy bit changes.
- Variable Speed Trigger: Allows for precise control over driving speed.
- Forward/Reverse Selector: Changes the direction of rotation.
- LED Light: Illuminates the work area.
- Battery Interface: Connects to RYOBI ONE+ 18V battery packs (sold separately).
4. Setup
4.1 Battery Installation
This impact driver is sold as a "Tool Only" unit. An 18V RYOBI ONE+ battery pack and charger are required and sold separately. Ensure the battery is fully charged before use.
- Align the ribs on the battery pack with the grooves in the tool's battery port.
- Slide the battery pack into the tool until it clicks securely into place.
- To remove, press the battery release latch and pull the battery pack out.
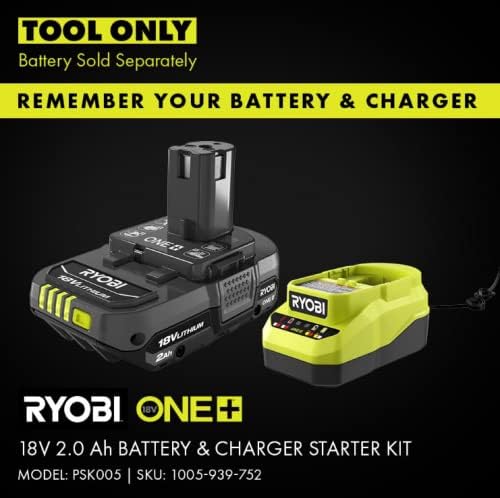
Figure 3: Example of a RYOBI ONE+ 18V Battery & Charger Starter Kit. This image illustrates the type of battery and charger required for the impact driver, which are sold separately.
4.2 Bit Installation and Removal
The 1/4 in. hex chuck allows for quick and secure bit changes.
- To Install: Pull the chuck collar forward, insert the 1/4 in. hex shank bit fully into the chuck, and then release the collar. Tug on the bit to ensure it is securely locked.
- To Remove: Pull the chuck collar forward and pull the bit out.
5. Operating Instructions
5.1 Forward/Reverse Operation
The forward/reverse selector switch is located above the trigger. Push the switch to the left for forward rotation (driving) and to the right for reverse rotation (removing). Position the switch in the center to lock the trigger and prevent accidental starting.
5.2 Variable Speed Control
The impact driver features a variable speed trigger. The speed of the tool is controlled by the amount of trigger depression. Pressing the trigger lightly results in slower speeds, while pressing it fully results in maximum speed and impact.
5.3 General Operation
- Ensure the correct bit is securely installed.
- Set the forward/reverse selector to the desired direction.
- Position the bit on the fastener.
- Gradually depress the trigger to start the tool. Apply steady pressure to the tool to keep the bit engaged with the fastener.
- The impact mechanism will engage automatically when resistance is met, providing additional torque.
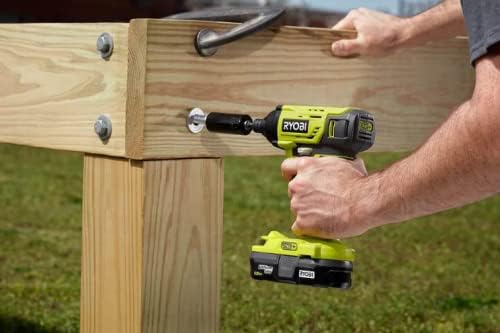
Figure 4: User operating the RYOBI Impact Driver to tighten a bolt on a wooden structure. This demonstrates the tool's application in heavy-duty fastening tasks.

Figure 5: User operating the RYOBI Impact Driver to drive a screw into a wooden plank. This illustrates the tool's use for general screw driving applications.

Figure 6: User operating the RYOBI Impact Driver to drive screws into outdoor decking. This highlights the tool's capability for demanding outdoor construction tasks.
6. Maintenance
Regular maintenance ensures optimal performance and extends the life of your tool.
6.1 Cleaning
- Always disconnect the battery pack before cleaning.
- Use a clean, dry cloth to wipe off dirt, dust, oil, grease, etc.
- Do not use solvents, as they may damage plastic parts.
- Keep the ventilation openings clear and free of debris.
6.2 Storage
- Store the tool in a dry, secure place out of reach of children.
- Avoid storing in direct sunlight or areas with extreme temperatures.
- Remove the battery pack from the tool before storing for extended periods.
7. Troubleshooting
| Problem | Possible Cause | Solution |
|---|---|---|
| Tool does not start | Battery pack not installed correctly or discharged. Forward/reverse selector in center (locked) position. | Ensure battery is fully charged and properly seated. Move selector to forward or reverse position. |
| Loss of power during operation | Battery pack is low on charge. Overload protection activated. | Recharge battery pack. Reduce pressure or load on the tool. |
| Bit not holding securely | Chuck collar not fully released. Bit shank is not 1/4 in. hex or is damaged. | Ensure chuck collar snaps back into place. Use only 1/4 in. hex shank bits. Inspect bit for damage. |
8. Specifications
- Model: P235AB
- Brand: RYOBI
- Voltage: 18 Volts
- Chuck Size: 1/4 inch Hex
- Power Source: Battery Powered (RYOBI ONE+ 18V)
- Material: Metal
- Item Weight: 1.2 kg
- Product Dimensions: 14.5 x 1.2 x 6.4 cm
- Manufacturer: RYOBI
9. Warranty and Support
For warranty information, service, or technical support, please refer to the documentation included with your purchase or visit the official RYOBI website. Keep your proof of purchase for warranty claims.


