1. Introduction
This manual provides detailed instructions for the assembly, operation, and maintenance of your iPormis Queen Size Upholstered Platform Bed Frame. Please read these instructions carefully before beginning assembly and retain this manual for future reference. Proper assembly and care will ensure the longevity and stability of your bed frame.
2. Safety Information
- Read all instructions: Ensure you understand all steps before assembly.
- Two-person assembly recommended: For safety and ease, assembly is best performed by two adults.
- Keep children and pets away: Small parts can be a choking hazard.
- Use on a level surface: Assemble the bed frame on a clean, flat, and soft surface (e.g., carpet) to prevent damage.
- Do not overtighten screws: Tighten fasteners firmly, but avoid overtightening to prevent stripping or damage.
- Regularly check fasteners: Periodically inspect all bolts and screws to ensure they remain tight.
- Maximum weight capacity: This bed frame is designed to support up to 800 lbs (including mattress and occupants). Do not exceed this limit.
- Mattress compatibility: This platform bed frame does not require a box spring. It is suitable for various mattress types including memory foam, latex, or spring mattresses.
3. Package Contents
Before assembly, verify that all parts listed below are present. If any parts are missing or damaged, please contact iPormis customer support.

Image: Exploded view of all bed frame components, including headboard, side rails, center support, legs, wood slats, and hardware.
The package typically includes:
- Upholstered Headboard (Adjustable)
- Upholstered Side Rails (Left and Right)
- Upholstered Footboard
- Center Support Beam(s)
- Support Legs
- Wood Slats (with Velcro attachment)
- Hardware Pack (bolts, washers, Allen wrench)
- Instruction Manual
4. Assembly Instructions
Follow these steps carefully for proper assembly. It is recommended to have two people for this process.
Step 4.1: Unpack and Identify Parts
Carefully unpack all components from the box. Lay them out on a soft, clean surface. Refer to the 'Package Contents' section and the exploded view image to identify each part and ensure nothing is missing.
Step 4.2: Attach Support Legs to Headboard and Footboard
Attach the designated support legs to the headboard and footboard using the provided bolts and Allen wrench. Ensure they are securely fastened.
Step 4.3: Assemble Side Rails to Headboard and Footboard
Connect the upholstered side rails to the headboard and footboard. Align the pre-drilled holes and insert the bolts. Hand-tighten all bolts initially. Once all connections are made, fully tighten all bolts with the Allen wrench.

Image: The fully assembled bed frame structure, showing the headboard, side rails, and footboard connected.
Step 4.4: Install Center Support Beam(s)
Attach the center support beam(s) to the designated brackets on the headboard and footboard, or to the side rails as per your specific model's design. Ensure any central support legs are also attached and adjusted to touch the floor.
Step 4.5: Place Wood Slats
Unroll or place the wood slats across the bed frame. The slats are designed with Velcro strips to secure them to the frame, preventing movement and noise. Ensure each slat is properly aligned and adhered to the Velcro on the side rails.

Image: Detailed view of the bed frame's noise-free features, including EVA mute bars between the steel frame and wood slats, and Velcro strips securing the slats to the foundation.

Image: An illustration highlighting the sturdy construction of the bed frame, showing durable metal cross bars, 2.5-inch wood slats, and 6.5-inch firm legs. It also indicates 'No Box Spring Needed' and an '800 LBS Weight Capacity'.
Step 4.6: Adjust Headboard Height
The headboard height is adjustable to accommodate mattresses of varying thicknesses (8-12 inches). Adjust the headboard to your desired height by repositioning the attachment points before fully tightening the headboard bolts.
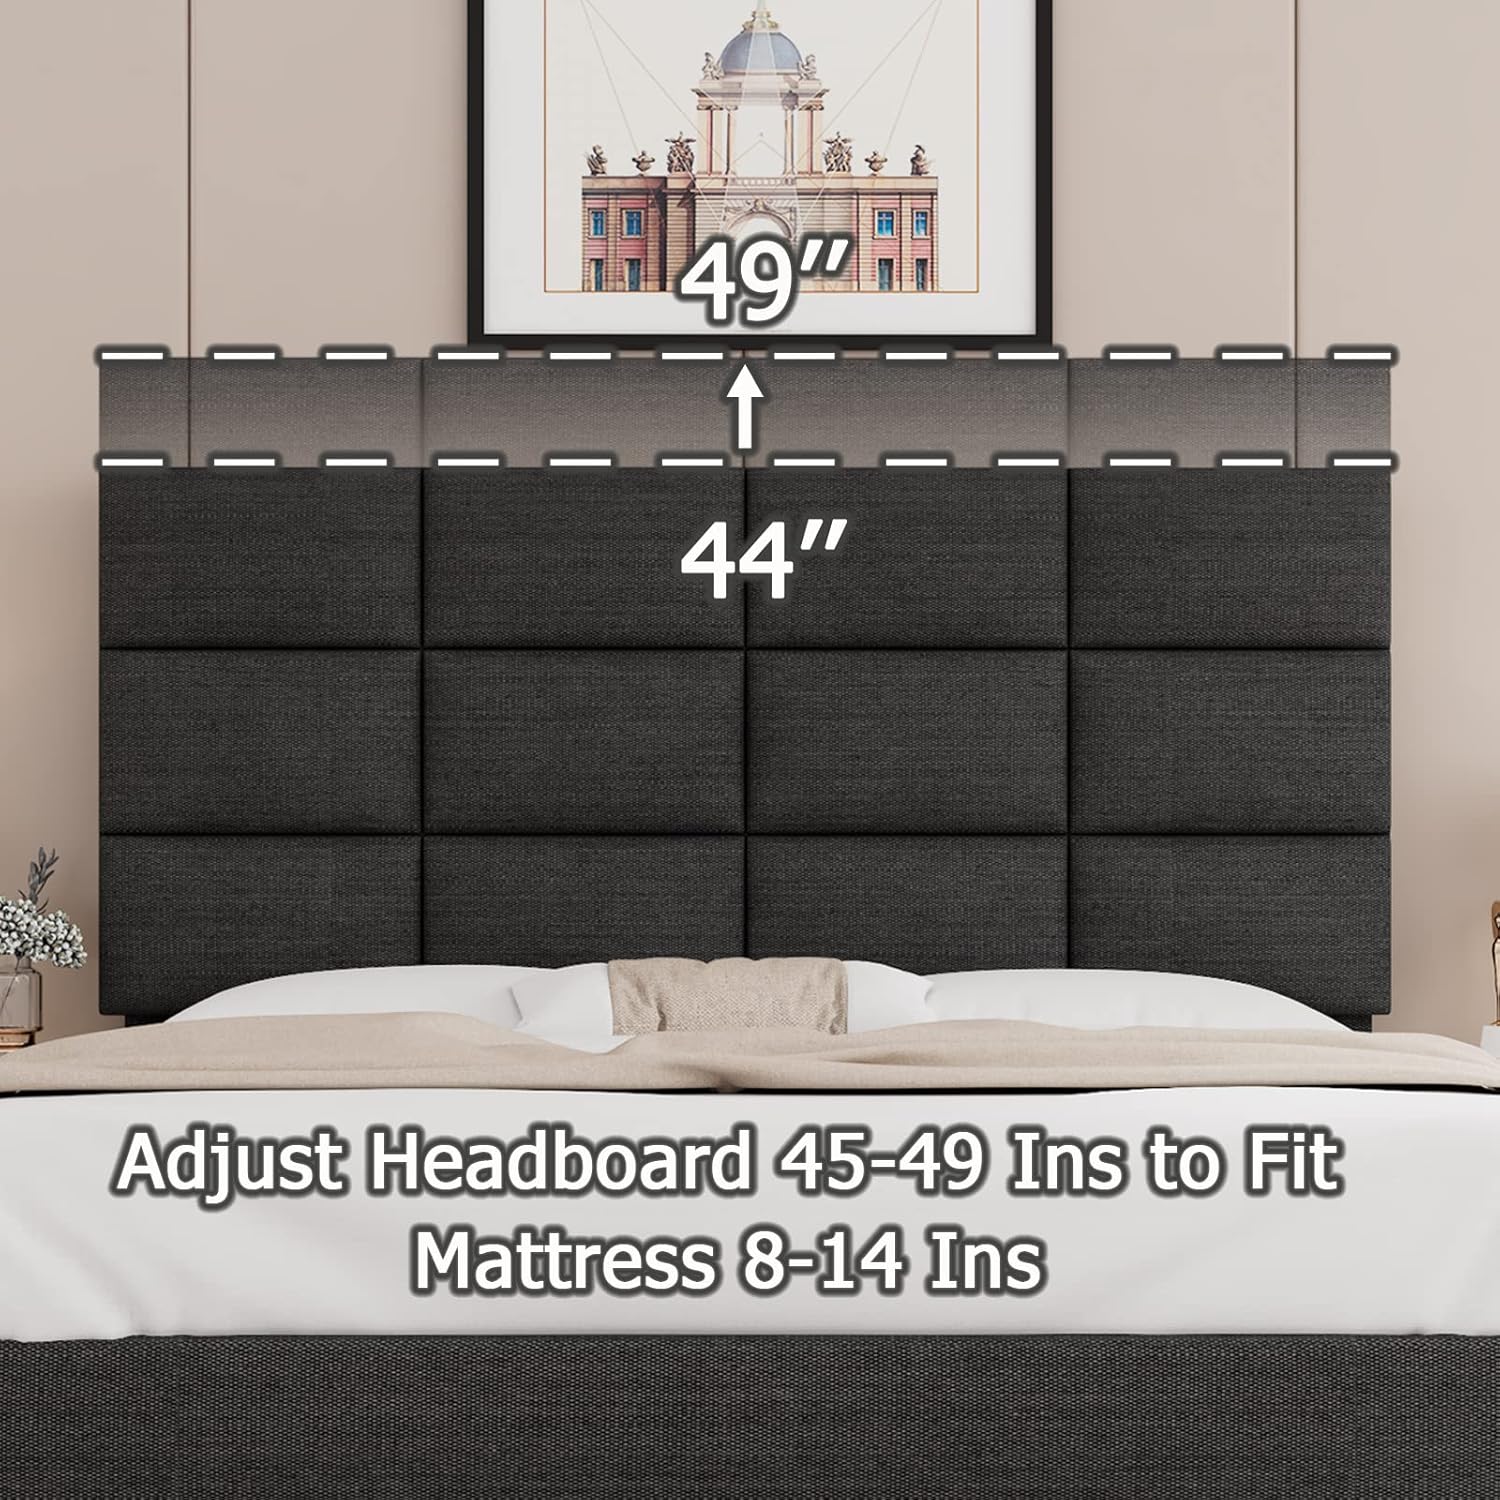
Image: A visual representation demonstrating how the headboard height can be adjusted between 45 and 49 inches to fit mattresses ranging from 8 to 14 inches in thickness.
Step 4.7: Final Check
Before placing your mattress, double-check all connections to ensure they are tight and secure. Confirm the bed frame is stable and level.
5. Product Features
The iPormis Queen Size Upholstered Platform Bed Frame offers several key features designed for comfort and durability:
- Heavy-Duty Sturdy Construction: Constructed with metal cross center bars and solid wood slats, providing a robust foundation capable of supporting up to 800 lbs.
- Adjustable Upholstered Headboard: The headboard height can be adjusted to accommodate mattresses between 8 and 12 inches. It is padded with high-density rebound sponge for comfort and safety.
- Noise-Free Design: Features unique Velcro slat attachments and EVA mute bars to eliminate friction and noise, ensuring a quiet sleep environment.
- No Box Spring Needed: Durable wood slats provide direct support for your mattress, extending its life and eliminating the need for a box spring.
- Ergonomic Design: The bed board height is designed for ease of use for both adults and children.
- Modern Aesthetic: Minimalist style with premium fabric upholstery that complements various home decor styles.

Image: The iPormis Queen Size Upholstered Platform Bed Frame in Dark Grey, fully assembled with a mattress and bedding, showcasing its modern design.
6. Care and Maintenance
- Cleaning Upholstery: For general cleaning, vacuum the upholstered parts regularly with a soft brush attachment. For spills, blot immediately with a clean, dry cloth. For stubborn stains, consult a professional upholstery cleaner or use a mild fabric cleaner according to its instructions, testing on an inconspicuous area first.
- Frame Cleaning: Wipe metal and wood components with a damp cloth and mild detergent if necessary. Dry immediately.
- Hardware Check: Periodically (every 3-6 months) check all bolts and screws to ensure they are tight. Retighten as needed to maintain stability and prevent noise.
- Avoid Harsh Chemicals: Do not use abrasive cleaners, strong solvents, or harsh chemicals on any part of the bed frame, as they may damage the finish or fabric.
- Protect from Direct Sunlight: Prolonged exposure to direct sunlight can cause fabric fading.
7. Troubleshooting
Issue: Bed frame is wobbly or unstable.
Solution: Ensure all bolts and screws are fully tightened. Check that all support legs are firmly touching the floor and are evenly distributed. Re-check assembly steps to confirm all parts are correctly installed.
Issue: Squeaking or noise from the bed frame.
Solution: Verify that the wood slats are properly seated and adhered to the Velcro strips on the side rails. Ensure the EVA mute bars are correctly positioned between the steel frame and wood slats. Retighten all connection bolts. If the noise persists, disassemble and reassemble the affected section, ensuring all components are aligned correctly.
Issue: Headboard height does not match mattress.
Solution: The headboard is adjustable. Refer to Step 4.6 in the Assembly Instructions to adjust the headboard to the appropriate height for your mattress (8-12 inches).
Issue: Missing parts or damaged components.
Solution: Do not proceed with assembly. Contact iPormis customer support immediately with your purchase details and a description of the missing or damaged parts.
8. Specifications
| Feature | Detail |
|---|---|
| Brand | iPormis |
| Model | Queen Size Upholstered Platform Bed Frame |
| Size | Queen |
| Product Dimensions | 82"L x 60"W x 49"H |
| Material | Alloy Steel, Wood, Upholstered Fabric |
| Color | Dark Grey |
| Weight Capacity | 800 lbs |
| Headboard Adjustment | 45"-49" (to fit 8-12" mattresses) |
| Box Spring Required | No |
| Assembly Required | Yes |

Image: A diagram illustrating the Queen size bed frame's dimensions (82"L x 60"W x 49"H) and its 800 lbs weight capacity.
9. Warranty and Support
For warranty information, specific return policies, or technical support, please refer to the documentation included with your purchase or visit the official iPormis website. If you have questions regarding assembly or product functionality, please contact iPormis customer service directly.
Contact Information: Please refer to your purchase receipt or the product packaging for the most up-to-date customer support contact details.