1. Product Overview
The DieseRC 433.92MHz Fixed Code Clone Remote Control is a versatile RF transmitter designed to duplicate signals from existing fixed code remote controls. It features four independent buttons, allowing for the cloning of up to four different functions. This device is suitable for various applications, including garage doors, electric gates, and other remote-controlled systems operating on a 433.92MHz frequency.

Image 1.1: The DieseRC 433.92MHz Fixed Code Clone Remote Control.
2. Package Contents
- 3x DieseRC Fixed Code Clone Remote Controls
- 1x 27A 12V Battery (pre-installed in each remote)
- 1x Keychain (attached to each remote)
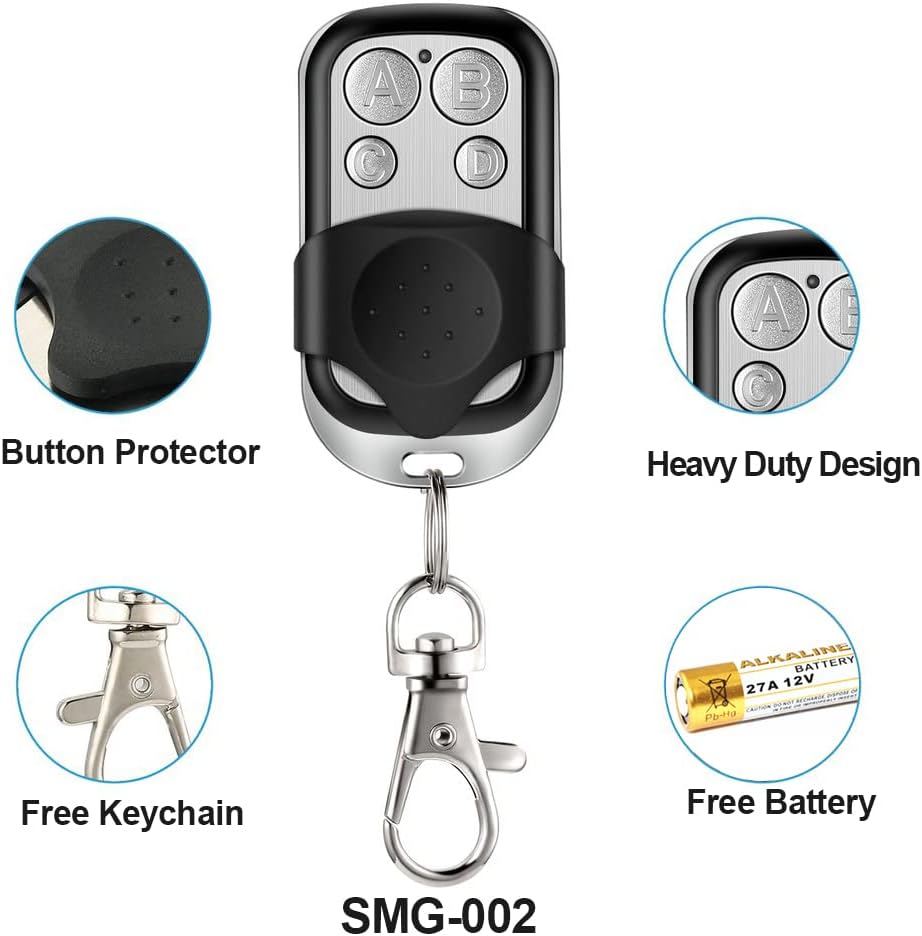
Image 2.1: Visual representation of the remote control's features including button protector, heavy-duty design, included keychain, and battery.
3. Specifications
| Parameter | Value |
|---|---|
| RF Frequency | 433.92MHz |
| Battery Type | 1x 27A 12V (included) |
| Dimensions | 55mm x 30mm x 14mm |
| Number of Buttons | 4 Keys (A, B, C, D) |
| Transmitter Range | Over 50 meters in open space |
| Weight | 0.08 Kilograms |
4. Compatibility Requirements
Before purchasing or attempting to clone, ensure your existing remote control meets the following three conditions:
- The original remote control must function normally.
- The frequency must be 433.92Mhz.
- The chip code (encoder chip) must be one of the following fixed codes: 2260, 2262 (e.g., PT2262, SC2262, HS2262, LX2262, HX2262), 1527 (EV1527, HS1527, HX1527, SC1527, GP1527, CP1527, AD1527, SCL1527, TL1527, ZX1527), PT2264, PT2240 (LX2240, LX2241, SCL2240), CS5211, SMC918, AX5026, SMC926, AX5326-3, AX5326-4, FP527, HT600, HT680, HT6207, HT6010, HT6012, HT6013, HT6014, HT12D, HT46F49E, PIC16F630, ULN2003.
Note: This remote control is NOT compatible with rolling code remotes.
5. Programming Instructions
5.1. Clearing Existing Codes (Reset)
Before cloning, it is essential to clear any pre-existing codes from the new remote control.
- Press and hold buttons A and B simultaneously.
- The LED indicator will flash three times.
- Release button B while continuing to hold button A.
- Press button B three times.
- The LED will flash rapidly and then turn off, indicating that the code clearing process is complete.
5.2. Cloning a Remote Control
Follow these steps to clone a function from your original remote to the new DieseRC remote.
- Place the original remote and the new cloner remote in a "back-to-back" position. Ensure they are in direct contact or as close as possible (e.g., side-by-side on a flat surface with zero distance).
- Press and hold one button on your original remote.
- While still holding the button on the original remote, press and hold the corresponding button on your new cloner remote.
- Keep holding both buttons until the LED on the cloner remote flashes twice, then three times, and finally remains steadily lit. This indicates successful cloning.
- If the LED does not flash beyond two blinks, the signal may not be transmitting effectively. Slowly adjust the position of the remotes (up and down, or slightly apart) until the signal is received and the cloning process completes.
- Repeat these steps for any additional buttons you wish to program.

Image 5.1: Step-by-step visual guide for clearing and cloning remote control codes.
Video 5.1: Official video demonstrating the remote control copying process.
6. Operation
Once successfully programmed, each button on the DieseRC clone remote control will operate independently, mimicking the function of the corresponding button on your original remote. Simply press the desired button to activate the linked device (e.g., open/close a garage door).
7. Maintenance
7.1. Battery Replacement
The remote control uses one 27A 12V battery. If the transmitter range decreases significantly or the LED indicator does not light up, it is time to replace the battery. To replace, carefully open the remote casing and insert a new 27A 12V battery, ensuring correct polarity.
8. Troubleshooting
- Cloning Fails (LED only blinks twice): This indicates the signal is not being received properly. Ensure the original and cloner remotes are in direct contact or very close. Try adjusting their relative positions slightly during the cloning process. Also, ensure there is no significant electromagnetic interference in the area.
- Cloned Remote Not Working: Verify that your original remote control is working correctly. Confirm that the frequency is 433.92MHz and the chip code is a fixed code listed in Section 4. Rolling code remotes are not compatible. If the issue persists, clear the code (Section 5.1) and attempt the cloning process again (Section 5.2).
- Reduced Transmission Range: This typically indicates a low battery. Replace the 27A 12V battery as described in Section 7.1.
- Accidental Button Press: The remote features a button protector to help prevent accidental presses. Ensure the protector is correctly positioned.
9. Support
For further assistance or inquiries, please contact DieseRC customer support. We are committed to providing excellent after-sales service and support for our products.