
1. Introduction
Thank you for choosing the Bejamy FM Radio Alarm Clock. This manual provides detailed instructions to help you set up, operate, and maintain your device. Please read it thoroughly to ensure proper use and to fully utilize all features.
2. Product Overview
The Bejamy FM Radio Alarm Clock is a versatile device featuring a large LED display, FM radio, alarm functions, and convenient charging capabilities. Its compact design makes it suitable for various indoor settings.
Key Features:
- FM radio with auto search and sleep timer function.
- Snooze function for extended sleep.
- Wake-up options: radio or buzzer.
- 5.2-inch LED display with large numbers.
- Stepless adjustable display brightness via a knob.
- Dual power options: AC adapter or 3xAAA batteries (for time memory).
- Telescopic antenna for enhanced FM signal reception.
- AUX Earphone Jack for private listening.
- 5V/1A USB output interface for charging other devices (when powered by AC adapter).
Components and Controls:
Familiarize yourself with the various parts and controls of your alarm clock.
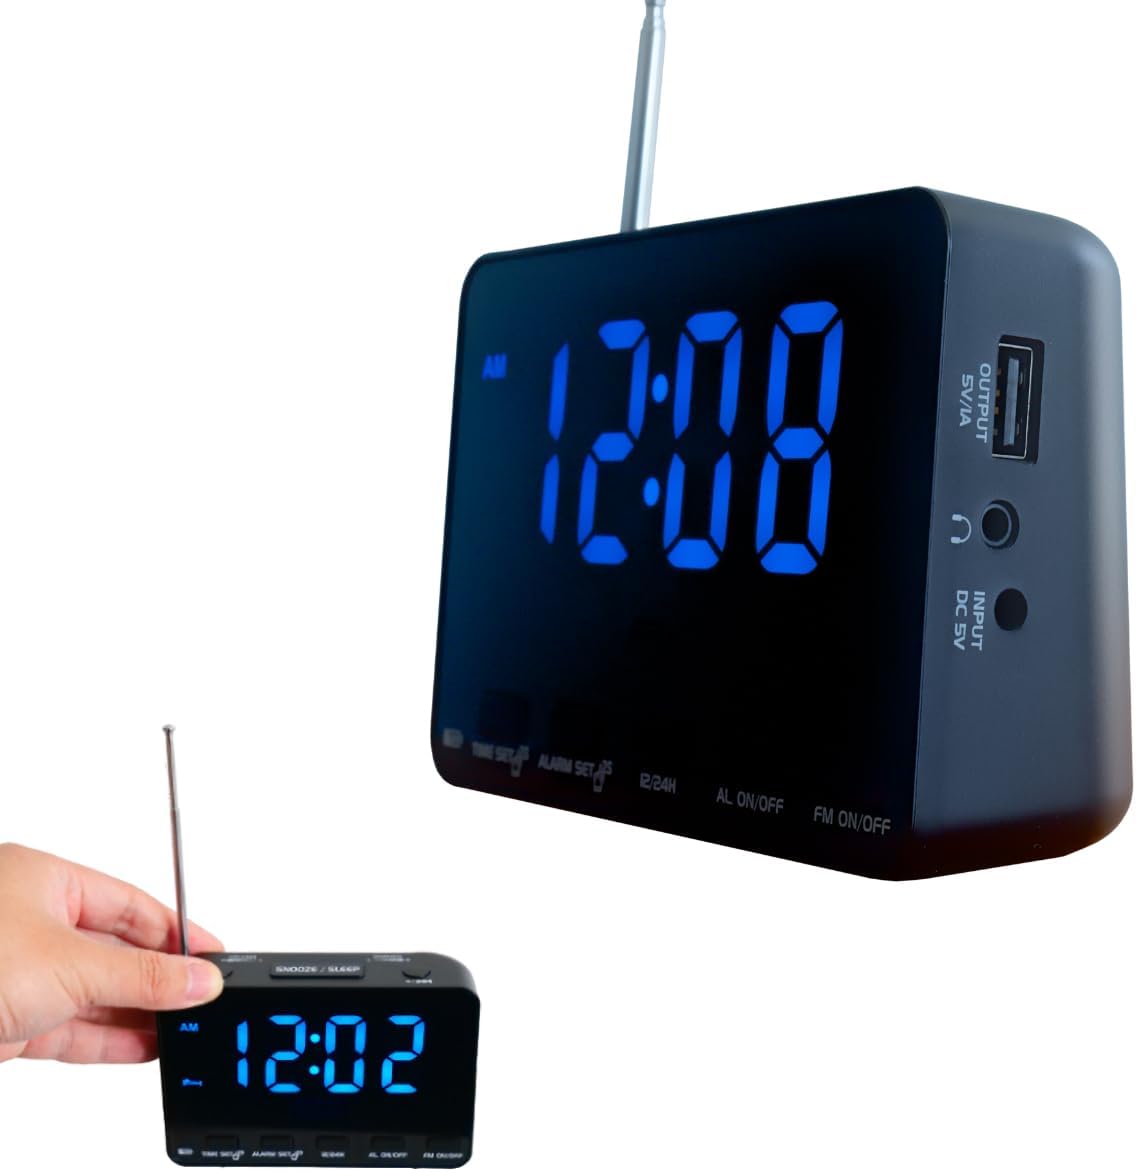
Figure 2.1: Front and side view of the Bejamy FM Radio Alarm Clock, highlighting the blue LED display and the telescopic antenna.

Figure 2.2: Right side panel of the clock, featuring the USB output (5V/1A), headphone jack, and DC 5V power input.

Figure 2.3: Top panel of the clock, displaying the SNOOZE/SLEEP button, volume control (H-L), and dimmer control (L-H).

Figure 2.4: Visual representation of the clock's compact dimensions and large, vivid display.
3. Setup
3.1 Powering the Device
The alarm clock can be powered by an AC adapter or 3xAAA batteries. Batteries primarily serve as a backup for time memory during power outages.
- AC Power: Connect the provided AC adapter to the DC 5V input port on the side of the clock and plug it into a wall outlet.
- Battery Backup: Open the battery compartment on the bottom of the clock and insert 3 AAA batteries (not included), ensuring correct polarity. These batteries will maintain time settings if AC power is interrupted.
3.2 Setting the Time
- Press and hold the TIME SET button for 2 seconds until the hour display flashes.
- Use the +/- buttons (located near VOLUME and DIMMER controls) to adjust the hour.
- Press TIME SET again to confirm the hour and move to minute adjustment.
- Use the +/- buttons to adjust the minutes.
- Press TIME SET once more to save the time and exit time setting mode.
3.3 12/24 Hour Format
To switch between 12-hour and 24-hour time formats:
- Press the 12/24H button to toggle between the two display modes.
3.4 Setting the Alarm
- Press and hold the ALARM SET button for 2 seconds until the alarm hour display flashes.
- Use the +/- buttons to adjust the alarm hour.
- Press ALARM SET again to confirm the hour and move to minute adjustment.
- Use the +/- buttons to adjust the alarm minutes.
- Press ALARM SET once more to save the alarm time.
- After setting the alarm time, use the +/- buttons to select the alarm sound: BUZ (buzzer) or RAD (radio).
- Press ALARM SET again to exit alarm setting mode.
3.5 Activating/Deactivating the Alarm
- Press the AL ON/OFF button to turn the alarm on or off. An alarm icon will appear on the display when the alarm is active.
Video 3.1: Detailed demonstration of setting time, alarm, and using the 12/24 hour function on the Bejamy FM Radio Alarm Clock.
4. Operating Instructions
4.1 FM Radio Operation
- Turn On/Off: Press the FM ON/OFF button to turn the FM radio on or off.
- Tune Stations: Use the +/- buttons to manually tune to your desired FM frequency.
- Auto Search: Press and hold the FM ON/OFF button for 2 seconds to initiate an auto-scan for available FM stations. The clock will automatically save found stations.
- Antenna: Extend the telescopic antenna for optimal signal reception.
4.2 Snooze Function
When the alarm sounds, press the large SNOOZE / SLEEP button to temporarily silence the alarm. The alarm will sound again after a short interval (typically 9 minutes).
4.3 Sleep Timer
The sleep timer allows the radio to play for a set duration before automatically turning off.
- While the radio is playing, press the SNOOZE / SLEEP button repeatedly to cycle through sleep timer options (e.g., 120, 90, 60, 45, 30, 15 minutes, OFF).
- Select your desired sleep duration. The radio will turn off automatically after the selected time.

Figure 4.1: Illustration of the SNOOZE/SLEEP button, used for both snooze and activating the sleep timer function.
4.4 Display Brightness Adjustment
The display brightness can be adjusted to your preference.
- Rotate the DIMMER knob (located on the top panel) to smoothly adjust the display brightness from low (L) to high (H).

Figure 4.2: Visual guide for adjusting the display brightness using the dedicated dimmer knob.
4.5 Volume Adjustment
Adjust the radio or buzzer volume as needed.
- Rotate the VOLUME knob (located on the top panel) to adjust the sound level from low (L) to high (H).

Figure 4.3: Guide for adjusting the volume using the rotary knob.
4.6 USB Charging Output
The clock features a USB output port for charging other devices.
- Connect your device's USB charging cable to the OUTPUT 5V/1A port on the side of the alarm clock.
- Note: The USB output can only be used to charge other devices when the alarm clock is powered by the AC adapter.
5. Maintenance
- Clean the clock with a soft, dry cloth. Do not use abrasive cleaners or solvents.
- Keep the device away from water, high humidity, and direct sunlight.
- Ensure the telescopic antenna is fully extended for best radio reception.
- If using battery backup, replace batteries periodically to ensure time memory function.
6. Troubleshooting
| Problem | Possible Cause | Solution |
|---|---|---|
| Clock display is blank or flashing. | No power or low battery backup. | Ensure AC adapter is securely plugged in. Replace AAA backup batteries if they are old or depleted. |
| Cannot set time or alarm. | Buttons not pressed correctly or for sufficient duration. | Press and hold TIME SET or ALARM SET for 2 seconds until the display flashes. Use +/- buttons to adjust. |
| Poor FM radio reception or static. | Antenna not extended, weak signal, or interference. | Fully extend the telescopic antenna. Try repositioning the clock to find a better signal. Avoid placing near other electronic devices that may cause interference. |
| Alarm does not sound. | Alarm is not activated or volume is too low. | Press AL ON/OFF to ensure the alarm is on (alarm icon visible). Check the volume knob and ensure it is not set to the lowest level. Verify alarm time is set correctly. |
| USB charging not working. | Clock is not powered by AC adapter. | Ensure the clock is connected to AC power via the adapter for the USB charging function to work. |
7. Specifications
| Feature | Detail |
|---|---|
| Brand | Bejamy |
| Model Number | B09PJQM9FF |
| Display Type | LED display |
| Product Dimensions | 4.76"W x 3.19"H |
| Power Source | Corded Electric and Battery Powered (3 AAA batteries required for backup) |
| Material | Acrylonitrile Butadiene Styrene (ABS) |
| Special Feature | Adjustable Brightness |
| Connectivity Technology | AUX, USB |
| Item Weight | 10.1 ounces |
8. Warranty & Support
This product is covered by a warranty based on Amazon policy. For specific warranty details or technical support, please refer to your purchase documentation or contact Bejamy customer service through the Amazon platform.