joliker YMUK5-16G
User Manual for joliker MP3 Player with Bluetooth 5.0
Model: YMUK5-16G
1. Introduction
Thank you for choosing the joliker MP3 Player. This device is designed to provide a high-quality audio experience with its HiFi Lossless sound, full touch screen, and versatile features including Bluetooth 5.0 connectivity, FM radio, voice recording, and e-book functionality. This manual will guide you through the setup, operation, and maintenance of your new MP3 player.
2. Package Contents
Please check the package carefully to ensure all items are present:
- 1 x joliker MP3 Player (Model: YMUK5-16G)
- 1 x Micro USB Charging Cable
- 1 x Wired Headphones
- 1 x Protective Case
- 1 x Anti-loss Rope
- 1 x User Manual

Figure 2.1: Contents of the joliker MP3 Player package, including the device, charging cable, headphones, protective case, anti-loss rope, and user manual.
3. Product Overview
The joliker MP3 Player features a compact design with a durable zinc alloy body and an acrylic glass screen. Its 1.8-inch full touch screen provides intuitive navigation and control.

Figure 3.1: Front view of the joliker MP3 Player, showcasing its 1.8-inch full touch screen during music playback.

Figure 3.2: Demonstrating the touch screen functionality of the MP3 player, allowing for easy navigation and control.
4. Setup
4.1 Charging the Device
Before first use, fully charge the MP3 player. Connect the provided Micro USB cable to the player's charging port and the other end to a USB power adapter (not included) or a computer's USB port. The battery indicator on the screen will show charging status. A full charge typically takes 2 to 3 hours.
4.2 Power On/Off
- To Power On: Press and hold the power button (usually on the side) for a few seconds until the screen lights up.
- To Power Off: Press and hold the power button until a power-off prompt appears on the screen, then confirm.
4.3 Initial Setup
Upon first power-on, you may be prompted to select a language. Follow the on-screen instructions to set your preferred language and other basic settings.
5. Basic Operation
5.1 Touch Screen Navigation
The device is controlled entirely via its touch screen. Tap icons to select, swipe to scroll, and use the back arrow icon (usually in the top-left corner) to return to the previous screen.
5.2 Music Playback
The player comes with 16GB of built-in memory, capable of storing approximately 4,000 songs. It also supports a Micro SD card up to 128GB for expanded storage.
- Adding Music: Connect the player to your computer using the USB cable. The player will appear as a removable disk. Drag and drop your audio files (MP3, WMA, APE, FLAC, WAV, DRM, ACELP) into the "Music" folder on the device.
- Playing Music: From the main menu, tap the "Music" icon. You can browse by artist, album, song, or folder. Tap a song to begin playback.
- Controls: On the playback screen, you will find controls for play/pause, next/previous track, volume adjustment, and shuffle/repeat modes.
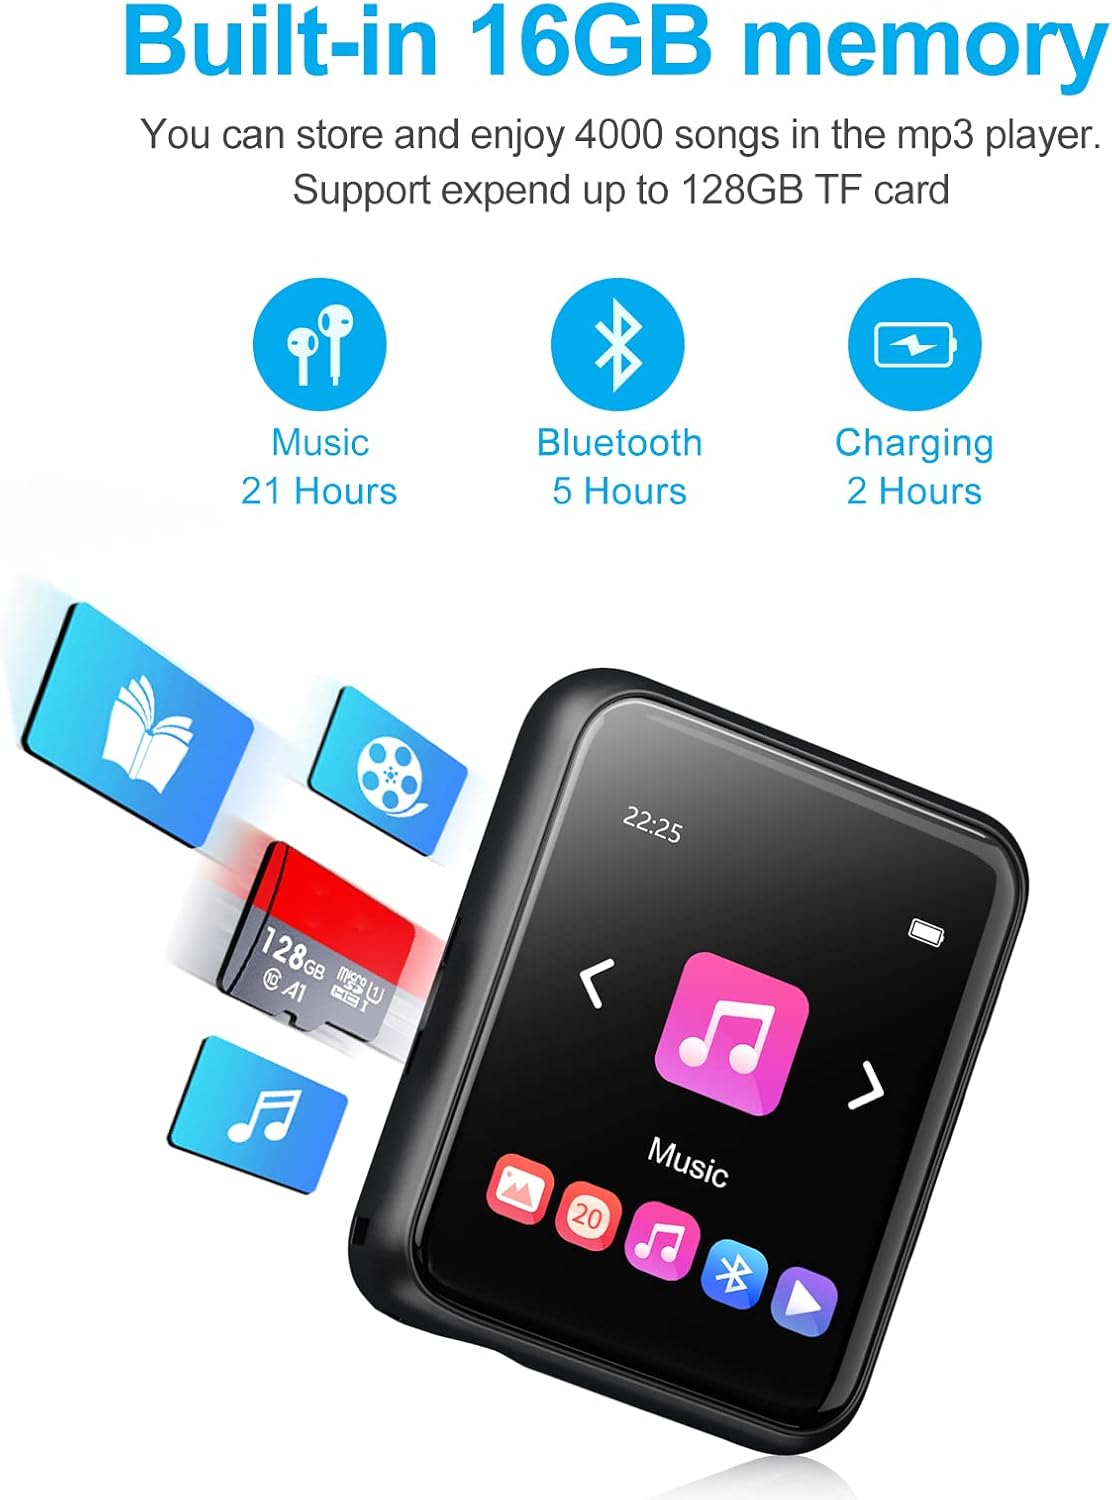
Figure 5.1: Overview of the player's memory capacity and estimated battery life for various functions.
6. Advanced Features

Figure 6.1: Icons representing the diverse functionalities of the joliker MP3 Player.
6.1 Bluetooth Connectivity (Bluetooth 5.0)
The player features Bluetooth 5.0 for faster transmission speed, stable performance, and enhanced anti-interference capabilities. You can connect to Bluetooth headphones or speakers.
- From the main menu, tap the "Bluetooth" icon.
- Turn on Bluetooth. The player will automatically search for nearby Bluetooth devices.
- Select your desired device from the list to pair. Once paired, the player will connect automatically in the future.

Figure 6.2: The MP3 player's Bluetooth 5.0 capability allows for seamless connection to various audio devices.
6.2 FM Radio
To use the FM radio, connect the wired headphones as they act as the antenna.
- Tap the "FM Radio" icon from the main menu.
- You can choose to auto-scan for stations or manually tune to a frequency.
- Save your favorite stations for quick access.
6.3 Voice Recorder
The built-in microphone allows for voice recording in WAV or MP3 format.
- Tap the "Recorder" icon.
- Tap the record button to start/stop recording.
- Recordings are saved and can be accessed from the "Recordings" folder.
6.4 E-book Reader
The player supports TXT format e-books.
- Transfer TXT files to the "E-book" folder on the device via computer.
- Tap the "E-book" icon to open the reader and select your file.
6.5 Pedometer
Activate the pedometer function to track your steps during walks or runs.
- Tap the "Pedometer" icon.
- Follow the on-screen instructions to start tracking.
6.6 Video Playback & Photo Browsing
The device supports video playback and photo browsing (JPG, BMP formats).
- Transfer compatible video and image files to the respective folders on the device.
- Tap the "Video" or "Photo" icon to view your media.
6.7 Line-in Recording
The player supports line-in recording, allowing you to transfer and collect music by connecting an Aux cable to external audio sources like CD/DVD players, power amplifiers, vinyl players, or radio/tape drives.
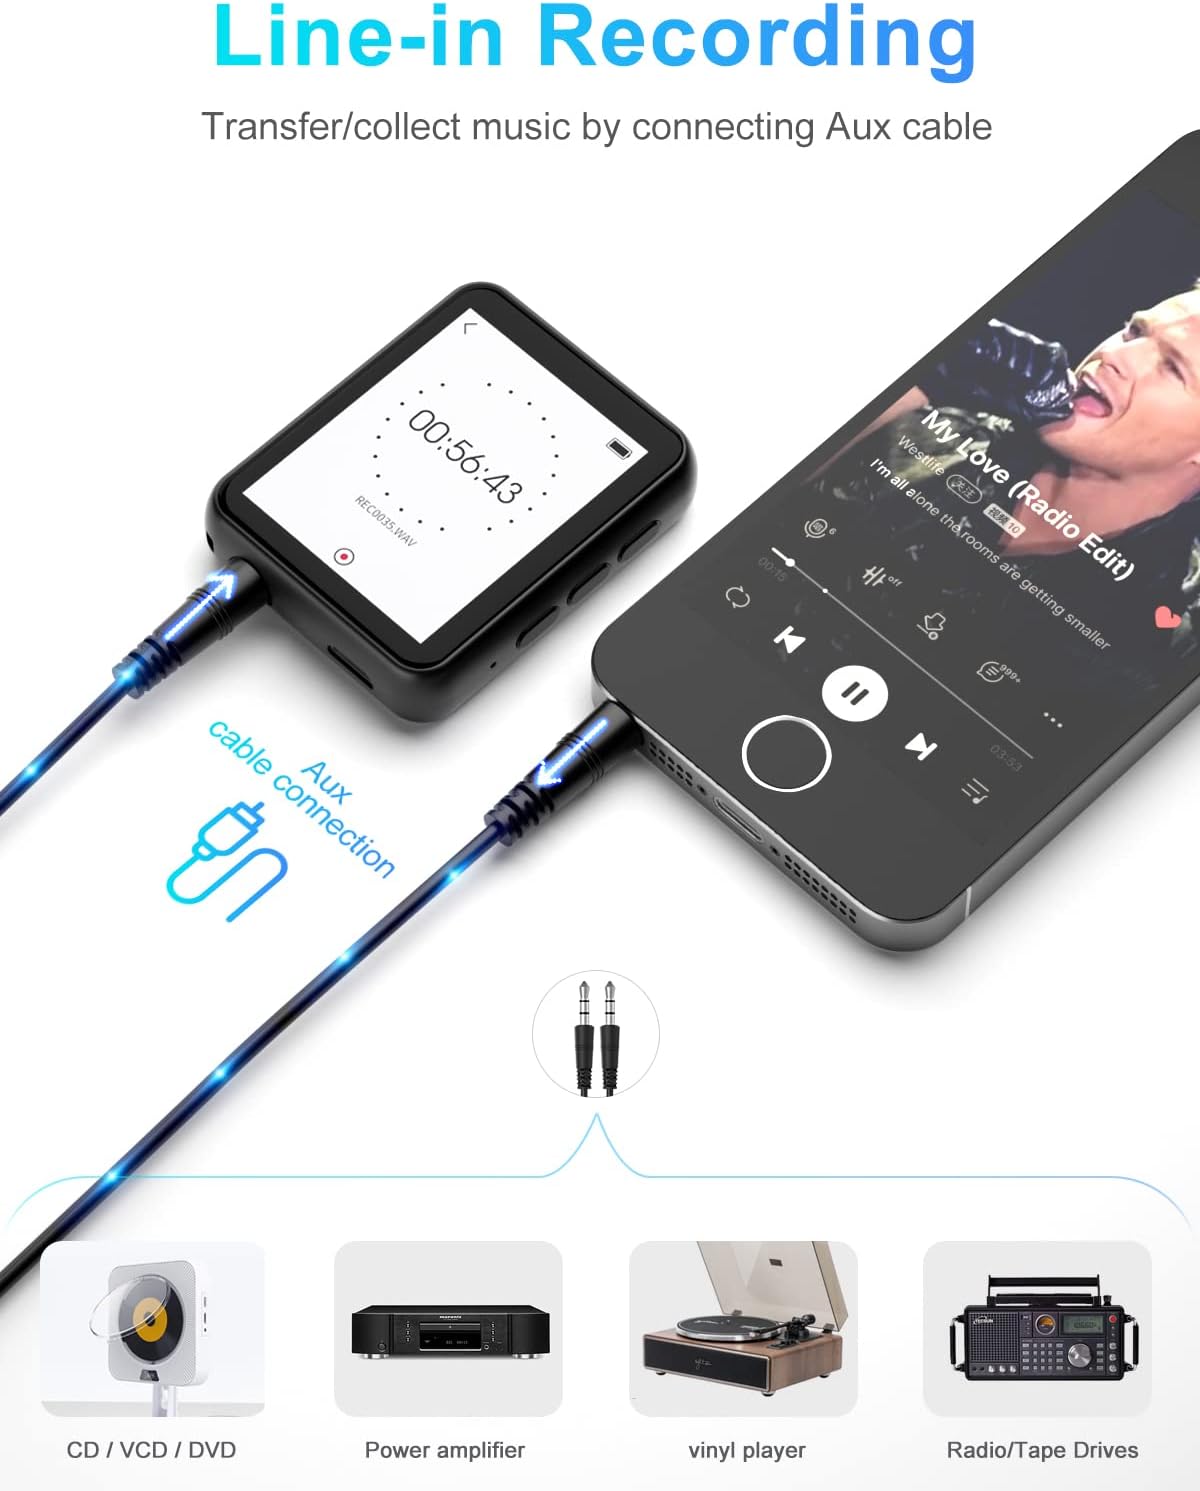
Figure 6.3: The line-in recording feature enables direct audio capture from various external devices.
7. Connecting to Computer
To transfer files, connect the MP3 player to your computer using the provided Micro USB cable. The device will be recognized as a removable disk (compatible with Windows XP SP1/SP2/SP3 32-bit, Windows 7-10 64-bit). You can then drag and drop music, e-books, photos, and videos to the appropriate folders on the player.
8. Maintenance
8.1 Cleaning
Wipe the device with a soft, dry cloth. Do not use liquid cleaners or abrasive materials, as they may damage the screen or finish.
8.2 Storage
Store the player in a cool, dry place away from direct sunlight and extreme temperatures. If storing for an extended period, ensure the battery is partially charged (around 50%) to preserve battery health.
9. Troubleshooting
| Problem | Possible Cause / Solution |
|---|---|
| Device won't turn on. | Battery might be depleted. Charge the device for at least 30 minutes. If still unresponsive, try resetting the device (refer to manual for reset instructions if available, or hold power button for 10-15 seconds). |
| Cannot connect to Bluetooth device. | Ensure Bluetooth is enabled on both the MP3 player and the target device. Make sure the target device is in pairing mode. Move closer to the target device. Try unpairing and re-pairing. |
| Music files not recognized. | Check if the music files are in a supported format (MP3, WMA, APE, FLAC, WAV, DRM, ACELP). Ensure files are placed in the correct "Music" folder on the device. |
| Screen is unresponsive. | Restart the device. Ensure the screen is clean and dry. |
| Short battery life. | Bluetooth usage, high volume, and continuous screen activity consume more power. Reduce screen brightness, turn off Bluetooth when not in use, and use wired headphones for longer playback. |
10. Specifications
- Brand: joliker
- Model: YMUK5-16G
- Screen: 1.8-inch TFT Color Screen, 128 x 160 resolution
- Bluetooth Version: 5.0
- Internal Memory: 16GB
- Expandable Memory: Supports TF card up to 128GB (Micro SD slot)
- Audio Formats: MP3/WMA/APE, FLAC, WAV/DRM, ACELP
- Image Formats: JPG, BMP
- E-book Format: TXT
- Voice Recording Format: WAV/MP3
- USB Connection: USB 2.0
- Compatible Systems: Windows XP (Home, Pro, with SP1, SP2, SP3) 32-bit, Windows 7-10 64-bit
- Material: Zinc Alloy
- Item Weight: 52g
- Item Size: 4.9 x 3.9 x 1 cm (approx. 1.9 x 1.5 x 0.4 inches)
- Battery Type: Lithium Polymer
- Audio Playback Time (wired headphones): Up to 20 hours
- Bluetooth Playback Time: Approx. 5.5 hours
- Charging Time: 2-3 hours
- Special Features: Full touch screen, built-in speaker, FM radio, voice recorder, e-book, video playback, photo browsing, screen saver, alarm, pedometer, 26 languages.
11. Warranty and Support
For any questions regarding the use or functionality of your joliker MP3 Player, please refer to the contact information provided in the physical user manual included with your product. Our support team is committed to providing a prompt and satisfactory response to assist you.
Please retain your proof of purchase for warranty purposes. Specific warranty terms and conditions are detailed in the included user manual.
Ask a question about this manual
Ask about setup, troubleshooting, compatibility, parts, safety, or missing instructions. Manuals+ will review the question and use this page’s manual context to help answer it.