Flame King YSN340Ka
Flame King Propane Torch Kit - Model YSN340Ka
Heavy Duty Weed Burner, 340,000 BTU with Piezo Igniter
Introduction
The Flame King Propane Torch Kit, Model YSN340Ka, is a versatile heavy-duty tool designed for a variety of outdoor tasks. With a powerful 340,000 BTU heat output and a convenient piezo igniter, it is suitable for weed burning, melting snow and ice, removing parking lot markings and paint, thawing frozen pipes and equipment, melting tar and asphalt, and various roofing and woodworking projects.
Important Safety Information
WARNING: Propane is highly flammable. Always follow all safety instructions to prevent serious injury or property damage.
- Before using the torch, ensure you have the recommended safety gear, including goggles and heavy work gloves.
- Wear close-fitting long-sleeved shirts and pants to protect your limbs.
- Always face the torch downwind when igniting it.
- Keep a fire extinguisher or water source nearby.
- Do not use near flammable materials or structures.
- Ensure all connections are tight and leak-free before operation.
- Never leave an ignited torch unattended.
- Store propane cylinders in a well-ventilated area, away from heat sources and direct sunlight.

Figure 1: POL fittings are reverse thread. Tighten by turning left ('Lefty Tighty, Righty Loosey').
Components Overview
The Flame King Propane Torch Kit comes fully assembled and includes the following main components:
- Torch Handle with Piezo Igniter: For ignition and flame control.
- Flame Control Knob: Adjusts propane flow to control flame size.
- Idle Boost Control Lever: Provides a temporary boost in flame intensity.
- Large Wide Nozzle: Directs the flame for efficient heat application.
- 10-foot Hose: Connects the torch to the propane cylinder, offering extended reach.
- POL Safety Valve with Handwheel Tightener: Connects to standard propane cylinders.
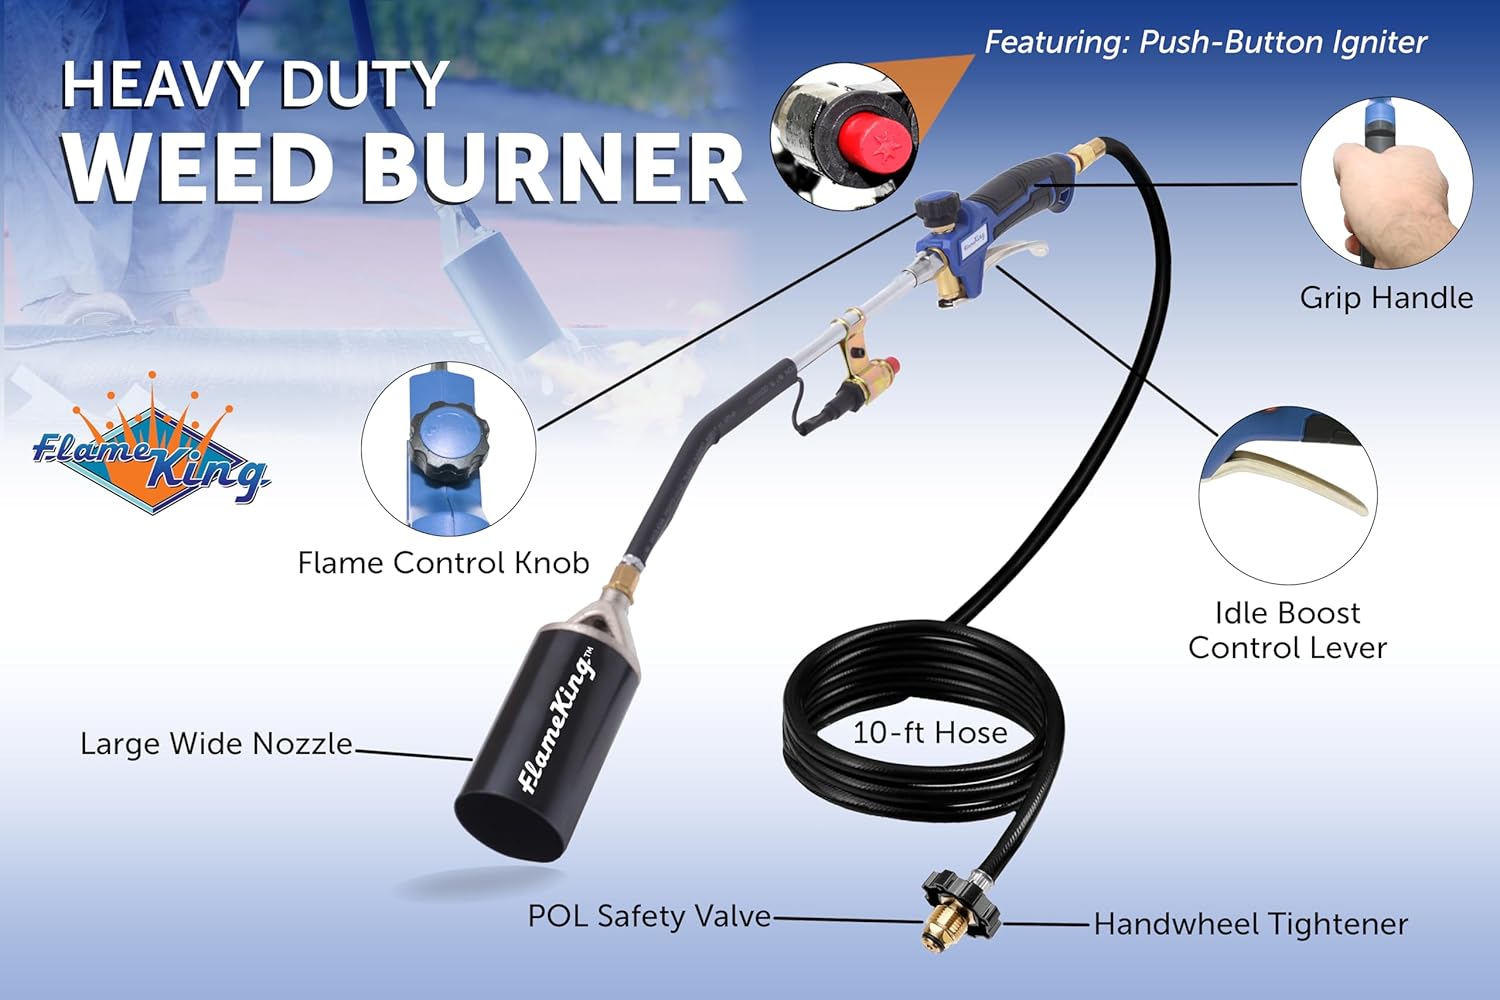
Figure 2: Key components of the Flame King Propane Torch Kit.

Figure 3: Close-up of the torch handle and control features.
Setup Instructions
- Connect the Hose to the Propane Cylinder:
- Ensure the propane cylinder valve is fully closed.
- Attach the POL safety valve (handwheel tightener) on the hose to the propane cylinder valve. Remember, POL fittings are reverse thread: turn the handwheel counter-clockwise to tighten.
- Tighten securely by hand. Do not overtighten.
- Check for Leaks:
- Slowly open the propane cylinder valve (one full turn is usually sufficient for most tasks).
- Apply a soapy water solution to all connections. If bubbles appear, there is a leak. Close the cylinder valve immediately and re-tighten connections. Repeat until no bubbles are present.
- Prepare for Ignition:
- Point the torch nozzle away from yourself, other people, and any flammable materials.
- Ensure the flame control knob on the torch handle is slightly open (about 1/8 of a turn).
- The idle boost control lever should be in the idle (not pushed down) position.
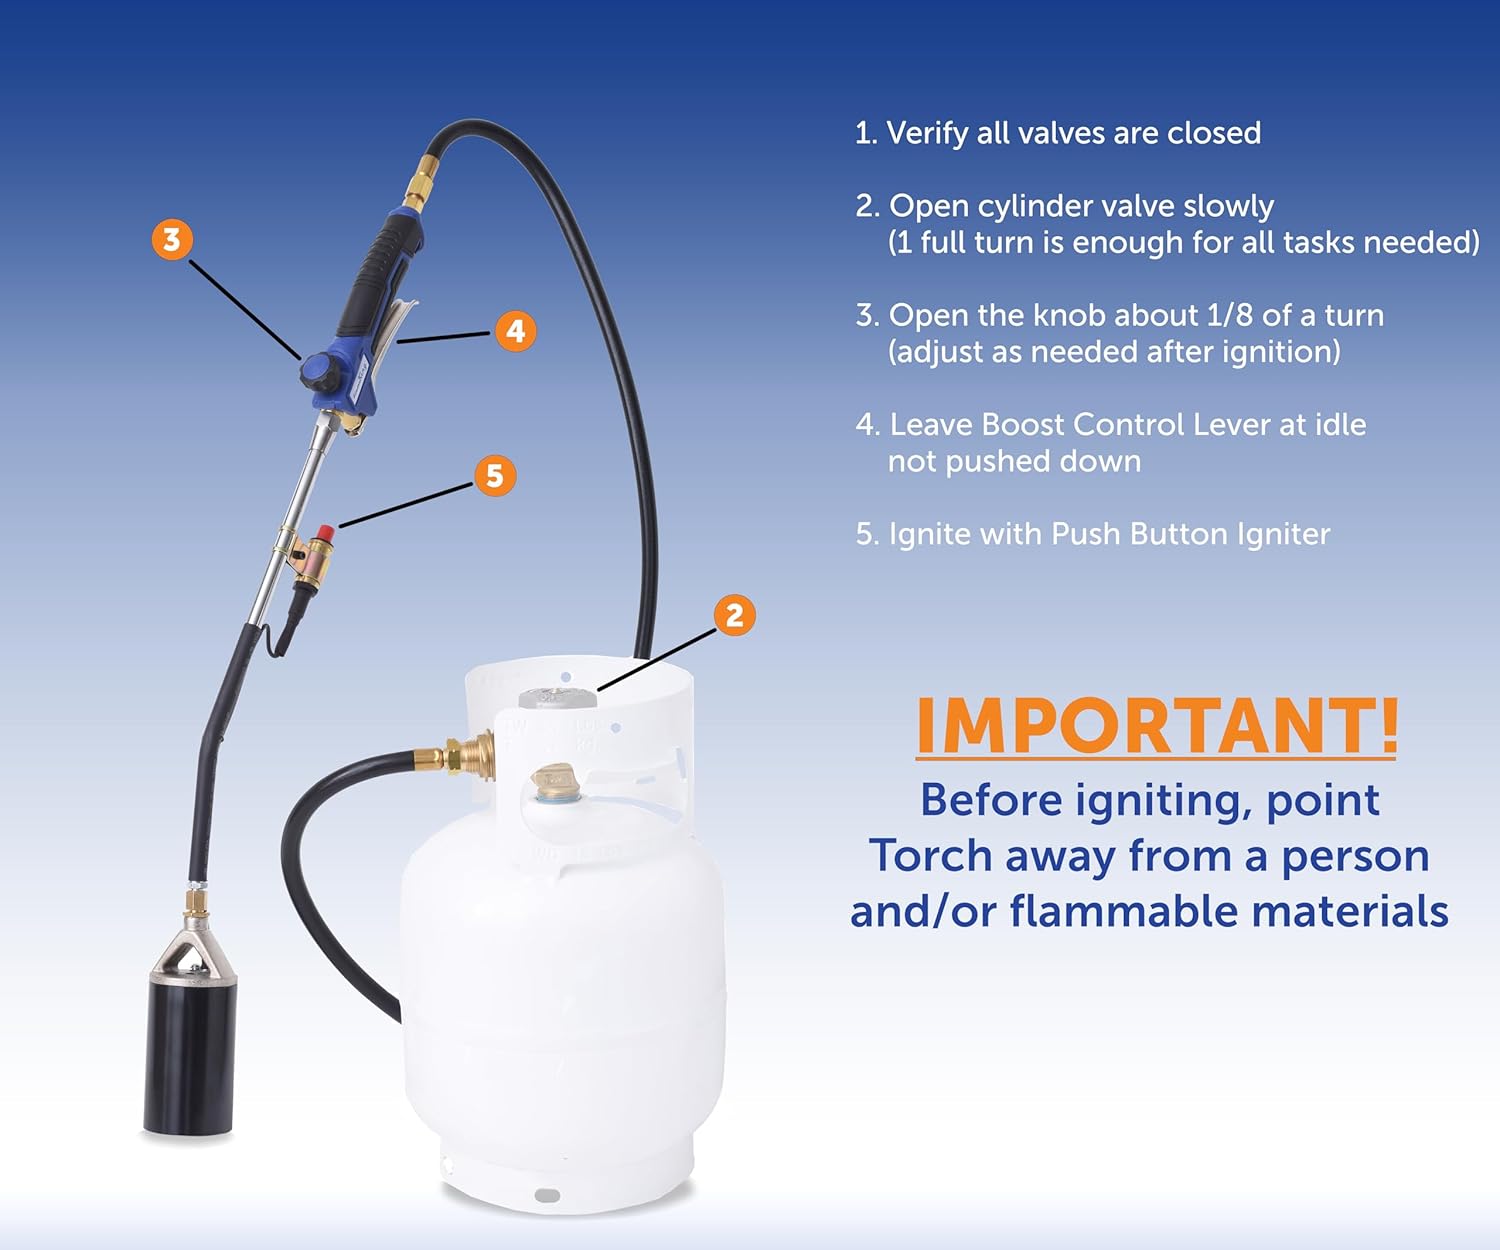
Figure 4: Step-by-step guide for connecting the torch to a propane tank and initial setup.
Video 1: Official product video demonstrating the Flame King YSN340K Propane Torch Kit in action, highlighting its features and ease of use for various tasks, including setup and ignition.
Operating Instructions
- Ignition:
- With the propane cylinder valve open and the flame control knob slightly open, press the red piezo igniter button. The torch should ignite with a small pilot flame.
- If the torch does not ignite, ensure propane is flowing and repeat the ignition process.
- Adjusting Flame Intensity:
- The flame control knob on the handle allows you to adjust the continuous flame intensity. Turn clockwise for a smaller flame, counter-clockwise for a larger flame.
- For maximum heat output (340,000 BTU), press and hold the idle boost control lever. This will significantly increase the flame size and intensity. Release the lever to return to the set continuous flame.
- Using the Torch:
- Weed Burning: Direct the flame at the base of weeds for a few seconds until they wilt. This heats the plant cells, causing them to die. Avoid completely incinerating the weeds to prevent fire hazards.
- Melting Ice and Snow: Move the torch evenly over the ice or snow until it melts.
- Other Applications: For tasks like paint removal or roofing, apply heat as needed, always maintaining a safe distance and monitoring the material for overheating.
- Shutting Down:
- Close the propane cylinder valve completely.
- Allow the remaining propane in the hose to burn off until the flame extinguishes.
- Close the flame control knob on the torch handle.
- Allow the torch to cool completely before storing.

Figure 5: Weed burning with the Flame King torch.
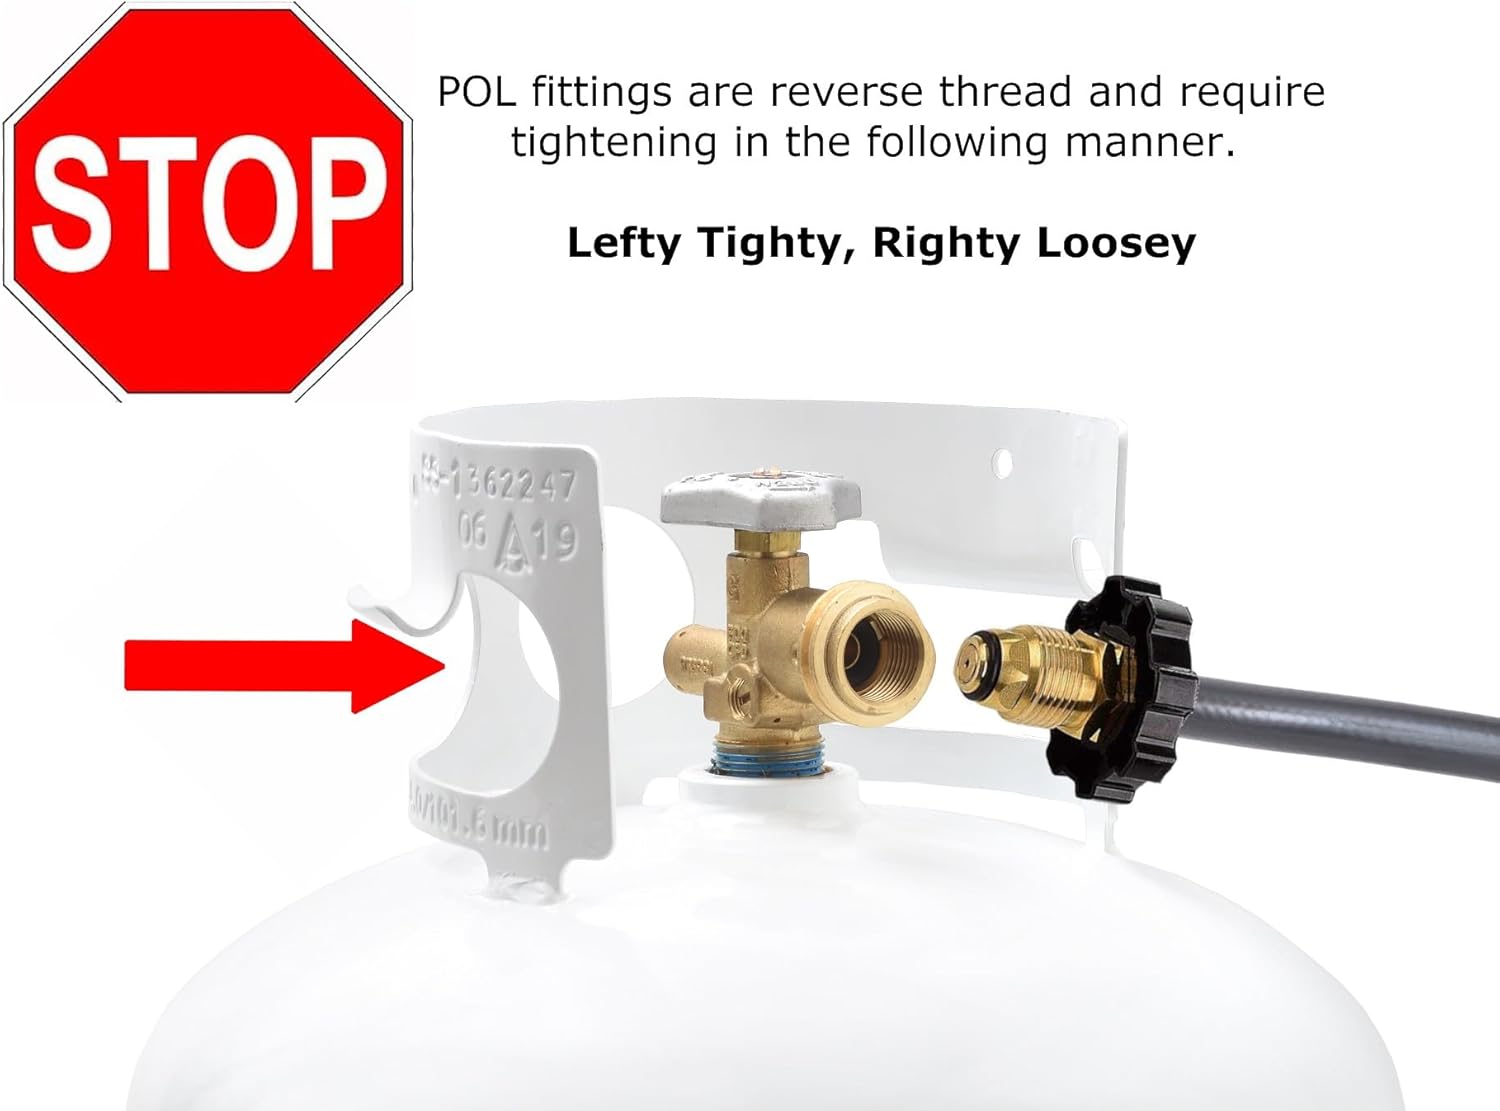
Figure 6: Torch in use for roofing.

Figure 7: Multiple applications of the Flame King Propane Torch.
Maintenance
- Regularly inspect the hose for cracks, cuts, or signs of wear. Replace immediately if any damage is found.
- Check all connections for tightness before each use.
- Keep the torch nozzle clean and free of debris to ensure optimal flame performance.
- Store the torch in a dry, cool place, away from direct sunlight and extreme temperatures. Disconnect from the propane cylinder before storage.
Troubleshooting
| Problem | Possible Cause | Solution |
|---|---|---|
| Torch does not ignite. | Propane cylinder valve closed; insufficient propane flow; igniter malfunction. | Open cylinder valve; ensure flame control knob is slightly open; check igniter for spark. |
| Weak or inconsistent flame. | Low propane level; flame control knob not fully open; clogged nozzle. | Check propane level; adjust flame control knob; clean nozzle. |
| Propane leak detected (hissing sound, smell of gas, or soapy bubbles). | Loose connections; damaged hose or valve. | Immediately close cylinder valve. Re-tighten all connections. Inspect hose and valve for damage and replace if necessary. Do not operate with a leak. |
Specifications
- Model Number: YSN340Ka
- Heat Output: 340,000 BTU
- Ignition Type: Piezo Igniter (Self-Igniting)
- Hose Length: 10 feet
- Propane Compatibility: Works with standard liquid propane cylinders (5lbs, 10lbs, 20lbs, 30lbs, 40lbs, 60lbs, and 100lbs). Propane cylinder sold separately.
- Item Weight: 3.4 Pounds
- Product Dimensions: 104"L x 2.77"W x 3"H
- Material: Iron/Brass/Rubber/Plastic PA
- Included Components: 340Ka BTU Weed Burner Torch, 10 ft Hose Regulator Assembly
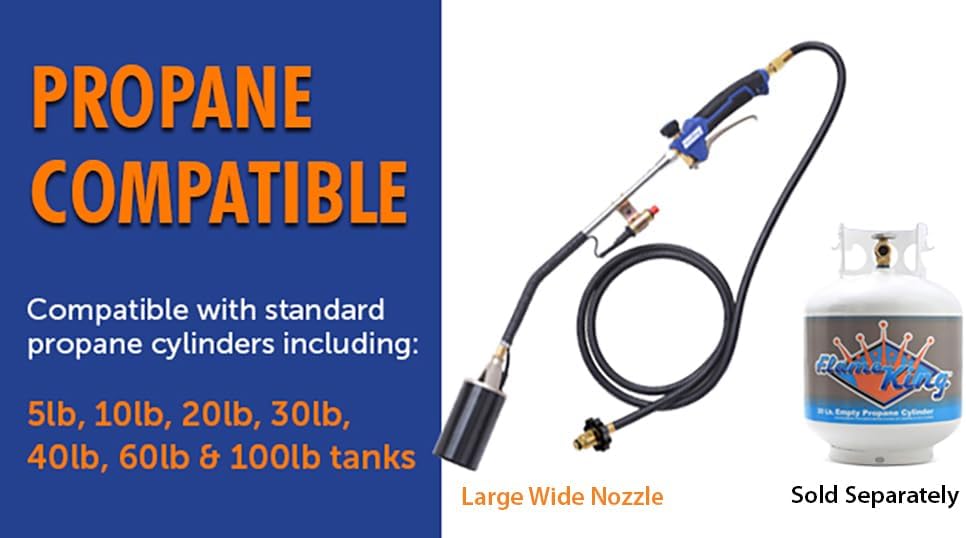
Figure 8: Propane tank compatibility.
Warranty Information
Flame King Products (except paint and finish) are warranted to be free from defects in materials and workmanship for 1 year from the date of purchase. For warranty claims or further details, please refer to the official Flame King website or contact customer support.
Customer Support
For any questions, technical assistance, or support regarding your Flame King Propane Torch Kit, please visit the official Flame King website or contact their customer service department. Always refer to the product packaging for the most up-to-date contact information.
Online Resources: Flame King Store on Amazon
Ask a question about this manual
Ask about setup, troubleshooting, compatibility, parts, safety, or missing instructions. Manuals+ will review the question and use this page’s manual context to help answer it.