DIYSecuritycameraworld 60S04MW
User Manual for 5MP True Full Color Night Vision WiFi IP Security Camera
Model: 60S04MW | Brand: DIYSecuritycameraworld
Introduction
This manual provides comprehensive instructions for the installation, operation, and maintenance of your 5MP True Full Color Night Vision WiFi IP Security Camera. This camera is designed for outdoor surveillance, offering high-resolution video, advanced AI human detection, two-way audio, and multiple night vision modes to enhance your security.
Please read this manual thoroughly before using the product to ensure proper setup and optimal performance. Keep this manual for future reference.
Safety Information
- Ensure the power supply voltage matches the camera's requirements (12V DC).
- Do not expose the camera to extreme temperatures or humidity beyond its operating range.
- Avoid direct exposure of the lens to strong light sources, as this may damage the image sensor.
- Do not attempt to disassemble or modify the camera. This will void the warranty.
- Keep the camera and its components out of reach of children.
- Ensure proper grounding for electrical safety.
Package Contents
Verify that all items are present in the package:
- 1x 5MP Bullet Security Camera
- 1x Power Supply (US Plug)
- Mounting Screws and Wall Plugs
- User Manual (this document)
Product Overview
Familiarize yourself with the various components of your security camera.
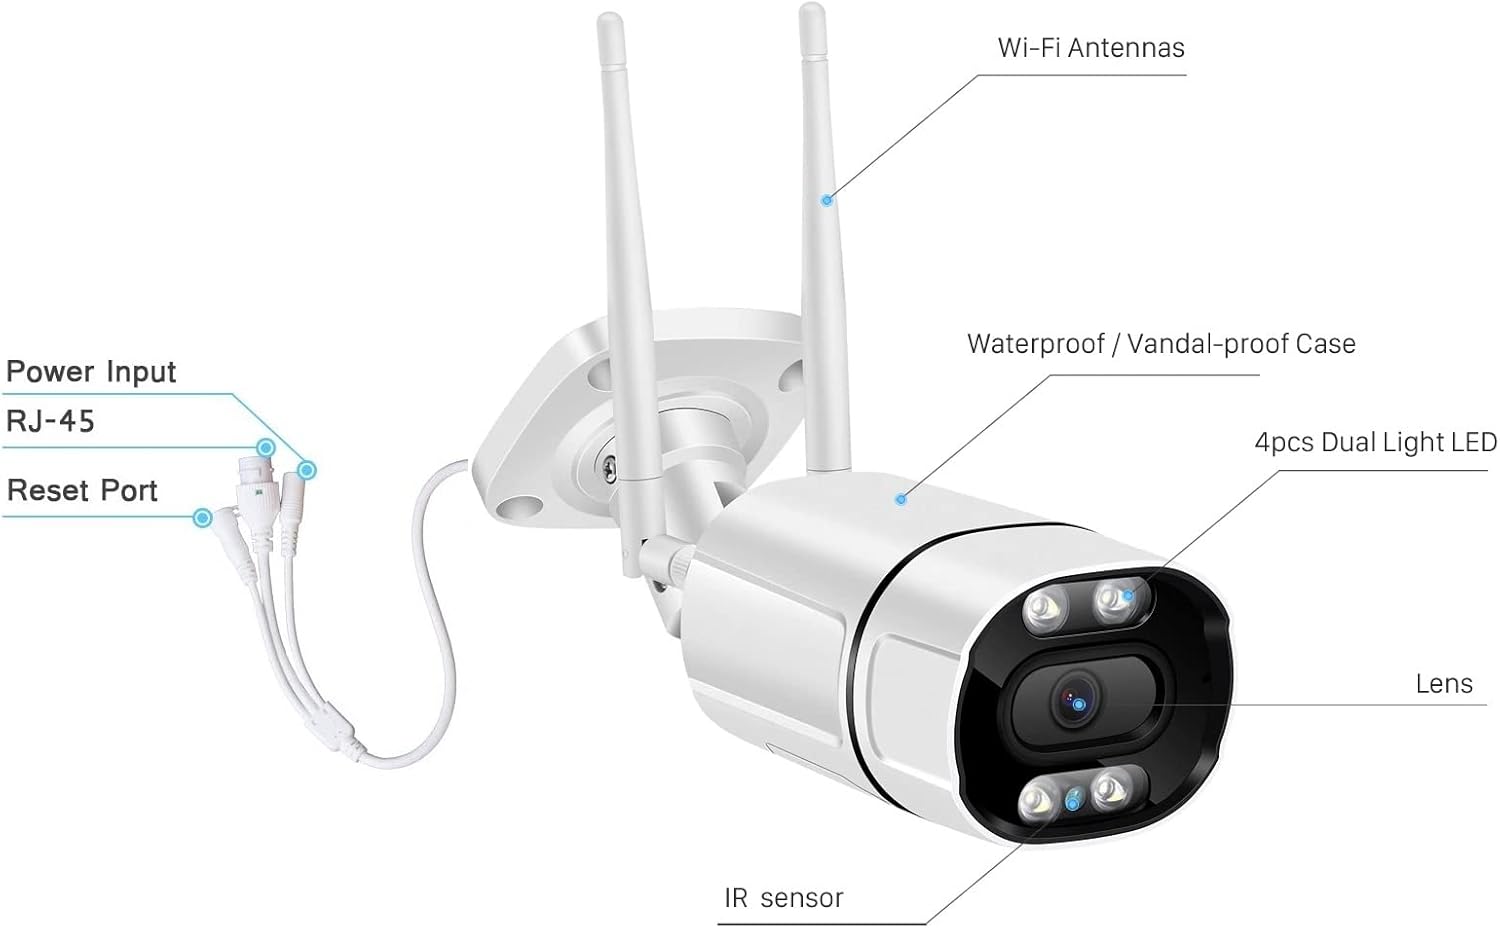
Figure 1: Camera Components Diagram
This image illustrates the key parts of the camera, including the Wi-Fi antennas for wireless connectivity, the robust waterproof and vandal-proof casing, the four dual-light LEDs for enhanced night vision, the main lens, and the infrared (IR) sensor. It also highlights the power input, RJ-45 port for wired network connection, and the reset port for factory defaults.

Figure 2: Internal Components (Microphone, Speaker, SD Card Slot)
This diagram shows the location of the microphone and speaker, which enable two-way audio communication. It also indicates the position of the SD card slot, where a microSD card (up to 128GB, not included) can be inserted for local video storage.
- Wi-Fi Antennas: For wireless network connection.
- Lens: Captures video footage.
- IR Sensor: Detects ambient light levels to activate night vision.
- Dual Light LED: Provides illumination for color night vision and acts as a deterrent.
- Power Input: Connects to the 12V DC power adapter.
- RJ-45 Port: For wired Ethernet connection.
- Reset Port: Used to restore factory default settings.
- Microphone: Captures audio for two-way communication and recording.
- Speaker: Outputs audio for two-way communication and custom voice alerts.
- SD Card Slot: For inserting a microSD card (up to 128GB) for local storage.
Setup Guide
1. Physical Installation
The camera is designed for outdoor use and can be wall-mounted. Choose a location that provides the desired viewing angle and is within reach of a power outlet and Wi-Fi signal (if using wireless connection).
- Mark the drilling points on the wall using the camera's base as a template.
- Drill holes and insert the wall plugs.
- Secure the camera base to the wall using the provided screws.
- Adjust the camera angle as needed.
2. Power Connection
Connect the provided 12V DC power adapter to the camera's power input port and then plug it into a power outlet.
3. Network Connection (Wi-Fi or Wired)
The camera supports both 2.4Ghz Wi-Fi and wired Ethernet connections.
Wi-Fi Connection:
- Ensure your Wi-Fi network is 2.4Ghz. The camera does not support 5Ghz Wi-Fi.
- Proceed to the App Installation and Setup section to configure the Wi-Fi connection through the app.
Wired Connection:
- Connect an Ethernet cable from your router or network switch to the camera's RJ-45 port.
- The camera will automatically obtain an IP address via DHCP.
4. App Installation and Setup (ICSee / Xmeye)
The camera uses the ICSee or Xmeye app for remote access and configuration. Both apps are compatible with iOS and Android devices.
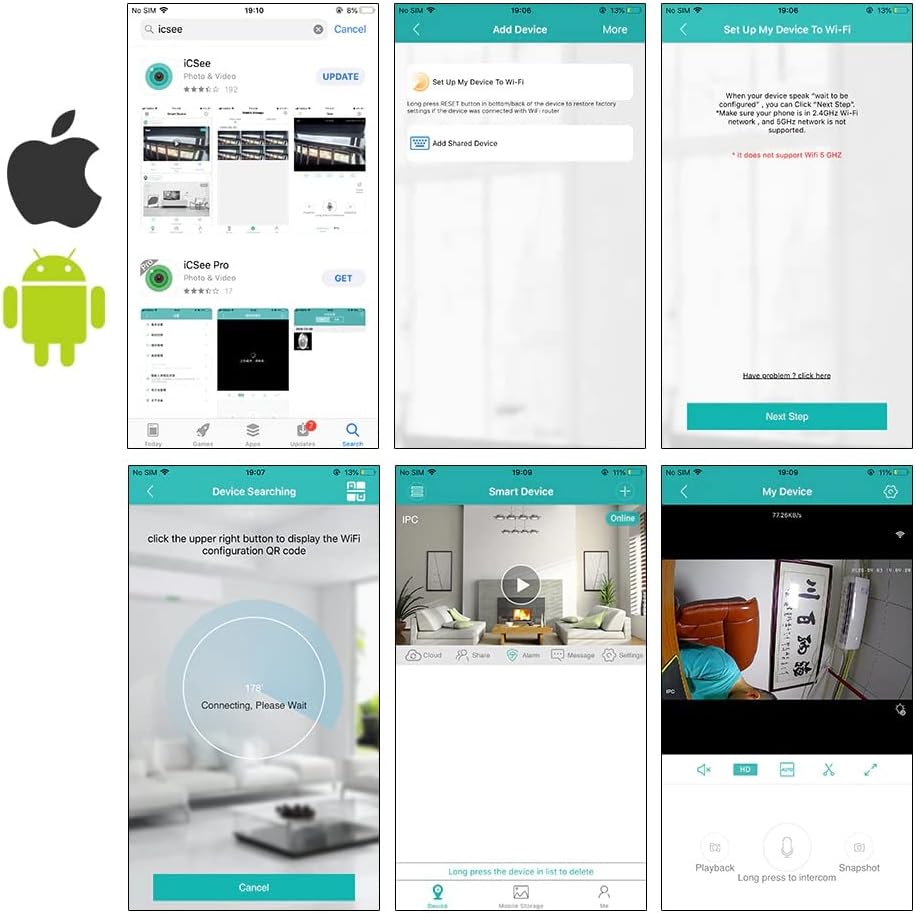
Figure 3: ICSee App Setup Process
This image displays a sequence of screenshots guiding the user through the ICSee app setup. It shows downloading the app, adding a device, connecting to Wi-Fi, device searching, and finally, the live view interface. Note the warning about 5Ghz Wi-Fi not being supported.
- Download the App: Search for "ICSee" or "Xmeye" in your device's app store (Google Play Store for Android, Apple App Store for iOS) and install it.
- Register an Account: Open the app and follow the prompts to register a new account or log in if you already have one.
- Add Device:
- Tap the "+" icon or "Add Device" to begin.
- Select "Set up My Device To Wi-Fi" for wireless connection or "Add Shared Device" if the camera is already configured.
- For Wi-Fi setup, ensure your phone is connected to the 2.4Ghz Wi-Fi network you intend to use for the camera. Enter your Wi-Fi password.
- The app will guide you to place your phone near the camera for configuration. The camera will emit a sound to confirm connection.
- If using a wired connection, the app should automatically detect the camera on the local network.
- Device Naming: Once connected, you can name your camera for easy identification (e.g., "Front Door Camera", "Backyard").
- Live View: After successful setup, you should be able to view the live feed from your camera.
Operating Instructions
1. Live View and Playback
- Open the ICSee/Xmeye app and select your camera from the device list to access the live view.
- From the live view interface, you can take snapshots, record video manually, and access playback of recorded footage.
- To view recorded footage, tap the "Playback" option. You can select a date and time to review recordings stored on the SD card or cloud.
2. Recording Options (SD Card & Cloud)
- SD Card Recording: Insert a microSD card (up to 128GB, not included) into the camera's SD card slot (refer to Figure 2). The camera supports continuous recording or motion-triggered recording. Format the SD card via the app settings before first use.
- Cloud Storage: The camera offers free 30-day cloud storage. After the trial period, subscription options may be available for continued cloud recording. Cloud storage provides an additional layer of data security.
3. Two-Way Audio
The camera features a built-in microphone and speaker, allowing for two-way communication.

Figure 4: Two-Way Audio Demonstration
This image illustrates the two-way audio feature, where a user can speak through their smartphone app and have their voice projected through the camera's speaker, and vice-versa. This allows for direct communication with individuals near the camera.
- From the live view, tap the microphone icon to speak through the camera's speaker. Tap it again to end speaking.
- Ensure the speaker icon is enabled to hear audio from the camera's microphone.
4. Night Vision Modes
The camera offers three night vision modes to suit different surveillance needs:

Figure 5: Night Vision Mode Comparison
This image provides a visual comparison of the camera's performance in different lighting conditions: clear daytime view (Day Mode), traditional black and white infrared night vision (IR Night Vision), and enhanced full-color night vision (Color Night Vision) achieved through the camera's dual-light LEDs.
- Black Light Full Color Night Vision: Utilizes the camera's dual-light LEDs to provide full-color video even in low-light conditions.
- Infrared (IR) Night Vision: Standard black and white night vision using infrared LEDs for discreet monitoring.
- Double Light Warning (Smart Mode): In this mode, the camera operates in IR night vision. When human motion is detected, the white light LEDs will automatically turn on, providing color night vision and acting as a visual deterrent.
You can switch between these modes in the camera settings within the app.
5. AI Human Detection and Alerts
The camera features advanced AI humanoid detection, which can distinguish human shapes from other moving objects, reducing false alarms.

Figure 6: AI Detection and Custom Alerts
This image demonstrates the camera's ability to define an "Alarm Area" for motion detection and to trigger custom voice alerts, such as "Alarm Area Please Leave," when human motion is detected within the specified zone. This feature enhances proactive security.
- Motion Detection Zones: Configure specific areas within the camera's view for motion detection to avoid unnecessary alerts.
- DIY Alert Voice: Customize the alarm sound or record your own voice message (e.g., "Warning, you are on camera!") that will play through the camera's speaker when motion is detected.
- Light Alarm: In Smart Night Mode, the white light LEDs will activate upon human detection, serving as a visual warning.
- Notifications: Receive push notifications on your smartphone when an alert is triggered.
These settings can be configured in the "Alarm" or "Detection" section of the app.
Maintenance
- Cleaning: Use a soft, dry cloth to clean the camera lens and body. Do not use harsh chemicals or abrasive cleaners.
- Firmware Updates: Regularly check for firmware updates through the app to ensure optimal performance and security.
- SD Card Management: If using an SD card, periodically check its status and format it if necessary to maintain recording efficiency.
- Power Supply: Ensure the power supply cable is not damaged and is securely connected.
Troubleshooting
| Problem | Possible Cause | Solution |
|---|---|---|
| Camera offline / Cannot connect to Wi-Fi | Incorrect Wi-Fi password; Camera too far from router; 5Ghz Wi-Fi network; Network issues. |
|
| No image / Black screen | No power; Network connection issue; Camera malfunction. |
|
| SD card not recording / Error | SD card full; SD card not formatted; Faulty SD card. |
|
| Frequent false alarms | Motion sensitivity too high; Detection zone too wide; Non-human motion triggering. |
|
Specifications
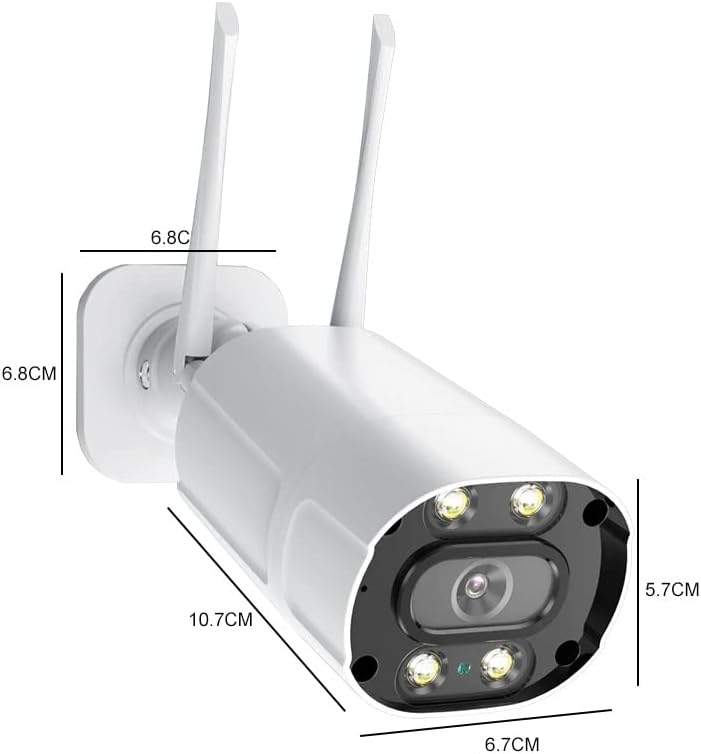
Figure 7: Camera Dimensions
This image provides the physical dimensions of the camera in centimeters, indicating its length, width, and height for installation planning.
| Feature | Detail |
|---|---|
| Model Name | 60S04MW |
| Resolution | 5MP (2592x1944) |
| Connectivity | 2.4Ghz Wi-Fi, RJ-45 Ethernet |
| Night Vision | True Full Color Night Vision, IR Night Vision, Double Light Warning (Smart Mode) |
| Audio | Two-Way Audio (Built-in Mic & Speaker) |
| Storage | MicroSD Card (Max 128GB, not included), Cloud Storage (30-day free trial) |
| Detection | AI Humanoid Detection, Motion Detection |
| Alerts | DIY Alert Voice, Light Alarm, Push Notifications |
| Weatherproof Rating | IP66 |
| Power Supply | DC 12V |
| Material | Metal Housing |
| Dimensions (L x W x H) | 8 x 4 x 4 inches (approx. 20.3 x 10.2 x 10.2 cm) |
| Weight | 1.5 pounds (approx. 0.68 kg) |
| Operating Temperature | Not specified (typical range for outdoor cameras is -20°C to 50°C) |
Warranty and Support
For warranty information and technical support, please refer to the contact details provided by your retailer or visit the official DIYSecuritycameraworld website. Keep your purchase receipt as proof of purchase for warranty claims.
If you encounter issues not covered in this manual, please contact customer support for assistance.
Ask a question about this manual
Ask about setup, troubleshooting, compatibility, parts, safety, or missing instructions. Manuals+ will review the question and use this page’s manual context to help answer it.